Introduction
In this article, we discuss on how to select, the desired identity provider while using Skycloak or Keycloak
Using Skycloak allows organizations to harness the powerful features of the open-source Keycloak IAM product while avoiding the challenges of installing, maintaining, and scaling Keycloak for production-grade environments — all in a cost-effective way.
Keycloak can be integrated with enterprise identity solutions such as Microsoft Entra ID, Okta, Ping Identity, social identity providers, or any system that supports OpenID Connect (OIDC) or SAML protocols. In many real-world deployments, organizations configure multiple OIDC clients within Keycloak. Although Keycloak can act as an Identity Provider for all these clients, there are often cases where clients need to target users maintained in external IDPs like Microsoft Entra ID, Okta, or similar solutions.
It’s possible that for your specific client application, you need to target an external provider like Okta or a particular social provider. Keycloak can help in this situation by acting as an Identity Broker between your client application and the external Identity Provider. Often, you may have multiple Identity Brokers configured to cater to the needs of your different client applications.
In such cases, for OpenID Connect-based client applications, Keycloak offers a feature to select the desired Identity Provider upfront by adding the kc_idp_hint parameter pointing to the alias name of the Identity Provider configured in Keycloak when making the request to the authorization endpoint. This way, without displaying the normal login page, the user is directly redirected to the Identity Provider that matches the kc_idp_hint query string parameter.
How it works
To support this feature, we need to modify the OIDC relying party implementation of your client application (since an additional query parameter must be added to the request to the Keycloak authorization endpoint).
In this article, we discuss how to do this using a Spring Boot application.
Before going into detail, let us look at the default browser flow in Keycloak.
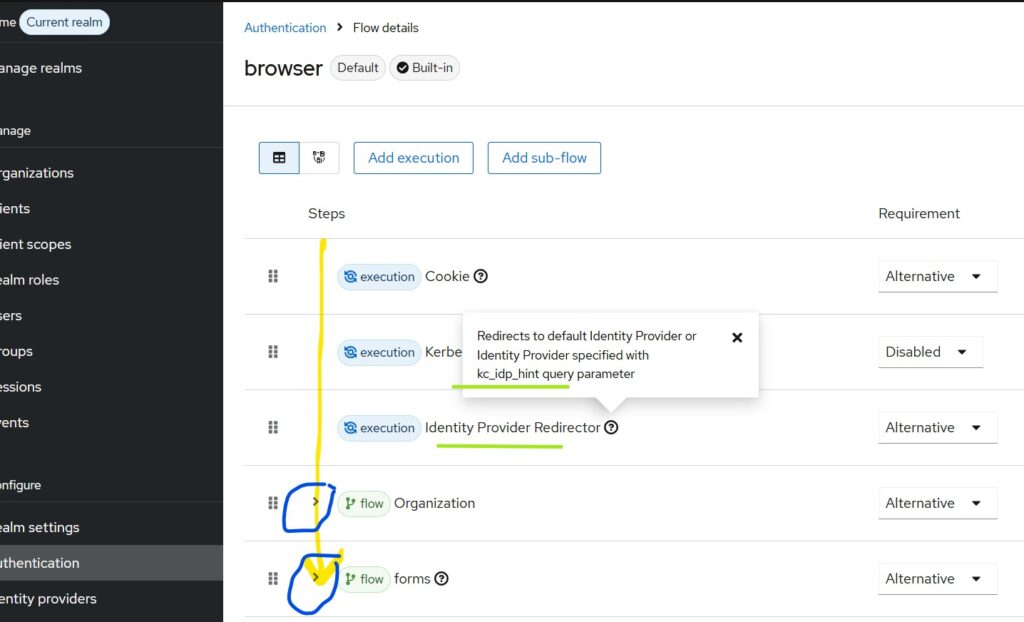
Make sure you are in the correct realm and select Authentication from the left pane → Browser.

If you observe the items in the collapsed view of the default browser flow, all are marked as ALTERNATE, except for Kerberos which is disabled by default. The execution happens from top to bottom, and the Identity Provider Redirector gets executed if there is no existing cookie and if the kc_idp_hint parameter is present in the authorization request.
Implementation Details
We required the following
- An Identity Provider configured in Keycloak
- An OIDC client created for our Spring Boot OAuth2 Client-based application
- A Spring Boot OAuth2 Client application
I will not go into detail about the first step, as it will be covered in a separate article. Let us assume that we already have an Identity Provider configured in Keycloak. In my case, I have configured GitHub.
Creating OIDC client for Spring Boot Application in Keycloak or Skycloak.
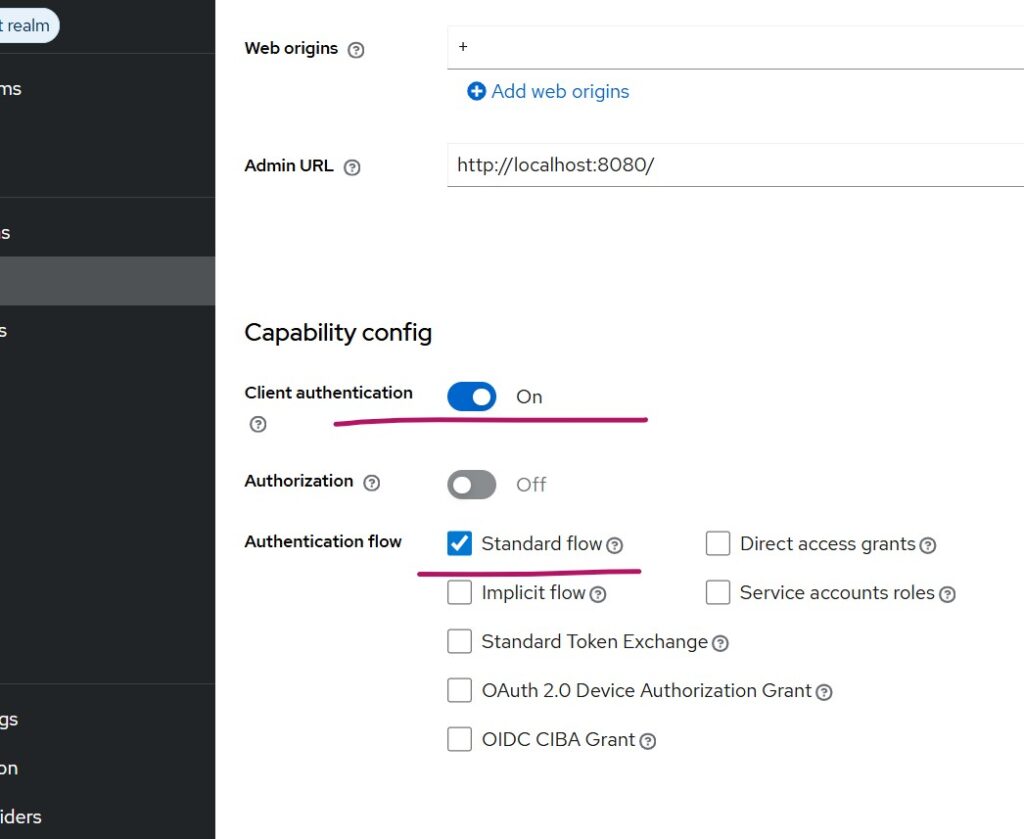
You can use the Skycloak Console → Application → Web Application → Spring Boot, or directly use the Keycloak Console to do this. I will not go into the details here. Please note that I am using the Authorization Code flow with client secret. The PKCE option (available under the Advanced tab of the client settings) is disabled in my case.

In my case, valid redirect URL at Keycloak OIDC client, ends with keycloak. If you use it as Skycloak, you would need to reflect it in application.properties of Spring Boot application.
Create a Spring Boot OAuth2 client application
Create a Spring Boot project. I will not go into the details here. You can create a Spring Boot project from Start Spring and add the following dependencies:
- Spring Web
- Spring Security
- OAuth2 Client
- Thymeleaf (required to display html content)
SecurityConfig class
package com.example.clienapp;

import jakarta.servlet.http.HttpServletRequest;
import org.springframework.context.annotation.Bean;
import org.springframework.context.annotation.Configuration;
import org.springframework.security.config.annotation.method.configuration.EnableMethodSecurity;
import org.springframework.security.config.annotation.web.builders.HttpSecurity;
import org.springframework.security.oauth2.client.registration.ClientRegistrationRepository;
import org.springframework.security.oauth2.client.web.DefaultOAuth2AuthorizationRequestResolver;
import org.springframework.security.oauth2.client.web.OAuth2AuthorizationRequestResolver;
import org.springframework.security.oauth2.core.endpoint.OAuth2AuthorizationRequest;
import org.springframework.security.web.SecurityFilterChain;

import java.util.HashMap;
import java.util.Map;

@Configuration
@EnableMethodSecurity
public class SecurityConfig {

    @Bean
    public SecurityFilterChain securityFilterChain(HttpSecurity http,
                                                   ClientRegistrationRepository clientRegistrationRepository) throws Exception {

        DefaultOAuth2AuthorizationRequestResolver defaultResolver =
                new DefaultOAuth2AuthorizationRequestResolver(
                        clientRegistrationRepository,
                        "/oauth2/authorization"
                );

        OAuth2AuthorizationRequestResolver customResolver = new OAuth2AuthorizationRequestResolver() {
            @Override
            public OAuth2AuthorizationRequest resolve(HttpServletRequest request) {
                OAuth2AuthorizationRequest originalRequest = defaultResolver.resolve(request);
                return customizeRequest(originalRequest, request);
            }

            @Override
            public OAuth2AuthorizationRequest resolve(HttpServletRequest request, String clientRegistrationId) {
                OAuth2AuthorizationRequest originalRequest = defaultResolver.resolve(request, clientRegistrationId);
                return customizeRequest(originalRequest, request);
            }

            private OAuth2AuthorizationRequest customizeRequest(OAuth2AuthorizationRequest originalRequest, HttpServletRequest request) {
                if (originalRequest == null) {
                    return null;
                }

                // Customize the request parameters
                Map additionalParams = new HashMap<>(originalRequest.getAdditionalParameters());
                additionalParams.put("kc_idp_hint", "github"); //identity Provider alias is github in my case.

                return OAuth2AuthorizationRequest.from(originalRequest)
                        .additionalParameters(additionalParams)
                        .build();
            }
        };

        http
            .authorizeHttpRequests(auth -> auth
                .requestMatchers("/login**", "/error").permitAll()
                .anyRequest().authenticated()
            )
            .oauth2Login(oauth2 -> oauth2
                .authorizationEndpoint(authz -> authz
                    .authorizationRequestResolver(customResolver)
                )
                .defaultSuccessUrl("/profile", true) //redirect to Profile page
            );

        return http.build();
    }
}
If you observe the above code, you’ll notice that we are appending kc_idp_hint as github.
If you use a different Identity Provider in Keycloak, use the corresponding alias name.
Controller class
package com.example.clienapp;

import org.springframework.security.core.annotation.AuthenticationPrincipal;
import org.springframework.security.oauth2.core.oidc.user.OidcUser;
import org.springframework.stereotype.Controller;
import org.springframework.ui.Model;
import org.springframework.web.bind.annotation.GetMapping;

@Controller
public class ClientAppController {

	@GetMapping("/profile")
	public String profile(@AuthenticationPrincipal OidcUser oidcUser, Model model) {
		if (oidcUser != null) {
			model.addAttribute("name", oidcUser.getFullName());
			model.addAttribute("email", oidcUser.getEmail());
			model.addAttribute("username", oidcUser.getPreferredUsername());
			model.addAttribute("claims", oidcUser.getClaims());
		}
		return "profile";
	}
}
application.properties
spring.application.name=clienapp
spring.security.oauth2.client.registration.keycloak.client-id=your_client_id
spring.security.oauth2.client.registration.keycloak.client-secret=your_client_secret
spring.security.oauth2.client.registration.keycloak.scope=openid,profile,email
spring.security.oauth2.client.registration.keycloak.authorization-grant-type=authorization_code
spring.security.oauth2.client.registration.keycloak.redirect-uri={baseUrl}/login/oauth2/code/{registrationId}
spring.security.oauth2.client.provider.keycloak.issuer-uri=https://your_skycloak_hostname/realms/your_realm
profile.html (under resources/templates)
<!DOCTYPE html>
<html xmlns:th="http://www.thymeleaf.org">
<head>
    <title>User Profile</title>
</head>
<body>
<h2>Logged-in User Profile</h2>

<div>
    <p><strong>Full Name:</strong> <span th:text="${name}">Name</span></p>
    <p><strong>Email:</strong> <span th:text="${email}">Email</span></p>
    <p><strong>Username:</strong> <span th:text="${username}">Username</span></p>
</div>

<h3>All ID Token Claims:</h3>
<table border="1" cellpadding="5">
    <thead>
    <tr>
        <th>Claim</th>
        <th>Value</th>
    </tr>
    </thead>
    <tbody>
    <tr th:each="entry : ${claims}">
        <td th:text="${entry.key}"></td>
        <td th:text="${entry.value}"></td>
    </tr>
    </tbody>
</table>
</body>
</html>
Testing the implementation
Access the Spring Boot application (e.g., http://localhost:8080).
Since that is a protected URL, redirection happens to the Keycloak authorization endpoint. Because the kc_idp_hint query string is present in the authorization request, the user is directly forwarded to the targeted Identity Provider. (this happens before the login page display logic as we discussed in the beginning of the article)
Summary
We have in this article, discussed how an OIDC-based client application can select its own desired Identity Provider at Keycloak.
Keycloak latest versions have Organization feature. I will come up with articles on that in future.
If you’re new to Skycloak, visit the Skycloak Getting Started Guide to learn more.
