
Last updated: March 2026
Introduction
In this article, we will look at how to populate the tokens issued by Skycloak or Keycloak with custom user attributes.
Skycloak is a managed Keycloak IAM platform in the cloud. It allows organizations to harness the powerful features of open-source Keycloak while avoiding the challenges of installation, maintenance, and scaling for production-grade environments — all in a cost-effective way.
This article explains how to ensure that OIDC tokens received by your client application contain custom attributes of the authenticated user. You can inspect the resulting tokens using our JWT Token Analyzer to verify your attribute mappings.
Configuration steps
We will perform the following steps:
- Create custom attributes
- Configure the OIDC client
- Add attribute mapping for the OIDC client
- Create client application
Step 1: Creating custom attributes
We will create the following custom attributes for each user:
- designation
- department
Navigate to:
Realm Settings -> User Profile -> Attributes -> Create Attribute
Enter the details.
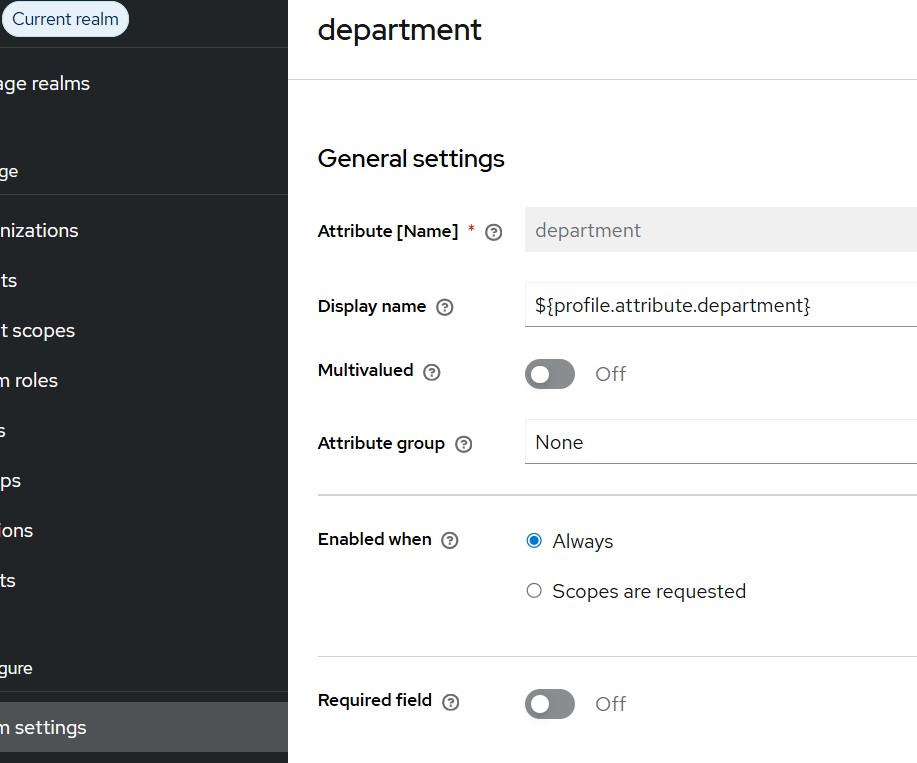
You may optionally make the field mandatory by enabling the Required field toggle.
About the Display Name:
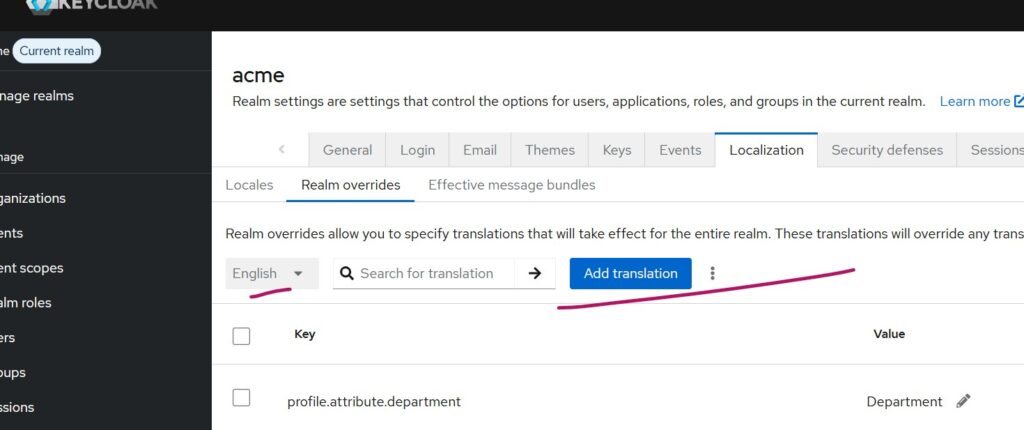
The display name supports localization. For English (default), add a translation under:
Realm Settings -> Localization -> Add Translation
Repeat the same steps for the designation attribute.
Next, populate these values for a user by navigating to:
Users -> Select User -> Details tab
Step 2: Configuring OIDC client for user attributes
Any OIDC client application that receives an ID token or access token after authentication can use these attributes.
In this article, we use a Spring Boot application.
First we need to create an OIDC client in Keycloak for our Spring Boot Client Application. I had covered this in another article available here. Please refer the section Creating OIDC client for Spring Boot Application in Keycloak or Skycloak.
For more on configuring identity providers and attribute mapping during brokering, see our article on Attribute Mapping in Keycloak During OIDC Identity Brokering.
After creating the OIDC client, we need to map the custom user attributes (designation and department) whenever this client is used.
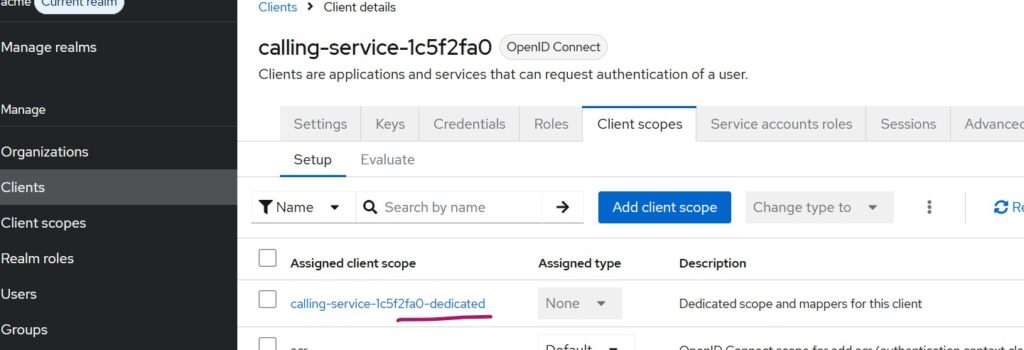
Navigate to Client -> Client Scopes and select the client dedicated link as highlighted above and further choose Add Mappers -> By Configuration from the mappers tab and further select User Attribute as shown below:
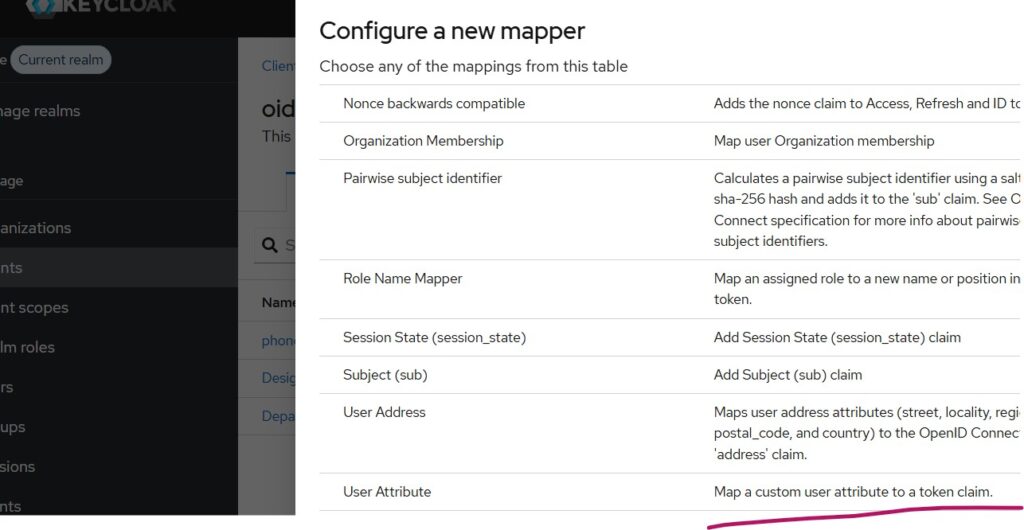
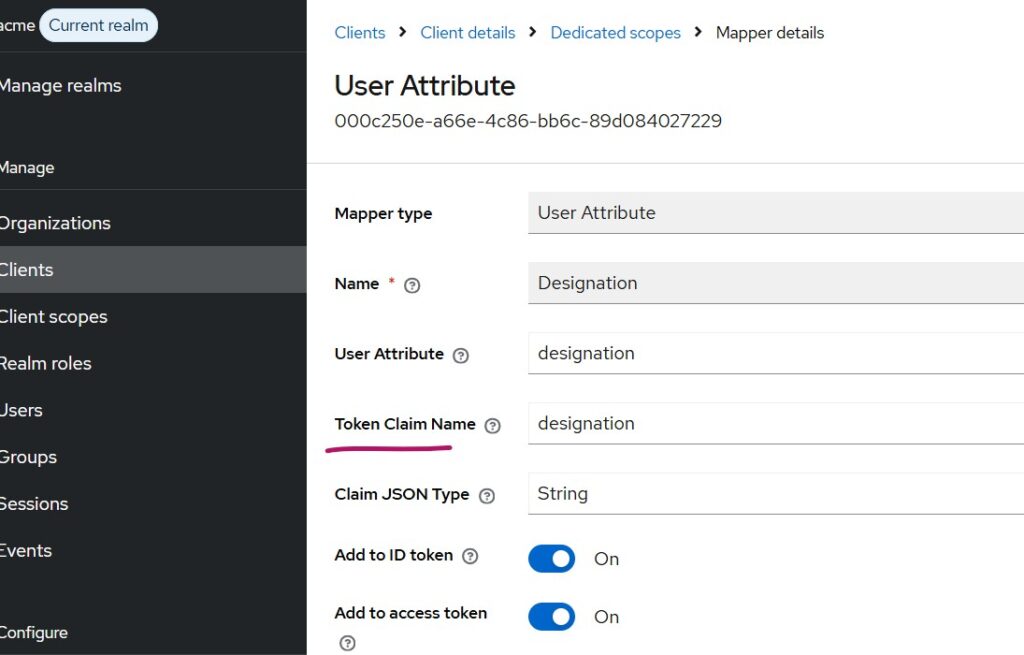
Similarly do for the department attribute.
Step 3: Creating the OIDC client application
Next we need to create a Spring Boot project. You can create a Spring Boot project from Start Spring and add the following dependencies:
- Spring Web
- Spring Security
- OAuth2 Client
- Thymeleaf (required to display html content)
SecurityConfig class
import org.springframework.context.annotation.Bean;
import org.springframework.context.annotation.Configuration;
import org.springframework.security.config.annotation.web.builders.HttpSecurity;
import org.springframework.security.web.SecurityFilterChain;

@Configuration
public class SecurityConfig {

    @Bean
    public SecurityFilterChain filterChain(HttpSecurity http) throws Exception {
        http
            .authorizeHttpRequests(auth -> auth
                .requestMatchers("/login").permitAll()
                .anyRequest().authenticated()
            )
            .oauth2Login(oauth -> oauth
                .defaultSuccessUrl("/home", true) //redirects to home on successful authentication
            );

        return http.build();
    }
}
Controller class
import org.springframework.security.oauth2.core.oidc.user.OidcUser;
import org.springframework.security.core.annotation.AuthenticationPrincipal;
import org.springframework.stereotype.Controller;
import org.springframework.ui.Model;
import org.springframework.web.bind.annotation.GetMapping;

@Controller
public class HomeController {

    @GetMapping("/home")
    public String home(@AuthenticationPrincipal OidcUser oidcUser, Model model) {

        String email = oidcUser.getEmail();
        String designation = (String) oidcUser.getClaims().get("designation");
        String department = (String) oidcUser.getClaims().get("department");

        model.addAttribute("email", email);
        model.addAttribute("designation", designation);
        model.addAttribute("department", department);

        return "home";
    }
}
application.properties
spring.application.name=sbclientdefault
spring.security.oauth2.client.registration.keycloak.client-id=your_client_id
spring.security.oauth2.client.registration.keycloak.client-secret=your_client_secret
spring.security.oauth2.client.registration.keycloak.scope=openid,profile,email
spring.security.oauth2.client.registration.keycloak.authorization-grant-type=authorization_code
spring.security.oauth2.client.registration.keycloak.redirect-uri={baseUrl}/login/oauth2/code/{registrationId}
spring.security.oauth2.client.provider.keycloak.issuer-uri=https://your_skycloak_hostname/realms/your_realm
home.html (under resources/templates)
<!DOCTYPE html>
<html xmlns:th="http://www.thymeleaf.org">
<head>
    <title>OIDC Attributes</title>
</head>
<body>
<h2>Logged-in User Details</h2>

<p>Email: <span th:text="${email}"></span></p>
<p>Designation: <span th:text="${designation}"></span></p>
<p>Department: <span th:text="${department}"></span></p>

</body>
</html>
Testing the implementation
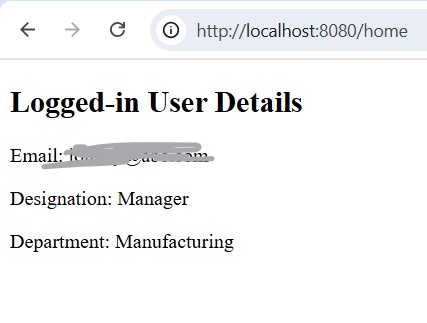
Access the client application and complete the login.
If everything is configured correctly, the ID token will contain the custom attributes, and your client application will display them as shown similar to below:
Summary
In this article, we learned how to populate custom attributes in the tokens returned by Keycloak or Skycloak during OIDC authentication.
Skycloak provides easy, production-ready Keycloak hosting in the cloud, helping organizations avoid the overhead of managing and scaling Keycloak themselves.
If you’re new to Skycloak, visit the Skycloak Getting Started Guide to learn more. You can also explore the Skycloak documentation for additional configuration guides, or check out our pricing plans to find the right fit for your team.

Ready to simplify your authentication?
Deploy production-ready Keycloak in minutes. Unlimited users, flat pricing, no SSO tax.
