Author: David Lorenz (@activenode) is a Supabase Expert and Web Software Architect writer of the well-known Supabase book supa.guide
Choosing the right tools for authentication and authorization can make or break your web application’s security and user experience. In this article, we’ll explore the key differences between Supabase and Keycloak, two powerful platforms for identity management. You’ll discover their unique features, ideal use cases, and how they compare when securing modern applications. If you’re looking for a robust, enterprise-grade identity solution, Keycloak offers unparalleled flexibility and security.
With https://skycloak.io hosting and configuring Keycloak is as easy as snapping your fingers, so if you don’t want to run your own containers, just deploy a Keycloak instance with them, worry-free. By the end of this article, you’ll know when to choose Supabase, Keycloak, or even how they can work together for a seamless authentication system.
What you’ll learn in this article:
- Understanding the crucial difference of Authentication vs. Authorization
- What Supabase and Keycloak are
- How Supabase authenticates and authorizes users
- How to decide if you need Keycloak or if Supabase will be sufficient
- How to connect Supabase with Keycloak
- Realising why using Keycloak can be beneficial as your default Authorization and Authentication system
- Alternative solutions to Supabase & Keycloak
- A final conclusion of the key points
Let’s kick it off.
Authentication vs. Authorization
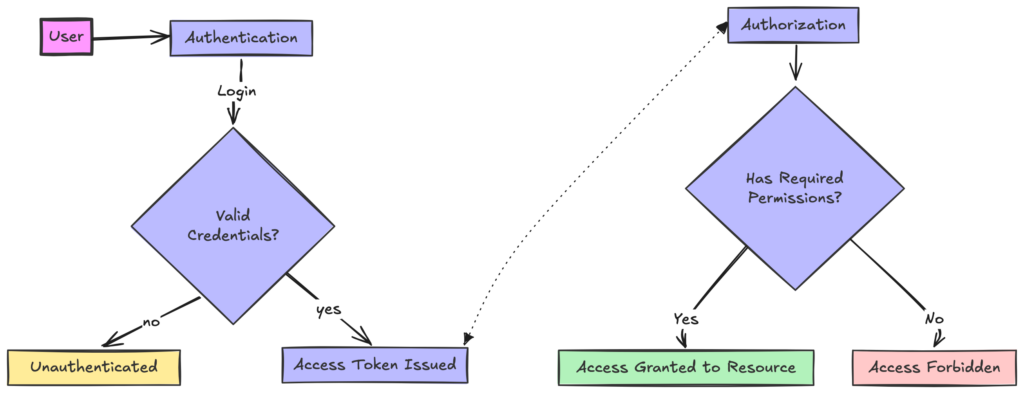
Authentication is the process of verifying a user’s identity in a web application. For example, when you log into a website using your username and password, the system checks if these credentials are valid and match an existing user account – this is authentication.
Authorization, on the other hand, determines what actions a user is allowed to perform within the application. After you’re logged in, the system checks what parts of the website you can access or what operations you can perform, such as viewing certain pages, editing content, or accessing admin features. This is authorization.
For example, if you visit the page /admin/show-all-users, the authorization system checks – with your authentication information – if this authenticated user is authorized to access this part of the application.
Understanding the distinction between these two concepts is crucial when designing secure web systems. While authentication verifies who the user is, authorization controls what that user can do within the application.
Supabase
What is Supabase?
Supabase is a popular Firebase alternative that has gained significant traction over the past two years. As of this writing, it boasts around 75,000 GitHub stars, placing it near the top 100 repositories.
At its core, Supabase is essentially a “superpowered” Postgres database wrapped in a carefully curated toolstack.
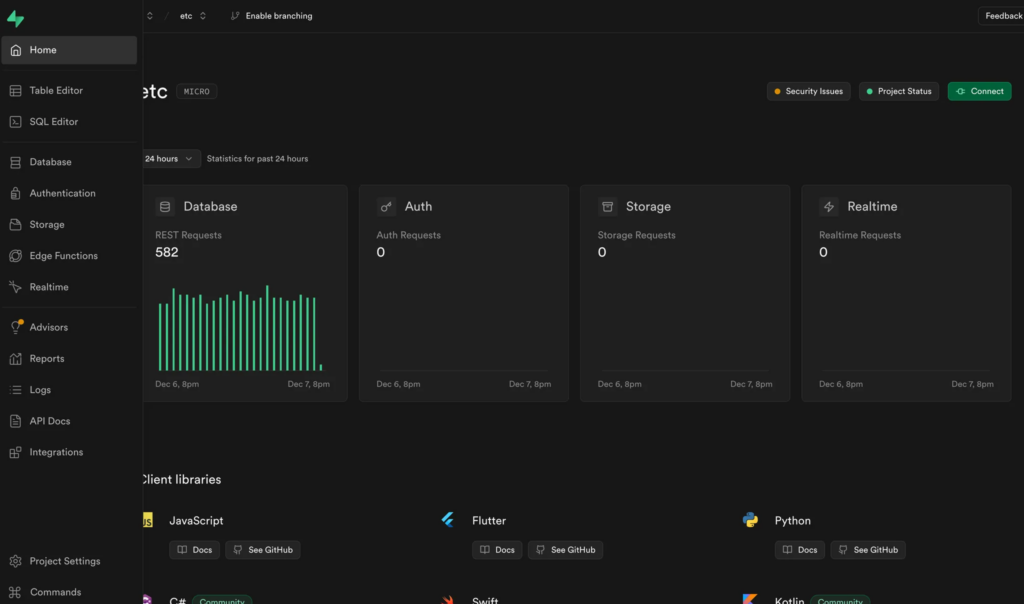
It’s crucial to understand that Supabase isn’t a non-standard version of Postgres. Rather, it’s standard Postgres enhanced with a selection of excellent extensions and settings, surrounded by services that leverage the database.
For instance, the Auth service (previously called GoTrue) handles user authentication, while the Realtime service delivers user-specific real-time data, among many other features.
Supabase isn’t a single entity—it’s a comprehensive toolkit centered around the Postgres database. This suite of tools addresses common “Day One” challenges faced by most products, while also offering advanced features like logging and monitoring.
- Where to host the database?
- How to implement authentication?
- How to implement realtime data?
- Where to store files?
- How to implement scheduled tasks?
- How to manager users?
- Where to store secrets?
- How to collect logs and reports?
- How to get data from payment providers?
- etc.
Most importantly: All of those pieces, are open source and can be self-hosted. I personally love using the zero-effort variant by using their hosted supabase.com service.
For more than 90% of my new clients, I use supabase, even on enterprise level. Simply because it just works, is fully open-source and can be self-hosted. Plus, it’s language-independent: Although many Supabase libraries exist, everything is callable via REST API as well.
But now, let’s have a look at Supabase’s Authentication and Authorization.
How does Supabase authenticate?
Supabase uses the Supabase Auth system to authenticate users, formerly known as GoTrue which was initially developed by Netlify and massively improved and extended by Supabase.
In simple words, authentication works like this:
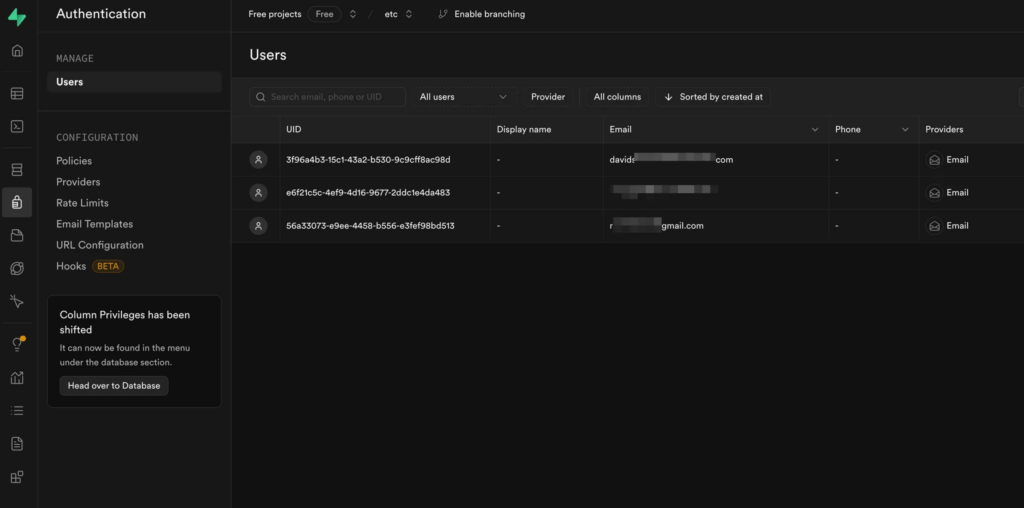
- You create a user in the Supabase Dashboard or programmatically via one of the many Supabase libraries (e.g. for JavaScript, or Golang) by providing an E-Mail, e.g.
[email protected]- This user is now saved in the Postgres database in a protected place, in the
authschema in theauth.userstable
- This user is now saved in the Postgres database in a protected place, in the
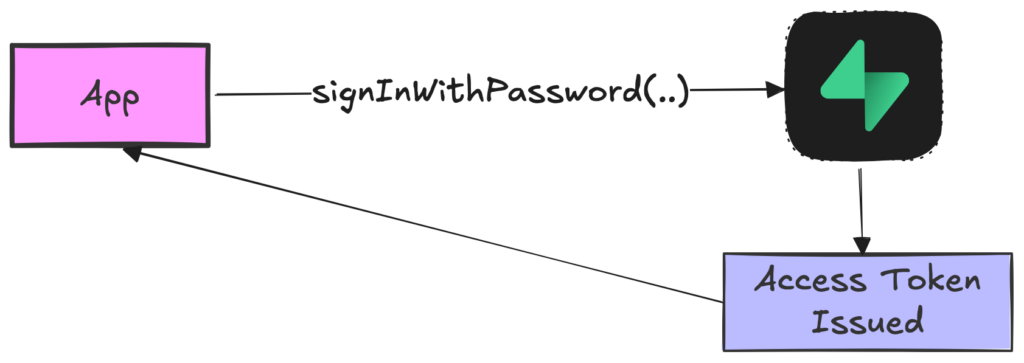
- When a user then logs in (e.g. because you provided a login form and called the
supabase.signInWithPassword()method, the user credentials are checked on the Supabase backend. - If the user credentials are valid, a signed session is returned and saved (a so-called JWT which contains also the information when the session expires) – you are authenticated.
- When you now try to fetch something from the database e.g. with the Supabase JS library via
supabase.from('tableName').select('*').limit(1), it will verify on the server if the authentication is valid and trustworthy. If yes, it will execute the commands with the Authorization feature (see below) as the guardian.
From a DX-perspective, the authentication is an absolute no-brainer as you literally only need one small code snippet to sign someone in. Also the creation of a user is just one line of code programmatically.
But what about Google Login or Magic Login then? Let’s talk about that next.
Authentication methods with Supabase
Supabase Auth not only supports logging in via password but a variety of authentication methods such as Magic Link, generic One-Time passwords (OTP Login), Phone login and many 3d-party Identity providers such as logging in via:
- Generic Single Sign On (SSO) via SAML 2.0 (SAML 2.0 Explanation) – which is a standard also supported by Keycloak (amongst many as you’ll see in the Keycloak section)
- Sign in with Keycloak – a very crucial one
- Sign in with Apple
- Sign in with Google
- Sign in with Azure
- Sign in with Bitbucket
- Sign in with Discord
- Sign in with Facebook
- Sign in with Figma
- Sign in with GitHub
- Sign in with GitLab
- Sign in with Kakao
- Sign in with LinkedIn
- Sign in with Notion
- Sign in with Twitch
- Sign in with Twitter
- Sign in with Slack
- Sign in with Spotify
- Sign in with WorkOS
- Sign in with Zoom
- More providers coming
But how to use those within Supabase and does it interfere with existing users? Let’s take “Sign in with GitHub” for example and have a look:
To implement GitHub login with Supabase, you go into your GitHub account and create a new OAuth Application in your GitHub Developer Settings.
There you’ll enter the Callback URL from Supabase (see image) with which GitHub will exchange authentication information.
Then, you’ll get a so-called Client ID and Client Secret from GitHub after submitting your GitHub application form which you fill in the Identity Provider information of Supabase:
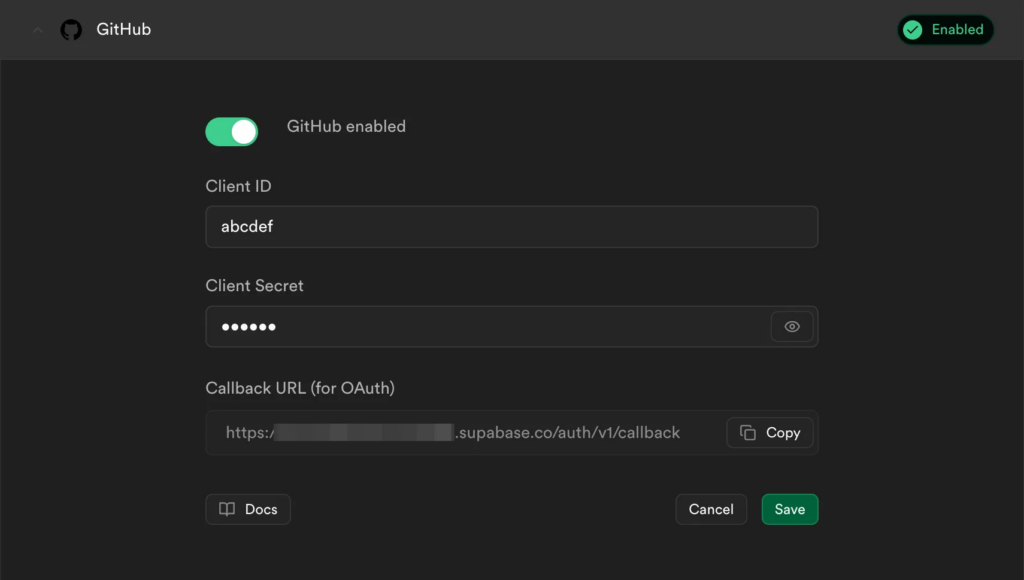
That’s all. Now, you are able to trigger the signInWithOAuth({provider: ‘github’}) which will forward users to the GitHub login page where they need to confirm that they want to sign in in your Supabase-powered application with their GitHub account.

Multiple providers, same email? Supabase has automatic Linking
A common question is: What happens if you add multiple login options to your applications and have a “Sign in with GitHub”, a “Sign in with Apple” and a standard magic Link (email-only) login?
If the user’s email is the same e.g. [email protected], and that email is confirmed to be verified by the provider, the identity information is all stored with the same user – hence, it doesn’t matter with which provider they log in, they will always get access to their user data.
Pretty helpful. But what about different email identities, can they also be linked to one account? Yes, check the following section.
Multiple providers, different email but same user? Supabase has manual linking
If there is a user signed into your application, e.g. via GitHub login, but wants to use the Apple Login in the future, Supabase provides a linkIdentity({ provider: 'PROVIDER_NAME' }) function to trigger a signed-in user to be redirected to the chosen provider e.g. PROVIDER_NAME=apple , confirm the sign-in process and be redirected to the application where then the apple identity is also stored and linked to the existing account.
This would then even allow to delete the older existing identity afterwards.
How Authorization works in Supabase
We will now look at how we can give users specific access to specific resources in Supabase.
These two things sound contradictory but are not:
- You can control fine-grained access to data per user in Supabase
- The user management UI of Supabase is pretty plain. You can change a users password, you can delete a user, create a new user, request a new password but there is no “Permission Administration” in the user management.
So, how to do the first one, if there’s no such thing as a “Permission Administration”?
Let’s make a specific sample. Let’s take a specific user for that: [email protected] with the user id in Supabase being 005dfbcb-fb85-4955-9a58-a743350218e1 (a normal UUID).
Authorization the “old” way
When a user is authenticated in Supabase, you can confirm it by using the supabase client and calling supabase.getUser() (or manually doing so with the REST API if you prefer that).
Now imagine this Postgres table todos:
| todo_id (int8) | user_id (uuid) | todo_task (text) |
|---|---|---|
| 1 | 005dfbcb-fb85-4955-9a58-a743350218e1 | Clean the living room |
| 2 | 413a6486-0ff0-4be2-886a-d8798a48be9c | Wash the socks |
| 3 | 005dfbcb-fb85-4955-9a58-a743350218e1 | Make some indian curry |
If you have a backend in your application, you could now use it to retrieve only the tasks from that table where the user_id matches with the user id you got from the authenticated user
const user = await getUser()
const current_user_id = user.data.id;

const db = await connectWithDb();
const todos = await db.fromTable('todos').select([
  'todo_id',
  'todo_task'
]).where({ user_id: current_user_id });
That’s one solution but it obviously can only run on the backend as you will need to connect with the database with your credentials.
Let’s now look at the solution that became popular with Supabase: Authentication-bound Row Level Security.
Authorization with Row Level Security, Introduction
Row Level Security (RLS) is not a Supabase invention, it’s again a Postgres standard. If RLS is enabled on a table it means no one but admin roles in the database will be able to read or write on that table by default.
If you’ve only worked with databases the old way, this approach might seem new to you since many people only use one postgres root user to connect to the database and not multiple different roles. So, let’s get into it deeper to understand how it works and why it’s wonderful.
Let’s stay on the raw database level at first. If you create a new Postgres user (=role) in the database, you could give that Postgres user read access to specific tables or even specific rows within a specific table (that’s why it’s called Row Level Security).
For example, if you created a Postgres user foobar, you could give that user access to only the second todo in the todos table with this SQL:
ALTER TABLE todos ENABLE ROW LEVEL SECURITY;
CREATE POLICY "foobar can only access one row"
ON todos FOR SELECT
TO foobar
USING ( todos.todo_id = 2 );
Now, when you would connect with this foobar user to the Postgres database and that user would run a SELECT * FROM todos , all the database would return would be just one row.
But this is just the raw explanation of RLS. How can we bind it to a Supabase authenticated user? is every Supabase user its own Postgres user? No, not really, but there’s something that eludes this requirement. See next.
Authorization with Row Level Security, using the auth.* functions of Supabase
We’ve covered 2 things:
- How to use the
user_idto limit what we return – as a root user connected on the backend to the database. Which you can do in Supabase because it’s just Postgres. - What RLS is in general: a way to restrict row access to Postgres users.
What we now want to do is:
- Using RLS to bind it to a Supabase user without even the need to connect directly to the database and be able to safely use the connection both on frontend and backend without exposing secret data. Sounds exciting, right?
Let’s go through it step by step. The Supabase client, or more generically, the Supabase API, allows to request data from Postgres by constructing commands (similiar to what an ORM does).
In JavaScript, you can request data from the todos table via Supabase like this:
const supabase = createClient(SUPABASE_URL, SAFE_SUPABASE_ANON_KEY);
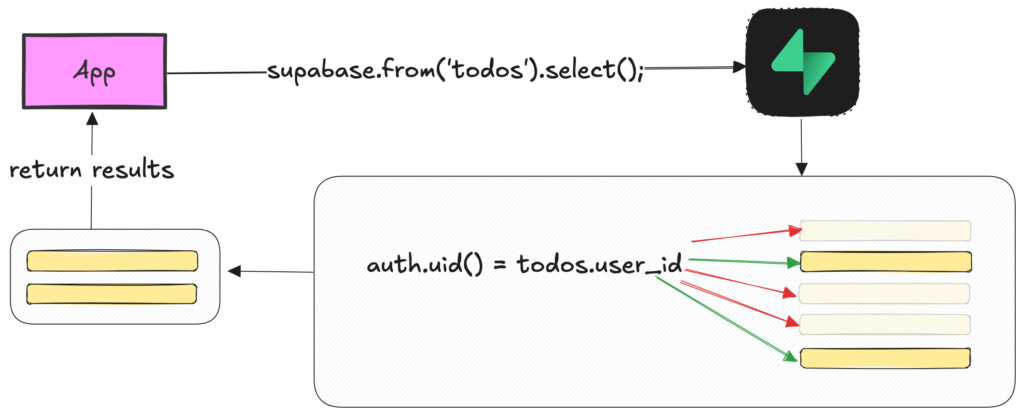
const { data } = await supabase.from('todos').select();
const todoData = data; // just to be very explicit here
But will this contain all todo entries? Even if we call this in the frontend? Can we even call this on the frontend? Yes, we can call this on the frontend as the anon key of Supabase is safe to expose (as opposed to the Supabase service_role key which is not safe to expose as it has admin rights).
But what will it return? By default, tables created in Supabase have RLS enabled. Hence, this request would go to the database and, if no POLICY is defined on that table, simply return everything that the existing policies allow: nothing, an empty array, 0 rows. So, it’s safe by default.
But what happens in the background? How would it know if a user has access or not?
When the request is sent to the API (which is the PostgREST library), it will take an existing session, verify it and then execute the SQL statement either as anon role in the database (if no valid authentication is available) or as authenticated role. So it will definitely execute that SQL statement in the database but those 2 roles don’t have admin privileges and hence, with activated RLS and no defined policy, nothing is returned.
This opens 2 questions:
- Why would I want to give the
anonrole (so no authentication) give access to data? - If every user has the same role, how can I prevent that one user can access data from another user?
The first question is rather straightforward to answer: Imagine a news page. You want non-logged in users to be able to read entries from the top_news table. This would be easy to achieve in Supabase by simply executing this SQL:
ALTER TABLE top_news ENABLE ROW LEVEL SECURITY;

CREATE POLICY "everyone can read the news"
ON top_news FOR SELECT
TO anon
USING ( true );
This however specifically targets the non-authenticated users but you literally want everyone to be able to read so you can simplify it with this statement:
ALTER TABLE top_news ENABLE ROW LEVEL SECURITY;

CREATE POLICY "everyone can read the news"
ON top_news FOR SELECT
USING ( true );
Now, let’s jump to the second question. We cannot simply do something like this as it would allow all authenticated users to access all todos entries:
CREATE POLICY "authenticated users can read todos"
ON todos FOR SELECT
TO authenticated
USING ( true );
But, within the database there is a helper function to make it more specific. It’s called auth.uid() and it is always the id of the currently authenticated user (or null if not authenticated). That means, we can do this:
CREATE POLICY "authenticated users can read their own todos"
ON todos FOR SELECT
TO authenticated
USING ( todos.user_id = auth.uid() );
Now, when a user is logged in and const { data } = await supabase.from(‘todos’).select(); is executed, data will really only contain user-bound data – authorization solved.
Keycloak
What is Keycloak and why is it so popular?
Keycloak is an open-source Identity and Access Management solution that solves both Authentication and Authorization for applications. It’s highly regarded for being enterprise-ready, open-source, and supporting all well-known standards, making it the go-to solution for companies needing a robust Auth system.
Keycloak offers a centralized system for user management, single sign-on (SSO), and identity brokering. This makes it particularly attractive for organizations grappling with complex identity management needs. Its flexibility and extensive integration capabilities have fueled its widespread adoption in enterprise environments.
But does that mean it should only be used for enterprise projects? No, but it is a good choice for enterprise projects.
But let’s have a look at how Keycloak solves authentication and what types of authentication it supports.
How does Keycloak authenticate and what authentication methods does it support?
Keycloak is your authentication manager. You can manage users and user permissions directly in Keycloak without the need of any 3d-party identity provider – however, Keycloak does support identification via every 3d-party provider.
Same as Supabase, Keycloak allows you to create users and login with those users directly with Keycloak.
Keycloak supports various authentication methods, including:
- Username and password authentication
- Two-factor authentication (2FA)
- Social login (e.g., Google, Facebook, Twitter)
- SAML 2.0
- OpenID Connect
The connection between your application and Keycloak will always either be done via SAML or OpenID connect. But don’t worry, you don’t need deep knowledge about these standards to use them.
When a user attempts to log in, Keycloak verifies their credentials against its user database or the configured identity provider. Upon successful authentication, Keycloak issues tokens (such as JWT) and responds back to your application. So it’s all very similiar to how Supabase solves authentication – so far, so clear.
Authenticating with pure Keycloak
Let’s make a concrete sample: We have an application, e.g. a Laravel PHP app or a Next.js app called “my-app” and we want to log in with a user via Keycloak. How would that work?
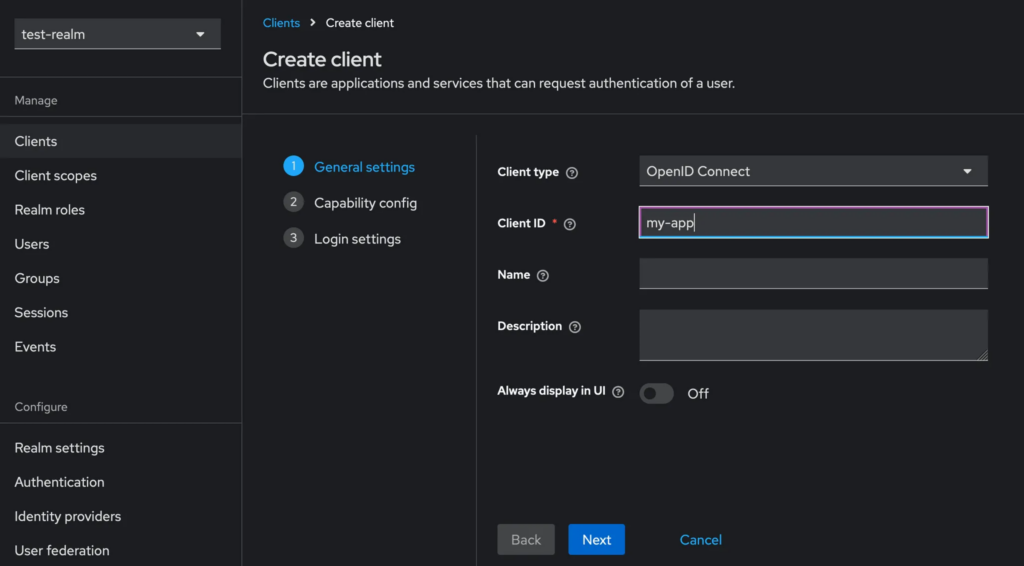
You need to create a so-called “Client” in Keycloak; the client is the bridge to authenticate with your application. This is easy: In Keycloak, click on “Clients” and then an “Create Client” and give it a client id, e.g. my-app
You need to have a user created to even be able to log in at all, so head to the Users section and click on “Create new user”
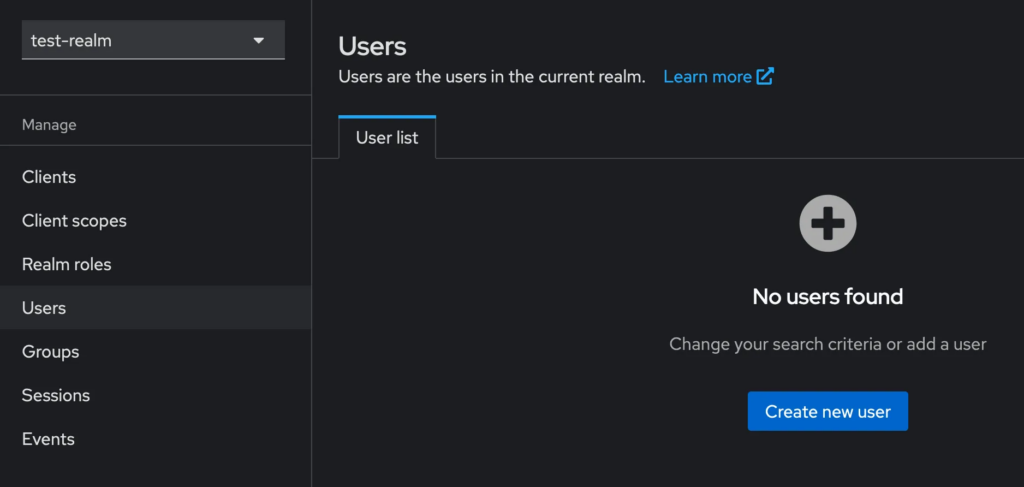
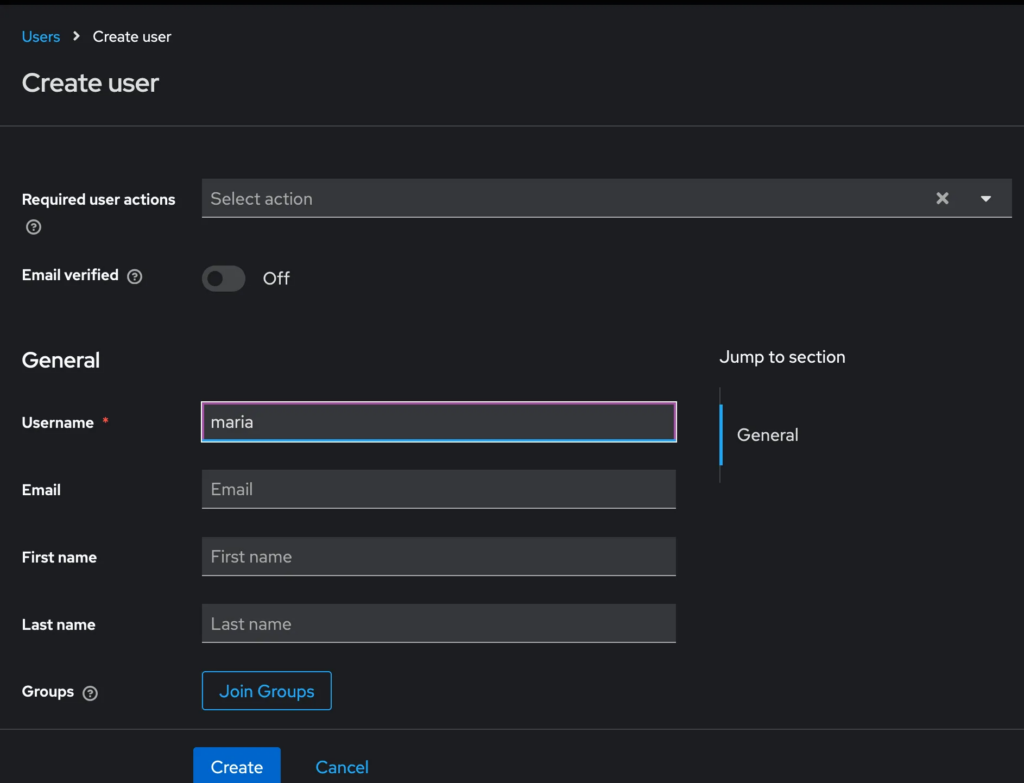
In this user creation form, the only required field is “username”. This is interesting because the username doesn’t have to be an email, it can be any alphanumeric name. Also, it doesn’t ask for a password at all, so how will the user be able to log in? We will solve this question soon.
After you click create, you’ll see the created user with a lot of options attached to it – this is already giving an impression of the power of Keycloak.
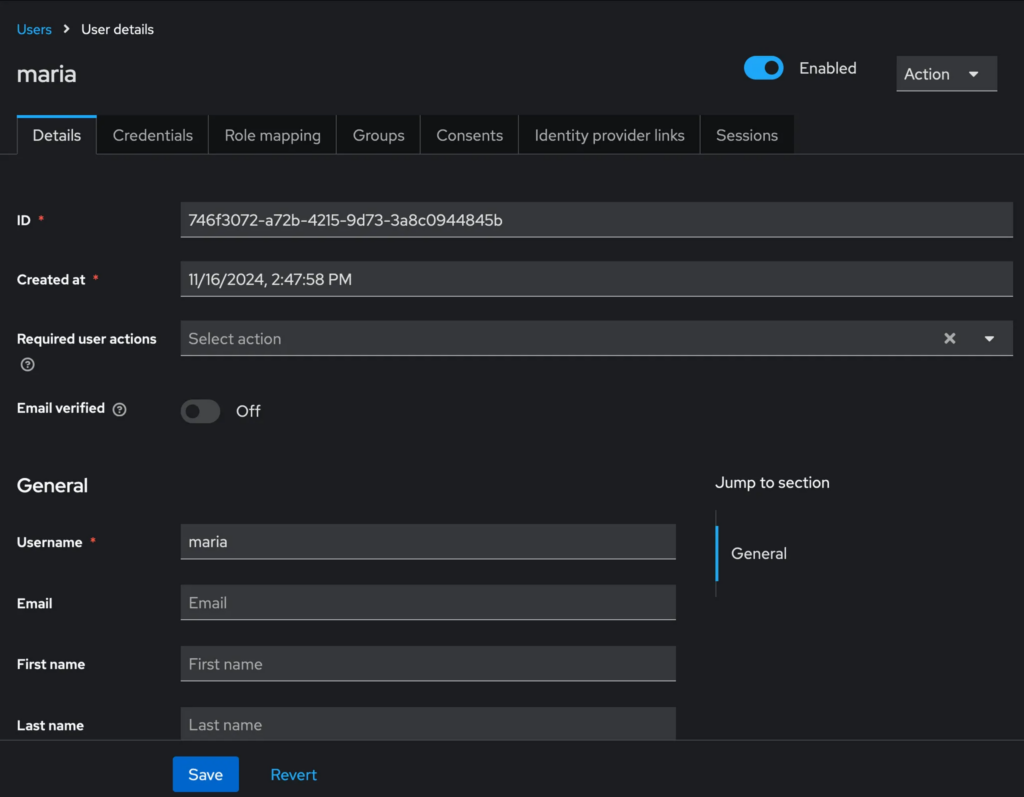
Before doing anything else, we need a way for maria to authenticate. We’ll use a password to be able to log in. You can just go to the Credentials tab in Keycloak and then set a password for that user. But even more so, you can also require that Keycloak prompts the user, after using that password, to set a new password – with the Temporary checkbox. Neat, right?

Now, we want maria to be able to authenticate in our application with that Keycloak user. How do we do achieve that? Without noticing, we created an OpenID Connect (look at the screenshot from point 1) standard client in Keycloak in step 1, named my-app. We now need to do two things:
- Make our application (let’s use a JavaScript sample) request authentication from Keycloak and make Keycloak return a valid session for a valid login to our application.
- Tell Keycloak that our application is actually allowed to request authentication that (by default no application can access anything from Keycloak)
OpenID connect is a standard and Keycloak exposes the required information to connect via this standard at this URL in JSON format: your-keycloak-url/realms/master/.well-known/openid-configuration ; or, in my specific case on Skycloak the URL is https://skycloak-id.app.skycloak.io/realms/test-realm/.well-known/openid-configuration . You don’t have to read those values manually but it’s something nice to look at (these are not secret values very obviously but the client needs those to connect).
If you ask yourself why I have test-realm in my URL instead of master: Keycloak allows to use multiple separate contexts called Realms. E.g. you can manage 5 completely separate applications with 5 different realms. Another Keycloak advantage, think of it as “Multiple Keycloaks in Keycloak”.
But let’s get back to how we can request an authentication with our JavaScript application. For this, you simply need to use and configure the Keycloak library – so, in our case, the JS library keycloak-js .
Instantiate the Keycloak instance like so:
import { Keycloak } from 'keycloak-js';
const kc = new Keycloak({
  url: 'https://my-skycloak-id-xabcy.app.skycloak.io',
  clientId: 'my-app',
  realm: 'test-realm' // "master" by default
});
Now, nothing happens yet. We need to tell the library to check and require an authentication. E.g. like so:
const keycloak = new Keycloak({
  realm: 'test-realm',
  url: 'https://5b77dccb-0080-4629-a47a-ab5b18a50a4c.app.skycloak.io',
  clientId: 'my-app'
});

window.onload = () => {
  keycloak.init({ onLoad: 'login-required' });
}
//....
My app runs on localhost:3000 and will then, on page load, trigger a redirect to authenticate to Keycloak and show an error like: “Invalid parameter: redirect_uri”. This is because we haven’t configured localhost:3000 (our app) to be legitimated to authenticate with our Keycloak. Let’s change that.
We can configure the allowed redirect URIs by going to our my-app client in Keycloak and adding our app’s url like so: http://localhost:3000/* (so any URL on localhost:3000 shall be legitimated to request authentication from Keycloak)
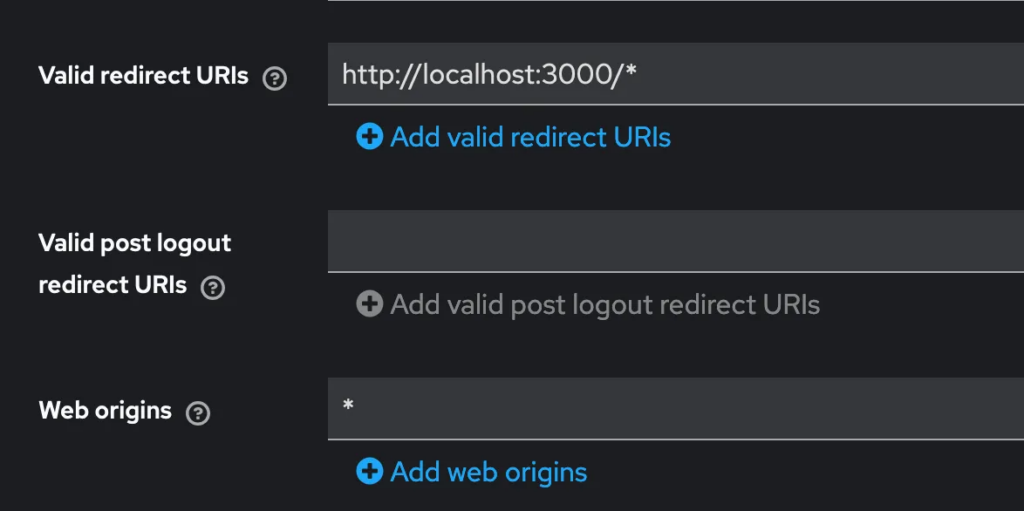
When you save that and then try again opening your page and click the button,you will not see an error but the login form from Keycloak. Here, I can now enter maria as username and the password credentials I’ve set:

After logging in, Keycloak immediately asks us to change the password to something new:

Once done, Keycloak will usually also ask for providing an Email and Name but you can turn off that these fields are required in your Keycloak Realm settings in the sub section User profile. After those initial actions, you’re headed back to the application page and the keycloak library will have saved the session in your app – you’re now authenticated via Keycloak with the user maria.
You can now load the user profile object – and hence verify the successful authentication by e.g. adding a button that triggers it
<button
        type="button"
        onClick={() => {
           keycloak.loadUserInfo().then((profile) => {
            console.log('profile', profile);
          });
        }}
      >
        Load profile
</button>
A basic authentication flow with Keycloak: done ✅
Let’s now have a look at how Keycloak would help to give access to specific data (Authorization).
Authenticating with 3d-party providers or SSO in Keycloak
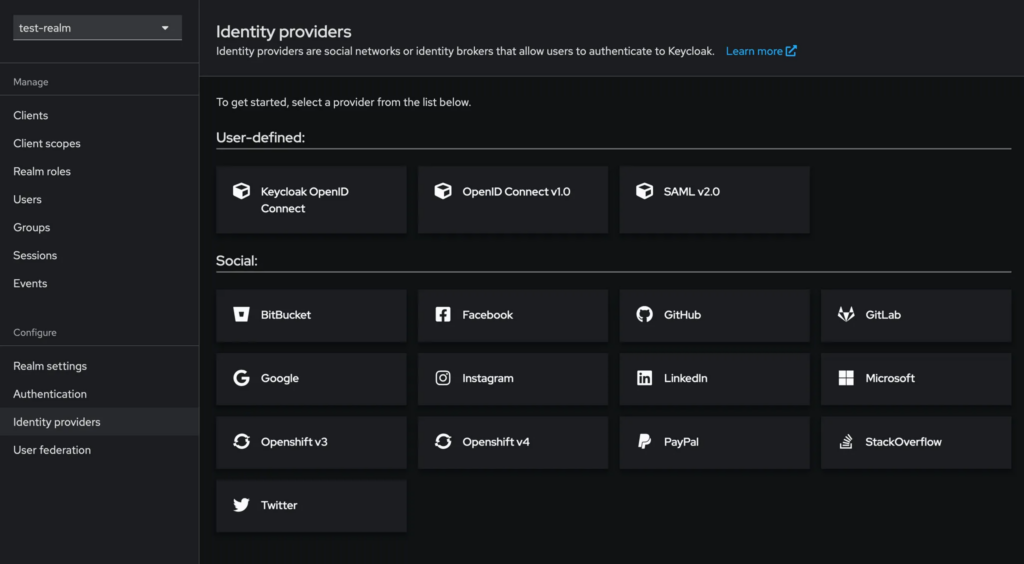
You’ve just learned how to use Keycloak for user authentication. Now, let’s explore how you can integrate third-party providers as Identity Providers (IDPs) in Keycloak. For example, GitHub. When set up, Keycloak will add a “Sign in with GitHub” option to its login form, connect with GitHub, and store the user information in Keycloak.
To set this up, navigate to the “Identity Providers” section in Keycloak. You can choose from pre-defined providers for a straightforward setup, or if your desired provider isn’t listed, you can define it manually according to the standard protocols.
This flexibility means Keycloak supports any Identity Provider that uses the common standards OpenID Connect or SAML—which essentially covers almost all providers.
How to authorize with Keycloak: A fine-grained permission system
The simplest approach to authorization is what we discussed in the Supabase section: saving a user’s ID alongside data in the database to control access. This method works regardless of whether you use Supabase, Keycloak, or any system that provides unique user IDs.
Keycloak, however, offers a more sophisticated permission management system. Let’s take a quick look at it.
If we check the “Role mapping” tab for our maria user in Keycloak, we’ll see a default-roles-... entry. Using the Keycloak JavaScript library we set up earlier, you can access an authenticated user’s roles via keycloak.realmAccess, which includes this default-roles-... role.
In Keycloak’s “Realm roles” section, you can create new roles and nest them within others. For instance, you could create a “content-admin” role and include “content-editor” and “content-publisher” roles within it. You can then assign these roles to users and check them on the backend using keycloak.realmAccess to manage access to specific actions in your system.
For example, if you assign someone the “content-admin” role and another person the “content-editor” role, you’d only need to check for “content-editor” permissions, as “content-admin” already includes “content-editor” capabilities.
Keycloak’s functionality extends further, allowing you to assign attributes to roles and use these roles to manage internal Keycloak permissions if desired.
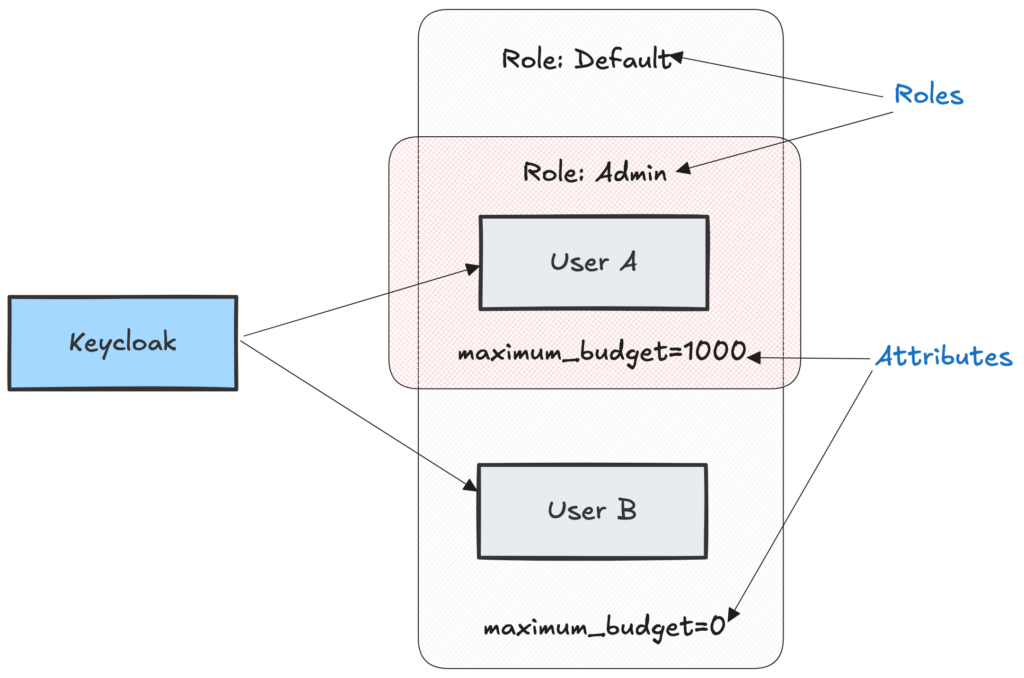
In summary, Keycloak provides a role-based system with inheritance and fine-grained attributes for roles. This approach makes role management and assignment more flexible and independent. You could even create a Keycloak user with the ability to assign only certain roles to other users, which could be useful for a service team.
Remember, though: These role definitions and attributes in Keycloak only take effect if you design your application’s backend to check for these roles.
Keycloak or Supabase?
On the surface, both Supabase and Keycloak use the same standards to authenticate a user and, in theory, both support arbitrary providers since Supabase also supports the generic SAML 2.0 standard. However, SAML is a standard that is more used in enterprise contexts. E.g. using SAML with GitHub is only possible in GitHub enterprise as of today.
Let’s have a look at when to use what and if it makes sense to use both.
When should I use Keycloak over Supabase?
There are multiple reasons that would pinpoint to using Keycloak instead of Supabase:
- You need to support identity providers that Supabase doesn’t support
- You need to have enterprise SSO support e.g. connecting Auth with an enterprise MS365 login
- You want real emailless logins
- You need to support User Federation systems such as Kerberos or Ldap
- You want to decouple the database management UI from the user management UI
- You want to be able to manage user permissions in a UI
- You want to create a team of people to be able to manage users and their permissions
- You need a more complex and flexible role-based access control system that goes beyond simple user permissions and you want to manage it in one centralized IAM UI
- You require detailed audit logs of user authentication and authorization activities
- You want to manage multiple different Authentication providers for different applications, e.g. for different clients, in one place (you can use one Keycloak with different Realms, no need to have multiple instances of Keycloak)
- You want to define authentication flows / rules such as requiring users to change their password every 6 months
- You want to easily and fully impersonate users with the click of a button
- You want to separate the Auth system from the database system to stay more flexible long-term
There are certainly more things Keycloak can do but the above list should provide a good first measure for you to decide if you want/need Keycloak.
Let’s have a look at Supabase.
When should I use Supabase over Keycloak?
Choosing between Supabase and Keycloak often depends on the specific needs of your project. While Keycloak excels in complex enterprise scenarios, Supabase offers a streamlined, developer-friendly approach that can be ideal for many modern web and mobile applications. If your project doesn’t require the advanced features that make Keycloak necessary, Supabase can be an excellent choice. Here are some scenarios where Supabase might be the preferable option:
- You’re using Supabase anyways due to its database, storage and realtime capabilities and now also need authentication
- You want a simple, integrated all-in-one solution for authentication and database management
- You don’t need to manage different apps / clients with the same Auth system
- You want to directly bind database data access to users as shown in the RLS samples in the previous Supabase sections
- You want to build your own role management system by reflecting roles and permissions in the database
- You’re building a new application and don’t need complex user management features such as requesting password rotation routinely
- You don’t need the ability to invalidate current sessions via the UI
For many people that are building an application with Supabase, the built-in authentication and authorization features will greatly be sufficient to also build complex projects.
But end of the day, you have to make your decision and you might even want to use both. Let’s look at that combination now.
How and why to connect Keycloak with Supabase and use both together
We already discussed that you can use a 3d-party login with Supabase such as “Sign in with Google”. Keycloak can do so too. But you can also do a “Sign in with Keycloak” which will then e.g. go to your Skycloak.io (hosted Keycloak) instance so suddenly your wonderful Keycloak becomes the authenticator for Supabase.
This is super easy to achieve. You would be using Supabase and its libraries to authenticate with Supabase and, when doing so, Supabase would request that authentication from Keycloak. So technically, your application will redirect to Supabase and then Supabase will redirect to Keycloak. Keycloak will do the authentication and give the result back to Supabase. Then, if everything went well, Supabase would respond with a Supabase authentication to your application.
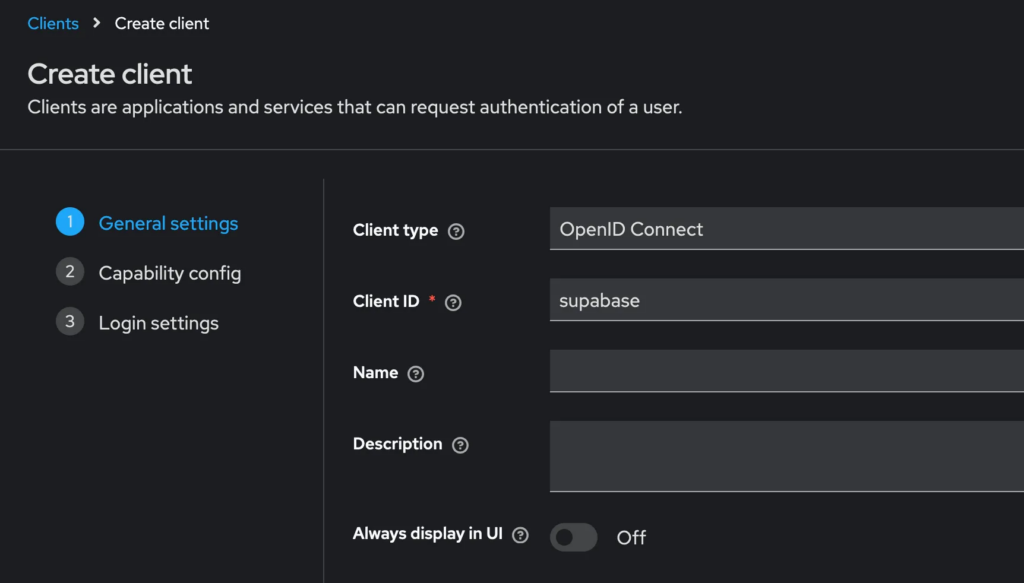
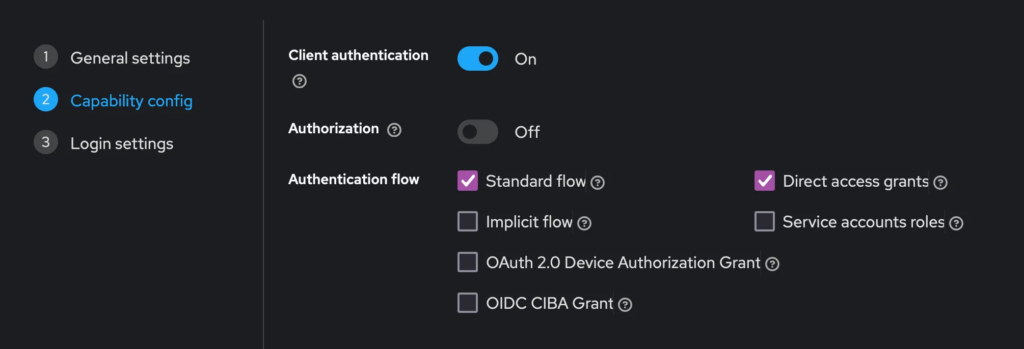
This allows you to manage users within Keycloak whilst making use of all Supabase Auth features. A pretty insane combination and also easy to set up. To achieve that, not your application, but Supabase itself will be a client of Keycloak. So, in Keycloak you would create a new client called “supabase”, set the authentication type to confidential (Client Authentication On) and provide the Callback URL from Supabase (your-supabase-url/auth/v1/callback) as Redirect URI in the Keycloak client creation:
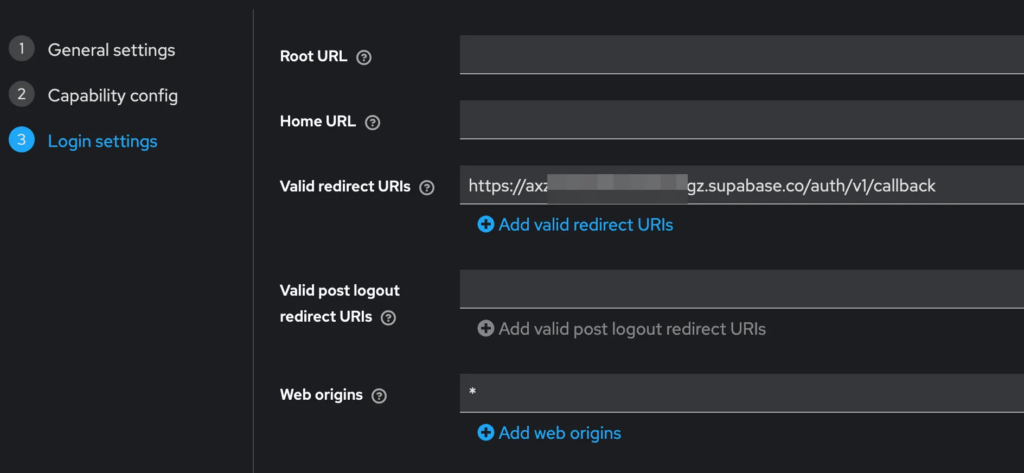
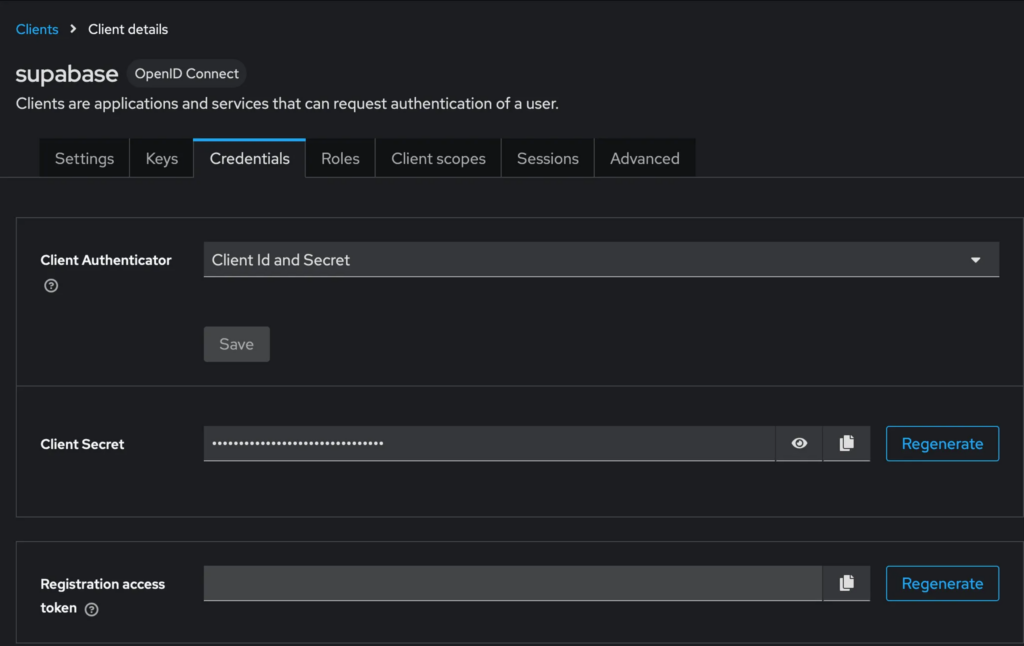
Then, you need to move to the “Credentials” Tab of that Keycloak client to obtain the client secret. Copy it into your clipboard:
Then, go into your Supabase instance, move to the “Providers” section, open Keycloak, enable it and add the client id, the obtained secret and the Realm URL of Keycloak as follows:
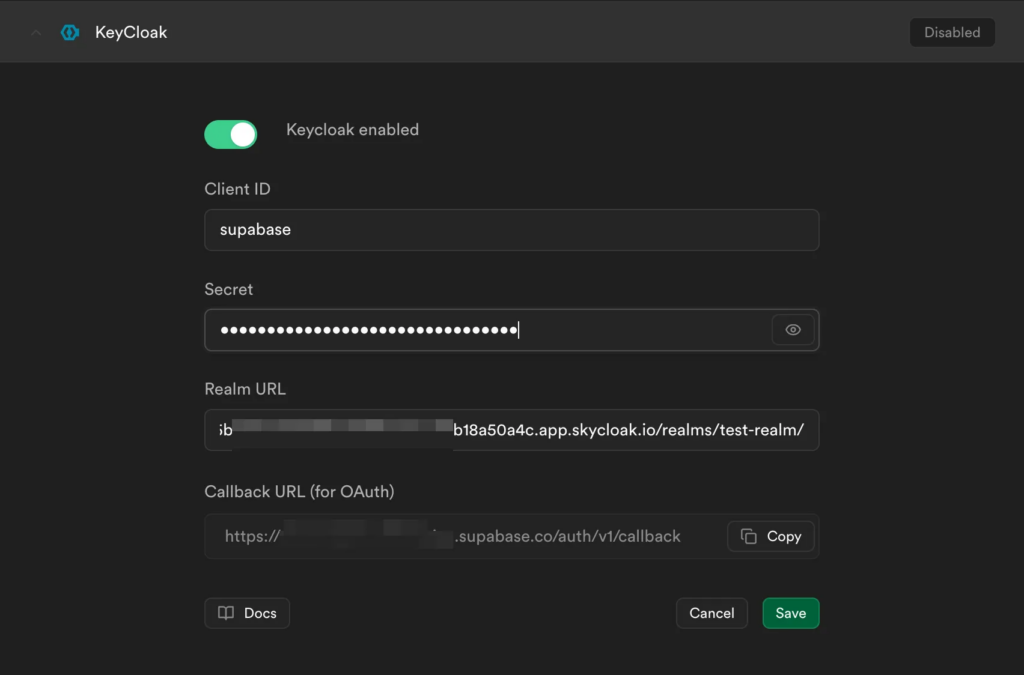
After creation of that connection (click “Save”), you can now use Supabase to log in via Keycloak. E.g., in JavaScript you would trigger an authentication with:
supabase.auth.signInWithOAuth({
  provider: 'spotify',
  scopes: 'openid profile email'
});
That also means: You can then connect to Keycloak any identity provider you want. You now have: The universal solution: You can manage users in Keycloak but use them with Supabase and also use the authorization methods of Supabase.
Supabase will still obviously create a user copy (requiring a user to have a valid email) but it will only authenticate and verify that user with Keycloak.
Supabase will then create a Session token which contains the Supabase data as well as the Keycloak session data. The latter is saved in supabaseSessionData.provider_token . That means that you can also read the Keycloak token directly from the Supabase token and e.g. store the role / permission information there.
Now it’s up to you to decide which solution you want.
How Skycloak makes usage of Keycloak even easier
Skycloak is a raw but fully managed Keycloak deployment system. It fully takes away the pain of deployment which is indeed a crucial point when it comes to efficiency. Using Keycloak is one thing, deploying and configuring it properly is another.
Forget about that and just use it. With Skycloak you can focus on building your application while leveraging the powerful features of Keycloak. Skycloak handles the complex deployment and maintenance tasks, ensuring your Keycloak instance is always up-to-date, secure, and optimized for performance. This allows you to take advantage of Keycloak’s robust authentication and authorization capabilities without the overhead of managing the infrastructure yourself.
