Why Default Settings Aren’t Always Enough
While Keycloak’s default configurations provide a functional starting point, it often falls short of meeting the specific needs of production environments. Relying solely on these defaults can lead to security vulnerabilities, performance bottlenecks, and more security vulnerabilities. This article will guide you through five critical default configurations that you should adjust immediately after setting up your Keycloak cluster. By making these changes, you’ll significantly enhance your system’s security, performance, and overall reliability.
Before we begin, it’s important to understand that Keycloak is highly customizable. The default settings are designed to be generic, catering to a wide range of use cases. However, your specific requirements will likely necessitate adjustments. This is especially true when moving from a development or testing environment to a production deployment. If you ignore these adjustments, it can expose your system to unnecessary risks and inefficiencies. This guide is designed to help you navigate these crucial initial steps.
1. Database Configuration: Get Rid of The Embedded H2
Keycloak’s default configuration uses an embedded H2 database. While convenient for quick setups and testing, it is absolutely not suitable for production environments. H2 is an in-memory database, meaning that data is lost when the server restarts. This makes it unsuitable for any system where data persistence is required. Moreover, H2 is not designed for high concurrency or large datasets, which are common in production scenarios.
Why you should change it:
- Data Loss: Embedded H2 databases are not persistent, leading to data loss on server restarts.
- Performance: H2 is not optimized for high-load production environments.
- Scalability: H2 does not scale well with increasing data and user loads.
How to adjust
WildFly (Keycloak 16-)
You should configure Keycloak to use a robust, production-ready database such as PostgreSQL, MySQL, or MariaDB. Here’s a basic example of how to configure Keycloak to use PostgreSQL:
# In your standalone.xml or domain.xml configuration file
<datasource jndi-name="java:jboss/datasources/KeycloakDS" pool-name="KeycloakDS" enabled="true">
    <connection-url>jdbc:postgresql://your_db_host:5432/your_keycloak_db</connection-url>
    <driver>postgresql</driver>
    <security>
        <user-name>your_db_user</user-name>
        <password>your_db_password</password>
    </security>
</datasource>
Remember to replace your_db_host, your_keycloak_db, your_db_user, and your_db_password with your actual database credentials. Also, ensure you have the correct JDBC driver installed for your chosen database.
Quarkus (Keycloak 17+)
In Keycloak 17+, the configuration style has changed significantly with the transition to Quarkus. Here’s how you can configure Keycloak to use a robust, production-ready database like PostgreSQL:
Using Environment Variables
KC_DB=postgres
KC_DB_URL=jdbc:postgresql://your_db_host:5432/your_keycloak_db
KC_DB_USERNAME=your_db_user
KC_DB_PASSWORD=your_db_password
KC_DB_SCHEMA=public
Replace your_db_host, your_keycloak_db, your_db_user, and your_db_password with your actual database details. The schema is optional and defaults to public.
Using the keycloak.conf File
db=postgres
db-url=jdbc:postgresql://your_db_host:5432/your_keycloak_db
db-username=your_db_user
db-password=your_db_password
db-schema=public
Add this configuration to your keycloak.conf file, typically located in the Keycloak configuration directory.
Additional Notes
- Install the PostgreSQL Driver: If using the official Keycloak Docker image, the PostgreSQL driver is already included. For custom deployments, download the driver from PostgreSQL Downloads.
- Customizing Pool Settings: You can fine-tune your database connection pool with the following environment variables:
KC_DB_POOL_INITIAL_SIZE=10
KC_DB_POOL_MIN_SIZE=10
KC_DB_POOL_MAX_SIZE=50
Docker Example
docker run --name keycloak \
    -e KC_DB=postgres \
    -e KC_DB_URL=jdbc:postgresql://your_db_host:5432/your_keycloak_db \
    -e KC_DB_USERNAME=your_db_user \
    -e KC_DB_PASSWORD=your_db_password \
    -p 8080:8080 quay.io/keycloak/keycloak:latest start
Kubernetes Example
env:
- name: KC_DB
  value: postgres
- name: KC_DB_URL
  value: jdbc:postgresql://your_db_host:5432/your_keycloak_db
- name: KC_DB_USERNAME
  value: your_db_user
- name: KC_DB_PASSWORD
  value: your_db_password
2. Enabling HTTPS: Securing Communication
By default, Keycloak often runs on HTTP, which is not secure. All communication, including user credentials, is transmitted in plain text, making it vulnerable to eavesdropping and man-in-the-middle attacks. Enabling HTTPS is a fundamental security requirement for any production deployment.
Why you should change it:
- Security: Protects sensitive data from being intercepted.
- Compliance: Many security standards and regulations require HTTPS.
- User Trust: HTTPS provides assurance to users that their data is secure.
Adjust in Wildfly (16-)
You’ll need to configure Keycloak to use a valid SSL/TLS certificate. This typically involves generating a certificate and configuring your Keycloak server to use it. Here’s a simplified example of how to configure HTTPS in standalone mode:
# In your standalone.xml configuration file
<https-listener name="https" socket-binding="https" security-realm="ApplicationRealm">
    <ssl key-alias="your_key_alias" password="your_keystore_password" path="path/to/your/keystore.jks" protocol="TLSv1.2" verify-client="false"></ssl>
</https-listener>
Replace your_key_alias, your_keystore_password, and path/to/your/keystore.jks with your actual certificate details. You can generate a self-signed certificate for testing, but for production, you should use a certificate from a trusted Certificate Authority (CA).
Keycloak 17+ (Quarkus)
For Keycloak 17+ (Quarkus), you can configure HTTPS using environment variables or by defining it in your keycloak.conf file.
1. Using Environment Variables
KC_HOSTNAME=https://your-domain.com
KC_HTTPS_CERTIFICATE_FILE=/path/to/your/certificate.crt
KC_HTTPS_CERTIFICATE_KEY_FILE=/path/to/your/private.key
Replace your-domain.com, /path/to/your/certificate.crt, and /path/to/your/private.key with your actual domain and certificate file paths.
2. Using the keycloak.conf File
hostname=https://your-domain.com
https-certificate-file=/path/to/your/certificate.crt
https-certificate-key-file=/path/to/your/private.key
Ensure your certificate and private key are valid and obtained from a trusted Certificate Authority (CA) for production use. For testing purposes, you can generate a self-signed certificate.
Steps to Generate a Self-Signed Certificate (Optional for Testing)
openssl req -newkey rsa:2048 -nodes -keyout private.key -x509 -days 365 -out certificate.crt
This command generates a private key and a self-signed certificate valid for 365 days.
3. Starting Keycloak with HTTPS
Once the certificate and key are configured, start Keycloak with the required HTTPS settings:
docker run --name keycloak \
    -e KC_HOSTNAME=https://your-domain.com \
    -e KC_HTTPS_CERTIFICATE_FILE=/path/to/your/certificate.crt \
    -e KC_HTTPS_CERTIFICATE_KEY_FILE=/path/to/your/private.key \
    -p 8443:8443 quay.io/keycloak/keycloak:latest start --https-port=8443
Best Practices
- Always use a certificate from a trusted Certificate Authority (CA) for production environments.
- Keep your private key secure and never share it.
- Regularly renew and update your certificates to avoid expiration issues.
For more detailed instructions, refer to the official Keycloak documentation.
Another method is to delegate HTTPS to a proxy so that you can run Keycloak in HTTP mode. We suggest this mode only if you trust your internal network.
3. Email Configuration: Enabling User Communication
Keycloak relies on email for various functions, such as user registration, password resets, and account verification. The default email configuration is often disabled or uses a mock email service, which is not suitable for production. Configuring a proper email server is crucial for a functional and user-friendly system.
Why you should change it:
- User Experience: Enables users to reset passwords and verify accounts.
- Security: Facilitates secure account recovery processes.
- Functionality: Required for many Keycloak features to work correctly.
How to adjust:
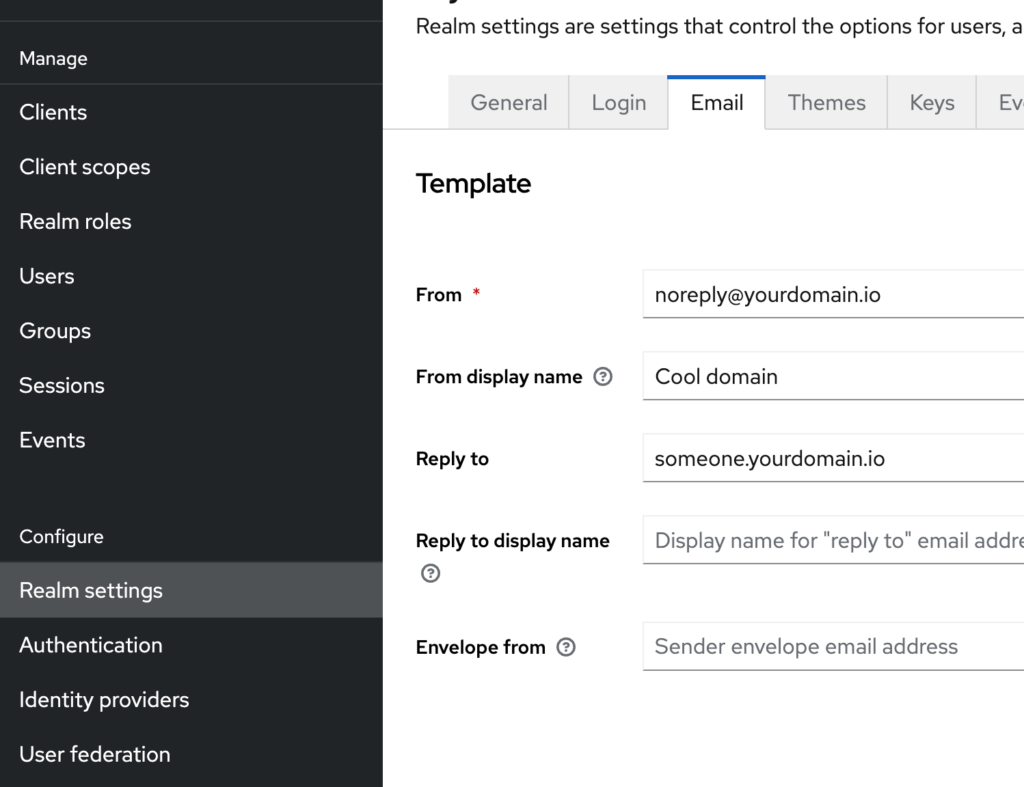
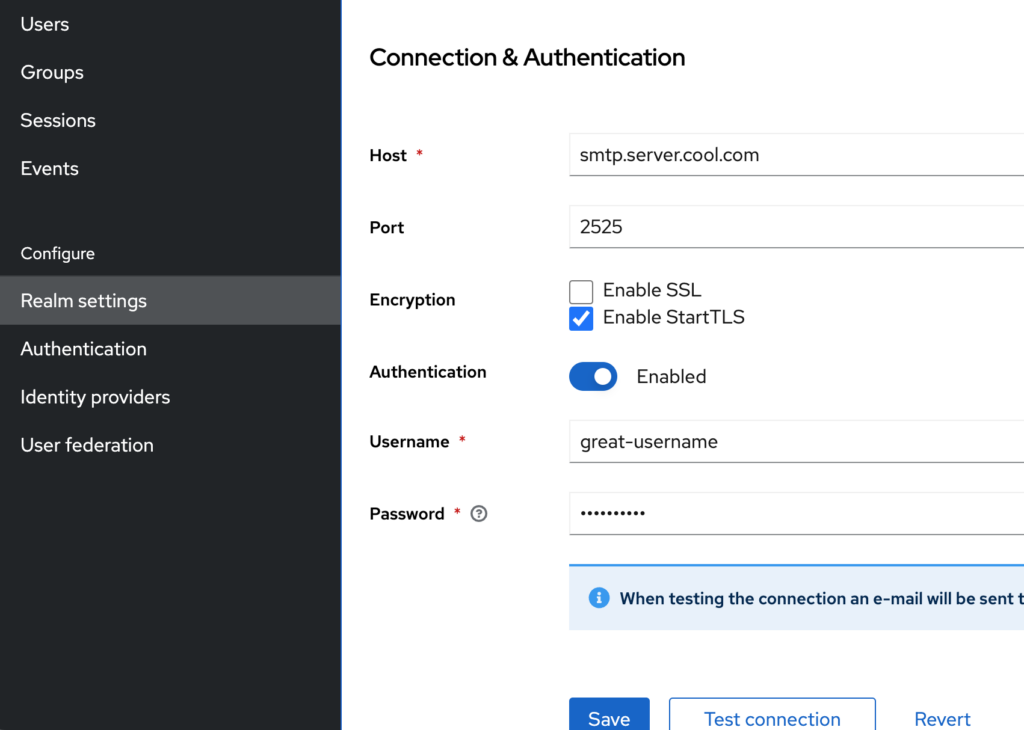
You’ll need to configure Keycloak to use an SMTP server. Here’s an example of how to configure email settings in the Keycloak Admin Console:
- Navigate to the ‘Realm Settings’ in the Keycloak Admin Console.
- Go to the ‘Email’ tab.
- Enter your SMTP server details, including the host, port, username, and password.
- Configure the ‘From’ address and other relevant settings.
- Test the configuration to ensure it’s working correctly.


You can use a service like SendGrid, Mailgun, or your own SMTP server. Ensure that your SMTP server is properly configured and allows Keycloak to send emails.
4. Session Management: Optimizing Performance and Security
Keycloak’s default session management settings might not be optimal for your specific use case. For example, default session timeouts might be too long, posing a security risk, or too short, leading to a poor user experience. Adjusting session timeouts and other session-related settings is crucial for both security and performance.
Why you should change it:
- Security: Reduces the risk of unauthorized access due to long-lived sessions.
- Performance: Optimizes resource usage by managing sessions efficiently.
- User Experience: Balances security with user convenience.
How to adjust:
You can configure session timeouts and other session-related settings in the Keycloak Admin Console. Here are some key settings to consider:
- Session Timeout: The maximum time a user session can remain active.
- Client Session Timeout: The maximum time a client session can remain active.
- Offline Session Timeout: The maximum time an offline session can remain active.
- Remember Me: Configure the ‘Remember Me’ functionality to allow users to stay logged in for longer periods.
Adjust these settings based on your specific security and user experience requirements. For example, you might want to set shorter session timeouts for sensitive applications and longer timeouts for less critical ones.
5. Client Grant Types: Securing Authorization Modes
Keycloak supports various client grant types like password, authorization_code, client_credentials, and refresh_token. While these are necessary for flexible integration, leaving default configurations unadjusted could introduce vulnerabilities, such as unauthorized access or privilege escalation by malicious actors.
Why you should change it:
- Security: Misconfigured grants like
passwordgrant can be exploited if client credentials are compromised. - Access Control: Ensures clients only use the required grant types for their specific use cases.
- Compliance: Minimizes the risk of improper access handling that could lead to non-compliance with standards like GDPR or PCI DSS.
How to adjust:
- Restrict Client Grant Types:
- In the Keycloak Admin Console, navigate to the
Clientstab. - Select a client and go to the
Settingstab. - Disable grant types that are not needed for this client, such as the
passwordgrant for public clients.
- In the Keycloak Admin Console, navigate to the
- Enable Fine-Grained Permissions:Go to the
Authorizationtab in the Admin Console and create fine-grained policies and permissions to control client access to resources. - Audit and Monitor Grant Usage:Regularly review logs for unusual grant requests and implement alerts for anomalous patterns, such as multiple
passwordgrant attempts. - Use Client Scopes:Assign specific scopes to clients to limit access to only the necessary resources.
Potential Attack Scenario:
An attacker who compromises client credentials could use the password grant to impersonate users. By restricting this grant type, you reduce the risk of unauthorized access.
6. Admin Endpoint Exposure: Protecting Against Brute Force Attacks
By default, the Keycloak admin console is accessible through a web-based interface, making it a potential target for brute force and credential stuffing attacks. Properly securing this interface is essential to prevent unauthorized access to your Identity and Access Management (IAM) system.
Why You Should Change It:
- Security: Admin endpoints are high-value targets for attackers.
- Risk Mitigation: Reduces the likelihood of brute force attacks succeeding.
- Operational Continuity: Prevents unauthorized changes that could disrupt services.
How to Adjust:
- Restrict Admin Access:
- Use IP whitelisting with Keycloak’s proxy settings or an external reverse proxy (e.g., NGINX or HAProxy).
- In the Keycloak server, configure the `proxy` settings to recognize only trusted IP ranges using the `proxy-trusted-addresses` option.
- Enable Multi-Factor Authentication (MFA):
- Go to Realm Settings > Authentication and enable MFA for admin and privileged users.
- Rate-Limit Login Attempts:
- Navigate to Realm Settings > Security Defenses > Brute Force Detection. Configure maximum failed attempts and lockout duration.
- Navigate to Realm Settings > Security Defenses > Brute Force Detection. Configure maximum failed attempts and lockout duration.
- Use HTTPS:
- Ensure the admin console is served over HTTPS by properly configuring the TLS settings in the Keycloak configuration.
Potential Attack Scenario:
An attacker uses an automated brute force script to guess admin credentials. By implementing rate limiting, MFA, and IP restrictions, you make it significantly harder for such an attack to succeed.
For more info on the admin endpoint and the master realm, see here.
7. Enabling Audit Events: Monitoring and Accountability
By default, Keycloak may not have comprehensive auditing enabled, which means critical security and operational events might go unlogged. Enabling audit events is essential for monitoring, troubleshooting, and maintaining compliance with security standards.
Why you should enable it:
- Security: Tracks unauthorized access attempts and suspicious activities.
- Compliance: Meets regulatory requirements such as GDPR, SOC2, or HIPAA.
- Accountability: Provides an audit trail for administrative and user activities.
How to adjust:
- Enable Audit Logging:
- In the Keycloak Admin Console, navigate to
Realm Settings > Events. - Enable
Save EventsandSave Admin Events.
- In the Keycloak Admin Console, navigate to
- Choose Events to Track:Under the
Event Configtab, select the specific events you want to log, such as login attempts, failed logins, client authentications, and administrative actions. - Set Retention Policy:Specify how long to retain the logs by setting a retention period in days. This helps balance compliance needs with storage requirements.
- Configure External Log Storage:For production environments, export logs to an external logging service such as ELK Stack, Splunk, or AWS CloudWatch for better management and analysis.
Potential Attack Scenario:
Without audit logs, you might not notice multiple failed login attempts or unauthorized admin actions. Enabling audit events provides visibility and accountability to prevent or mitigate such incidents.
For more information, check out our blog post on the subject.
8. Theme Customization: Branding and User Experience
Keycloak’s default theme is functional but might not align with your organization’s branding. Customizing the theme is essential for providing a consistent and professional user experience. Branding your Keycloak instance enhances user trust and recognition.
Why you should change it:
- Branding: Aligns the login and user management interfaces with your brand.
- User Experience: Provides a consistent and familiar experience for your users.
- Professionalism: Enhances the overall look and feel of your system.
How to adjust:
You can customize the Keycloak theme by creating a custom theme or modifying an existing one. Here are the basic steps:
- Create a new theme directory in the
themesdirectory of your Keycloak installation. - Copy the contents of an existing theme (e.g., the ‘base’ theme) into your new theme directory.
- Modify the HTML, CSS, and other resources to match your branding.
- Configure Keycloak to use your custom theme.
You can customize various aspects of the theme, including the login page, registration page, and user account management pages. This allows you to create a fully branded and user-friendly experience. For more advanced customization, you can also explore the Keycloak documentation on theme development.
Conclusion
Keycloak is a powerful IAM solution, but its default settings are just a starting point. By adjusting these five critical configurations—database, HTTPS, email, session management, and theme—you can significantly enhance the security, performance, and user experience of your Keycloak deployment. Remember that these are just the initial steps; continuous monitoring and optimization are essential for maintaining a robust and reliable system.

