Which Keycloak defaults should you change first?
Keycloak ships with sensible defaults for a laptop, not for production. Spin up a fresh cluster and you get an in-memory database, plain HTTP, no email, and verbose dev settings. None of that survives contact with real traffic. Here are the eight defaults worth fixing on day one, in priority order:
- Swap the embedded H2 database for PostgreSQL (or another real database).
- Turn on HTTPS, either directly on Keycloak or at a trusted proxy.
- Wire up SMTP so password resets and verification emails actually send.
- Tune session and token lifetimes for your security and UX needs.
- Restrict client grant types to only what each client uses.
- Lock down the admin endpoints with MFA, brute-force detection, and IP rules.
- Enable audit events so you can see who did what.
- Brand the login theme so users trust the page they land on.
The rest of this guide walks through each one with current Keycloak 26.x config. A quick heads-up before we start: everything here targets the Quarkus distribution. The old WildFly distribution, standalone.xml, and the /auth/ base path are end of life and gone from supported releases, so we won’t cover them. You configure modern Keycloak through kc.sh, conf/keycloak.conf, and KC_* environment variables instead. For broader cluster guidance, see our Top 7 Keycloak Cluster Configuration Best Practices and the official Keycloak server docs.
1. Swap the embedded H2 database for PostgreSQL
A fresh Keycloak install uses the embedded H2 database, and the project itself says H2 is for development only, not production. H2 stores data in a local file with no clustering story, so it can’t back a multi-node cluster and it buckles under real concurrency. Move to PostgreSQL, MySQL, MariaDB, MSSQL, or Oracle before you go live.
Why you should change it
- No clustering: H2 can’t be shared across nodes, so a real Keycloak cluster needs an external database.
- Performance: H2 isn’t tuned for high-load production traffic.
- Scalability: It struggles as data and user volume grow.
How to configure an external database
You set the database with the db option plus connection details. In Keycloak 26.x you can do this through conf/keycloak.conf, KC_* environment variables, or kc.sh flags. PostgreSQL is the most common choice and its JDBC driver ships in the official image.
Using conf/keycloak.conf:
db=postgres
db-url=jdbc:postgresql://your_db_host:5432/your_keycloak_db
db-username=your_db_user
db-password=your_db_password
db-schema=public
Using KC_* environment variables (handy for containers):
KC_DB=postgres
KC_DB_URL=jdbc:postgresql://your_db_host:5432/your_keycloak_db
KC_DB_USERNAME=your_db_user
KC_DB_PASSWORD=your_db_password
KC_DB_SCHEMA=public
Replace the host, database, and credentials with your own. The schema is optional and defaults to public.
Build vs runtime: remember to optimize
db is a build-time option in the Quarkus distribution. That means it’s baked in when you run kc.sh build (or when the container builds an optimized image). For production, build once and then start with --optimized so Keycloak skips the rebuild and boots faster:
# Build with your chosen database vendor
bin/kc.sh build --db=postgres

# Start using the pre-built, optimized config
bin/kc.sh start --optimized
Connection details like db-url and db-password are runtime options, so you can change them at start without rebuilding. You can also tune the pool:
db-pool-initial-size=10
db-pool-min-size=10
db-pool-max-size=50
Citation capsule: The Keycloak team documents the embedded H2 database as “not suitable for production use” and supports PostgreSQL, MySQL, MariaDB, Microsoft SQL Server, and Oracle as production databases (Keycloak Server Guides: Configuring the database, 2026). The
dbvendor is a build-time option set viakc.sh build.
With Skycloak’s managed Keycloak hosting, the database, pooling, scaling, and backups are handled for you, so this whole step disappears.
2. Turn on HTTPS
Out of the box, the dev profile happily serves over plain HTTP, and that’s fine on your laptop but dangerous in production. Without TLS, credentials and tokens travel in clear text, wide open to eavesdropping and man-in-the-middle attacks. In fact, Keycloak’s production mode (kc.sh start) refuses to boot without either HTTPS configured or HTTP explicitly enabled, which is the project nudging you to do the right thing.
Why you should change it:
- Security: Protects credentials and tokens from interception.
- Compliance: Most security standards require encryption in transit.
- User trust: A padlock and a clean cert reassure users the page is real.
Option A: terminate TLS directly on Keycloak
Point Keycloak at a certificate and private key. You can use PEM files or a keystore. Here’s the PEM approach in conf/keycloak.conf:
hostname=https://auth.your-domain.com
https-certificate-file=/path/to/your/certificate.crt
https-certificate-key-file=/path/to/your/private.key
Or the same thing as KC_* environment variables:
KC_HOSTNAME=https://auth.your-domain.com
KC_HTTPS_CERTIFICATE_FILE=/path/to/your/certificate.crt
KC_HTTPS_CERTIFICATE_KEY_FILE=/path/to/your/private.key
For testing only, you can self-sign a cert. Never ship this to production:
openssl req -newkey rsa:2048 -nodes -keyout private.key -x509 -days 365 -out certificate.crtOption B: terminate TLS at a reverse proxy
More commonly, you let a reverse proxy (NGINX, HAProxy, an ingress controller, or a cloud load balancer) handle TLS, then forward traffic to Keycloak. When you do this, tell Keycloak it’s behind a proxy with the proxy-headers option so it reads the forwarded headers correctly:
proxy-headers=xforwarded
hostname=https://auth.your-domain.com
Heads-up on a common change drift point: the old proxy=edge|reencrypt|passthrough option was deprecated and replaced by proxy-headers plus the HTTP/hostname settings. If you’re following a tutorial that still uses proxy=edge, it’s out of date. Only run Keycloak on HTTP behind a proxy if you trust the network between them.
Best practices
- Use a certificate from a trusted CA in production, not a self-signed one.
- Keep your private key secret and rotate certs before they expire.
- Set
hostnameexplicitly so token issuers and redirect URLs are correct.
For full detail, see the official Keycloak guide on configuring TLS and reverse proxy setup.
Citation capsule: Keycloak’s production mode will not start unless TLS is configured or HTTP is explicitly enabled, enforcing encrypted traffic by default (Keycloak Server Guides: Configuring TLS, 2026). The legacy
proxyoption was replaced byproxy-headersin current releases.
3. Wire up SMTP for email
Out of the box, a new realm has no SMTP server configured, so password resets, account verification, and admin notifications silently fail. That’s one of the most common “why isn’t my reset email arriving” support tickets, and the fix is just setting up email. Without it, half of Keycloak’s self-service flows simply don’t work.
Why you should change it:
- User experience: Users can reset passwords and verify their accounts.
- Security: Account recovery and forced re-verification need email.
- Functionality: Several built-in flows depend on a working mail server.
How to adjust:
Email is configured per realm in the Admin Console, not in keycloak.conf:
- Open Realm Settings in the Admin Console.
- Go to the Email tab.
- Enter your SMTP host, port, and credentials.
- Set the From address (and optionally From display name and Reply-To).
- Use Test connection to send yourself a test message.
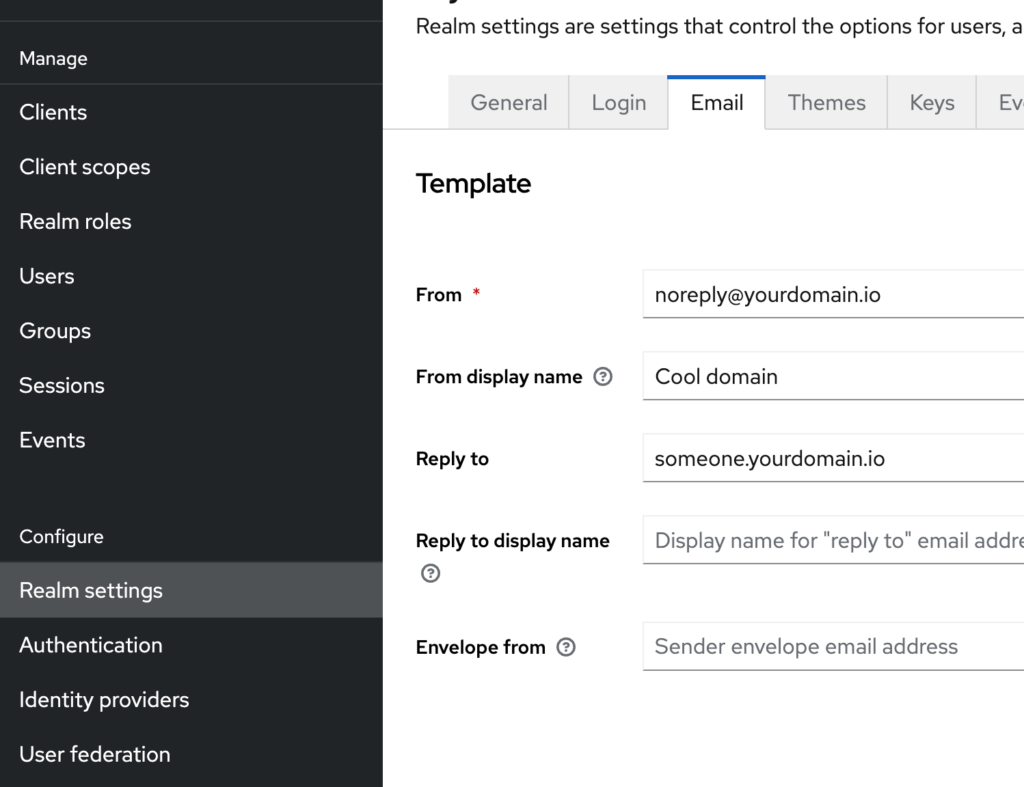
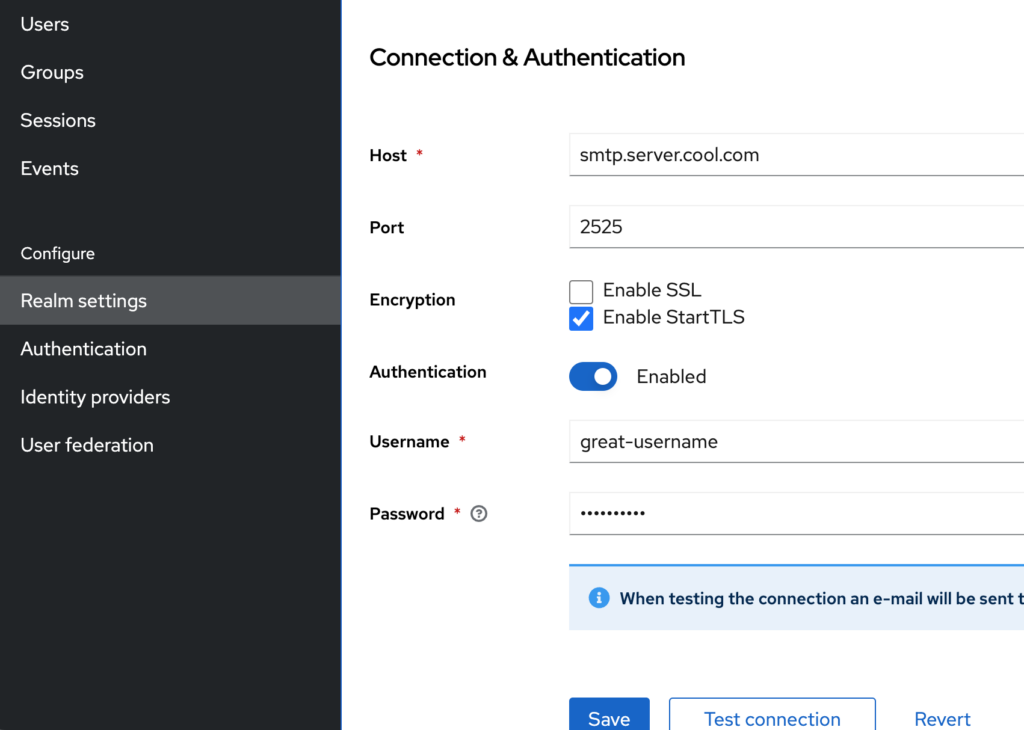
Use a transactional provider like Amazon SES, SendGrid, Mailgun, or Postmark rather than a personal mailbox, since they handle SPF, DKIM, and deliverability for you. Enable SSL or STARTTLS depending on the port your provider expects (465 vs 587). If you have multiple realms, remember each one carries its own email config.
4. Tune session and token lifetimes
Keycloak’s default session management settings are reasonable, but they aren’t tuned for your risk profile. A new realm defaults to a 30-minute SSO session idle, a 10-hour SSO session max, and a 5-minute (300 second) access token lifespan. Those numbers are fine for a generic app, but a banking dashboard and an internal wiki shouldn’t share the same timeouts.
Why you should change it:
- Security: Shorter sessions shrink the window for stolen tokens or hijacked sessions.
- Performance: Sensible offline-session limits keep the session store from bloating.
- User experience: Right-sized timeouts mean fewer surprise logouts.
How to adjust:
Set these per realm under Realm Settings > Sessions and Realm Settings > Tokens in the Admin Console:
- SSO Session Idle / Max: How long a session survives while idle, and its hard cap regardless of activity.
- Client Session Idle / Max: Per-client overrides, useful for a high-sensitivity app inside a shared realm.
- Access Token Lifespan: Keep this short (the 5-minute default is a good baseline). Apps refresh as needed.
- Offline Session Idle / Max: Controls long-lived “remember me” and offline tokens. Cap these deliberately.
Match the numbers to the app, not to a global default. A short access token lifespan plus refresh tokens gives you fast revocation without nagging users. For the full matrix of timeout settings, see the Keycloak server administration docs.
5. Restrict client grant types
When you create a client, Keycloak often enables more capability than that client actually needs. Leaving Direct Access Grants (the password grant) or the legacy implicit flow switched on widens your attack surface for no benefit. The modern best practice from the OAuth 2.0 Security BCP is simple: use the Authorization Code flow with PKCE for user-facing apps and turn off everything else.
Why you should change it:
- Security: The
passwordgrant hands raw credentials to the client app, which is exactly what OAuth was designed to avoid. - Access control: Each client should only enable the flow it genuinely uses.
- Compliance: Tighter grant handling supports standards like SOC 2, GDPR, and PCI DSS.
How to adjust:
- Disable unused flows per client: In the Admin Console, open Clients, pick a client, and under Capability config turn off Direct Access Grants unless you truly need it. The implicit flow is deprecated, so leave Implicit Flow off.
- Use Authorization Code + PKCE: Enable Standard Flow for browser and mobile apps. Set PKCE (
S256) under the client’s Advanced settings. - Use client credentials only for machines: Reserve the
client_credentialsgrant for service-to-service clients with no user. - Scope it down: Assign only the client scopes each client needs, so tokens carry the minimum claims.
Potential attack scenario:
If a public single-page app keeps Direct Access Grants enabled, a phishing page can collect a user’s username and password and replay them straight against the token endpoint, no consent screen, no redirect check. Authorization Code with PKCE removes that path entirely because there’s no password-for-token exchange to abuse.
6. Lock down the admin endpoints
The admin console and admin REST API are the keys to your kingdom, and by default they’re reachable on the same web interface as everything else. That makes them prime targets for brute force and credential stuffing. A few layered controls turn the master realm from low-hanging fruit into a hard target.
Why you should change it:
- Security: Admin endpoints are the highest-value target in your IAM stack.
- Risk mitigation: Layered controls make automated guessing impractical.
- Operational continuity: Stops attackers from quietly altering realms and clients.
How to adjust:
- Separate and restrict admin traffic: In Keycloak 26.x you can serve the admin endpoints on a dedicated port with the
https-management-portoption, then firewall it off or limit it to a VPN or internal network. Filtering admin access by IP belongs at your reverse proxy, ingress, or network layer, not inside Keycloak. Setproxy-headers=xforwardedso Keycloak sees the real client IP behind the proxy. - Require MFA for admins: Under Authentication, bind an OTP or WebAuthn requirement to admin and privileged users. See our overview of multi-factor authentication.
- Turn on brute force detection: Go to Realm Settings > Security Defenses > Brute Force Detection and set max failures, wait increments, and lockout behavior. It’s off by default, so don’t forget it.
- Serve admin over HTTPS only: Combine this with the TLS config from step 2.
Potential attack scenario:
An automated script hammers the master realm login with leaked credentials. With brute force detection, MFA, and network-level IP restrictions stacked together, each layer the attacker clears just leads to the next wall.
For more on the admin endpoint and the master realm, see our guide on securing your Keycloak master realm.
7. Enable audit events
By default, login and admin event persistence is switched off, so the security trail you’ll want during an incident simply isn’t being recorded. Keycloak can log both user events (logins, failed logins, token refreshes) and admin events (config changes), but you have to opt in. Turning on event logging is the difference between “we can see exactly what happened” and “we have no idea.”
Why you should enable it:
- Security: Surfaces unauthorized access attempts and suspicious patterns.
- Compliance: Supports requirements under SOC 2, GDPR, and HIPAA.
- Accountability: Gives you a real audit trail for user and admin activity.
How to adjust:
- Turn on event persistence: In the Admin Console go to Realm Settings > Events, then enable Save Events (user events) and Save Admin Events.
- Pick what to track: Under Event Config, select the event types you care about, such as
LOGIN,LOGIN_ERROR,CODE_TO_TOKEN, and admin operations. - Set a retention policy: Choose an expiration in days so the events table doesn’t grow forever. Balance compliance needs against storage.
- Ship logs off-box: For production, forward events to an external system (ELK, Splunk, Loki, or a cloud log service) so they survive a node loss and are searchable.
Potential attack scenario:
Without persisted events, a slow credential-stuffing run or a quiet admin change can pass completely unnoticed. With event logging on and shipped to a SIEM, those patterns become alerts instead of post-mortems.
For a deeper walkthrough, see our complete guide to Keycloak auditing and event logging.
8. Brand the login theme
The stock Keycloak login screen works, but it looks like Keycloak, not like your product. Users land on a page that doesn’t match your app, and that disconnect chips away at trust right at the moment they’re typing a password. Custom branding closes that gap and makes the login feel like a native part of your experience.
Why you should change it:
- Branding: Aligns login, registration, and account pages with your visual identity.
- User experience: A familiar look reduces drop-off and “is this legit?” hesitation.
- Professionalism: A polished login signals a mature product.
How to adjust:
- Create a new theme folder under the
themes/directory of your Keycloak install (for containers, mount it or bake it into your image). - Start from the
keycloakorbasetheme, and override only the parts you need (logo, colors, templates). - Edit the CSS, FreeMarker templates, and message bundles to match your brand.
- Select your theme per realm under Realm Settings > Themes.
A note on freshness: recent Keycloak releases ship a new account console and admin theme, and the project is actively reworking the theming system. Override sparingly so you’re not fighting upstream changes on every upgrade. For the full reference, see the Keycloak theme development docs.
In our experience running Keycloak for customers, the cleanest upgrades come from teams that override the minimum (logo, colors, a couple of templates) rather than forking an entire theme. Heavy forks tend to break on minor version bumps, which turns every upgrade into a debugging session.
A note on build vs runtime options in Keycloak 26.x
One thing trips up almost everyone moving to the Quarkus distribution: the split between build-time and runtime options. Build-time options (like db, features, and health-enabled) are locked in when you run kc.sh build. Runtime options (like db-url, hostname, and db-password) can change at start. Get this right and your containers boot fast and predictably.
For production, the recommended pattern is: build an optimized server once, then always start it with --optimized:
bin/kc.sh build --db=postgres --features=token-exchange
bin/kc.sh start --optimized --hostname=https://auth.your-domain.com
If you change a build-time option, you must rebuild. If you only change a runtime option, you don’t. Mixing these up is the cause of most “my config didn’t take effect” confusion.
How many resources does a Keycloak cluster need?
Size your cluster by request rate, not by registered user count. The official Keycloak load tests put it at roughly 1 vCPU per 15 password logins per second, plus about 1 vCPU per 120 client-credential grants per second and 1 vCPU per 120 refresh-token requests per second. Add about 150% CPU head-room for spikes, and budget around 1250 MB base RAM per pod (heap is roughly 70% of the limit).
The takeaway: a realm with a million registered users but light, spread-out traffic can run on modest hardware, while a smaller user base hammering logins at peak needs more vCPU. Ignore “X CPU per N users” tables; they’re made up. For the math behind your own cluster, our pricing calculator and plans start from real rate-based sizing.
Frequently asked questions
Do I still need WildFly or standalone.xml to configure Keycloak?
No. The WildFly distribution, standalone.xml/domain.xml, and the /auth/ base path are all end of life and removed from supported Keycloak releases. Current Keycloak (26.x) runs on Quarkus. You configure it with kc.sh, conf/keycloak.conf, and KC_* environment variables, and you build an optimized image for production.
What’s the single most important default to change in Keycloak?
Swapping the embedded H2 database for a production database like PostgreSQL. H2 is documented as development-only, it can’t be shared across cluster nodes, and it won’t hold up under real concurrency. Without an external database you literally can’t run a proper multi-node Keycloak cluster, so this one comes first.
What’s the difference between build-time and runtime options?
Build-time options (db, features, health-enabled) are baked in when you run kc.sh build and require a rebuild to change. Runtime options (db-url, hostname, db-password) can be set at startup. In production you build once, then start with --optimized so Keycloak skips the rebuild and boots faster.
Should I terminate HTTPS on Keycloak or on a reverse proxy?
Either works. Many teams terminate TLS at a reverse proxy, ingress, or load balancer, then forward to Keycloak. If you do, set proxy-headers=xforwarded so Keycloak reads the forwarded client details correctly. Note the old proxy=edge option is deprecated; use proxy-headers plus your hostname settings instead.
How do I size a Keycloak cluster?
Size by request rate, not user count. Keycloak’s load-tested formula is about 1 vCPU per 15 password logins per second, with roughly 1250 MB base RAM per pod and around 150% CPU head-room for bursts. A large but quiet user base needs far less than a small but busy one. Estimate your peak login rate first, then provision.
Are these settings different for a single node versus a cluster?
The same defaults apply, but a few items matter more at cluster scale. You must use an external database (H2 can’t be shared), TLS and hostname config need to be consistent across nodes, and session and event data lives in the shared database. For multi-node specifics, see our cluster configuration best practices.
Conclusion
Keycloak is a powerful IAM platform, but its defaults are tuned for a quick start, not for production. Fix these eight things on day one (the database, HTTPS, email, session and token lifetimes, client grant types, admin endpoint exposure, audit events, and login branding) and you’ve closed the gaps that cause most security and reliability headaches. None of them are hard on their own. The trick is doing them before real users show up, not after an incident.
From there, keep iterating: monitor your event logs, right-size by request rate, and rebuild optimized images as you upgrade. For deeper reference, browse the Keycloak documentation, or skip the infrastructure entirely with Skycloak’s managed Keycloak hosting, where the database, TLS, scaling, and backups are handled for you.