The Keycloak Admin REST API lets you create and manage realms, clients, roles, groups, and users over HTTP, with no clicking through the admin console. Every object you can create in the UI has an endpoint behind it, which means your Keycloak setup can live in a script instead of in someone’s memory.
This guide walks through the whole chain with curl: get an admin token, create a realm, add a client, define a role, create a group, attach a user, and finally pull a user access token to prove the wiring works. Every request here was run against a live Keycloak 26.7 instance on Skycloak.
Note: Some sections are labeled [Optional]. Those commands are not needed to follow the main path. They are included to show the read and delete endpoints for each resource.
You can browse the full Keycloak Admin REST API documentation for every endpoint that exists.
Extend the admin access token expiration time
Before sending any requests, extend the Expiration Time for the Admin Access Token. On the master realm it defaults to just one minute, which is not long enough to work through a tutorial.
- Open a browser and go to skycloak.io.
- Log in to your account.
- Make sure you have a cluster created. If you do not have one, create a new cluster.
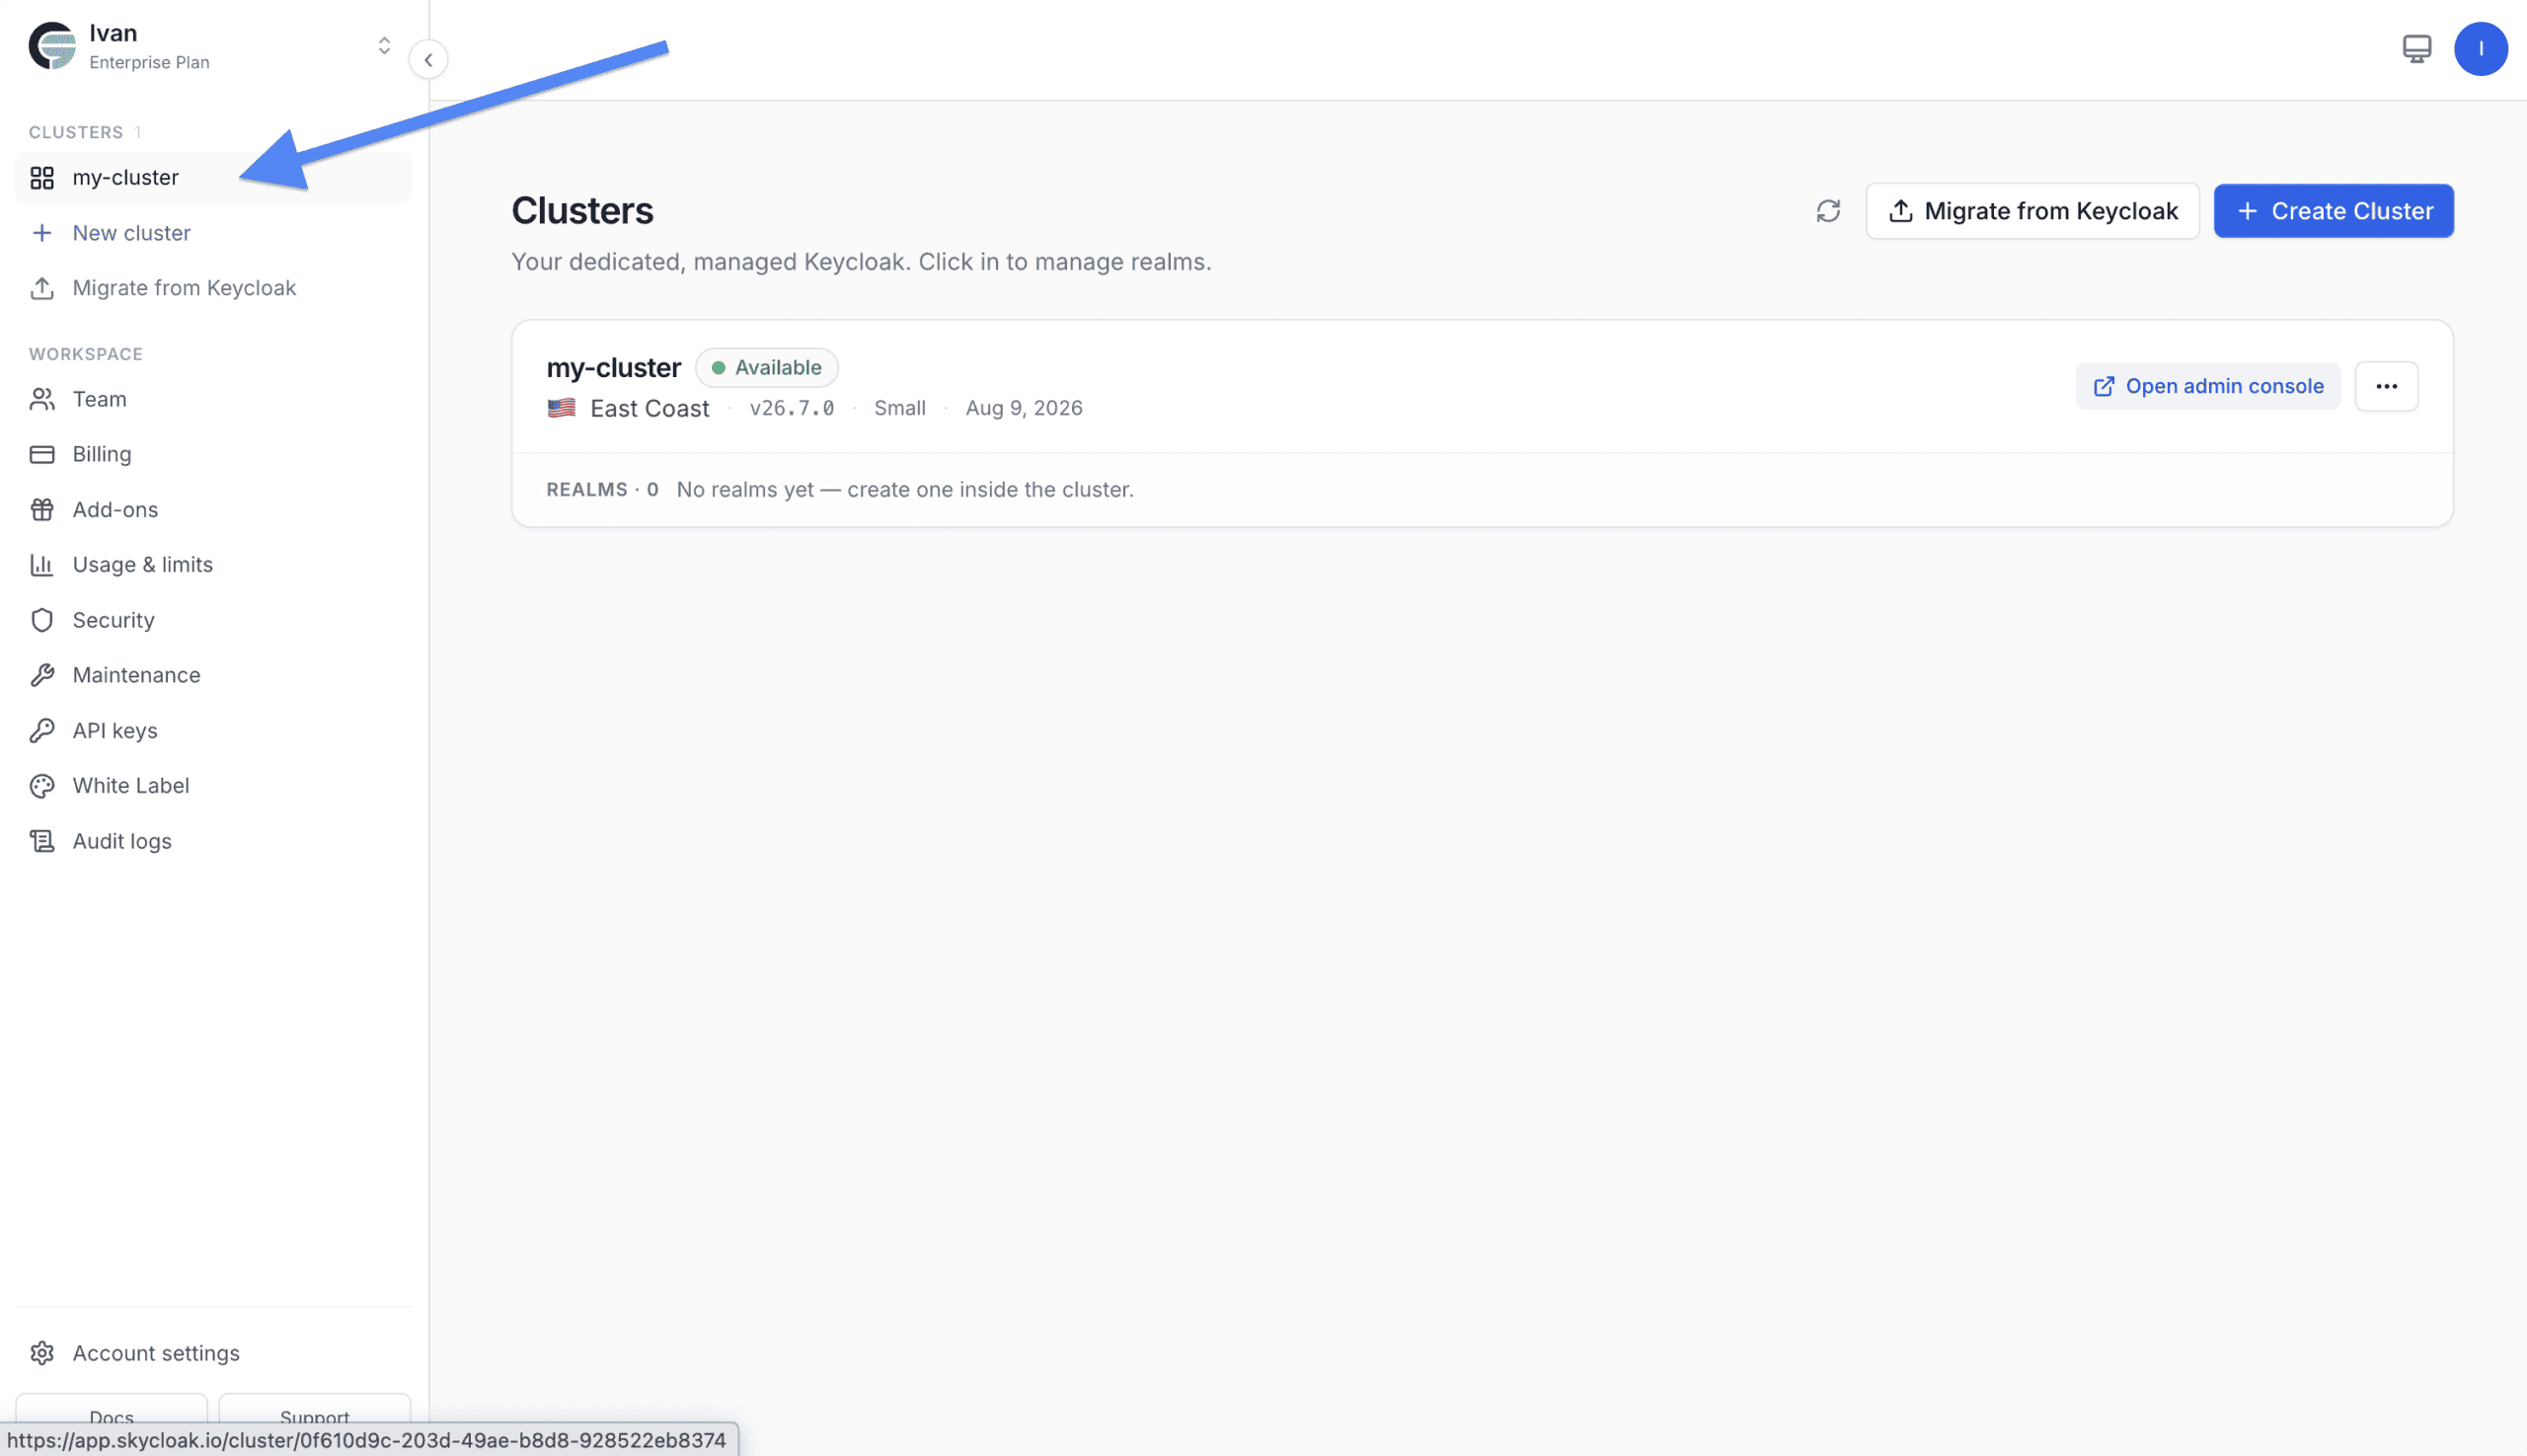
- Click your cluster in the sidebar on the left. Mine is named my-cluster.
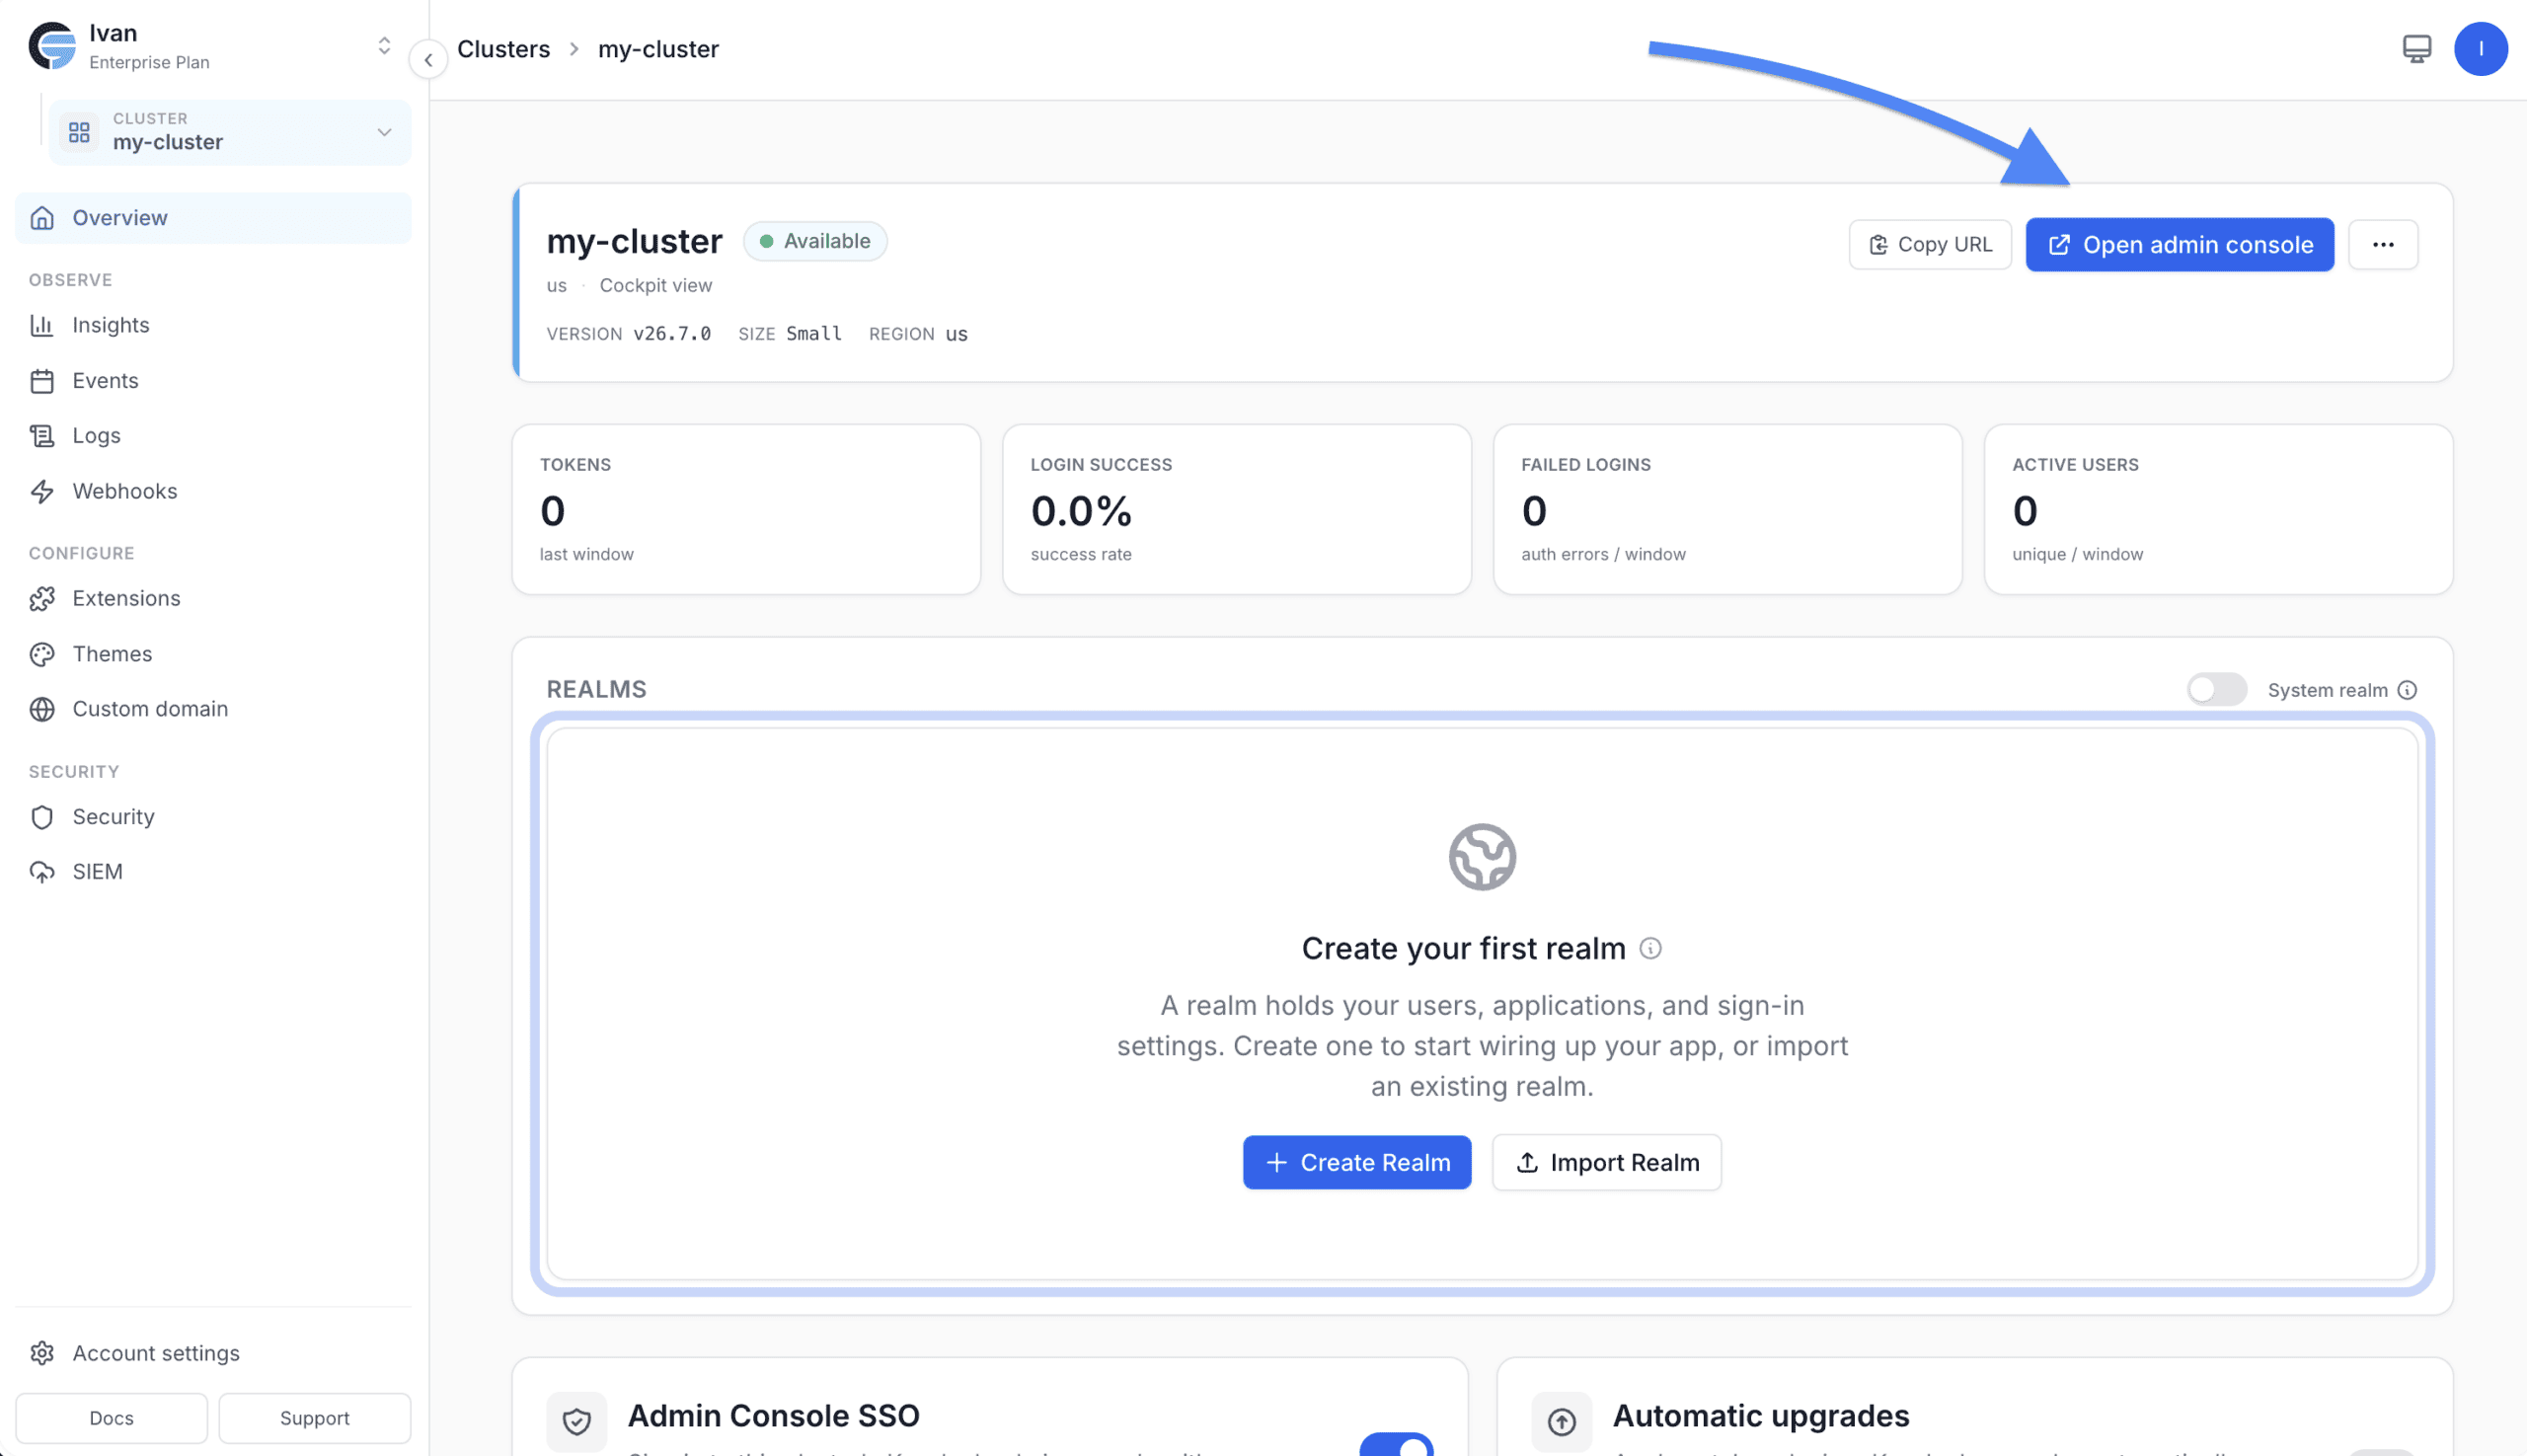
- On the Your Clusters page, click Open Admin Console at the top right.
- Log in to the Keycloak Admin Console with your credentials.
- Select Realm settings in the left menu, under the Configure section.
- On the master realm settings page, open the Tokens tab.
- Find the Access tokens section and set Access Token Lifespan to 30 minutes.
- Click Save.
Set this back when you are done. A 30 minute admin token is a convenience for a tutorial, not a setting to leave on a production cluster. A leaked admin token stays valid for the whole lifespan, so the shorter the better once you are finished. Better still, do this work on a throwaway cluster.
After the lifespan expires, any call to the Admin REST API returns HTTP 401 Unauthorized and you will need a fresh token.
Set credentials for the admin user
- In the Keycloak Admin Console, click Users in the left menu.
- Click the username of your admin user in the User list.
- On the User details page, open the Credentials tab.
- Click Set password.
- In the dialog:
- Enter a new password in the Password field.
- Enter the same value in Password confirmation.
- Turn Temporary off.
- Click Save, then confirm with Save password.
Set the Keycloak host and credentials as environment variables
- Back in the Skycloak dashboard, go to your cluster page.
- Click Copy URL.
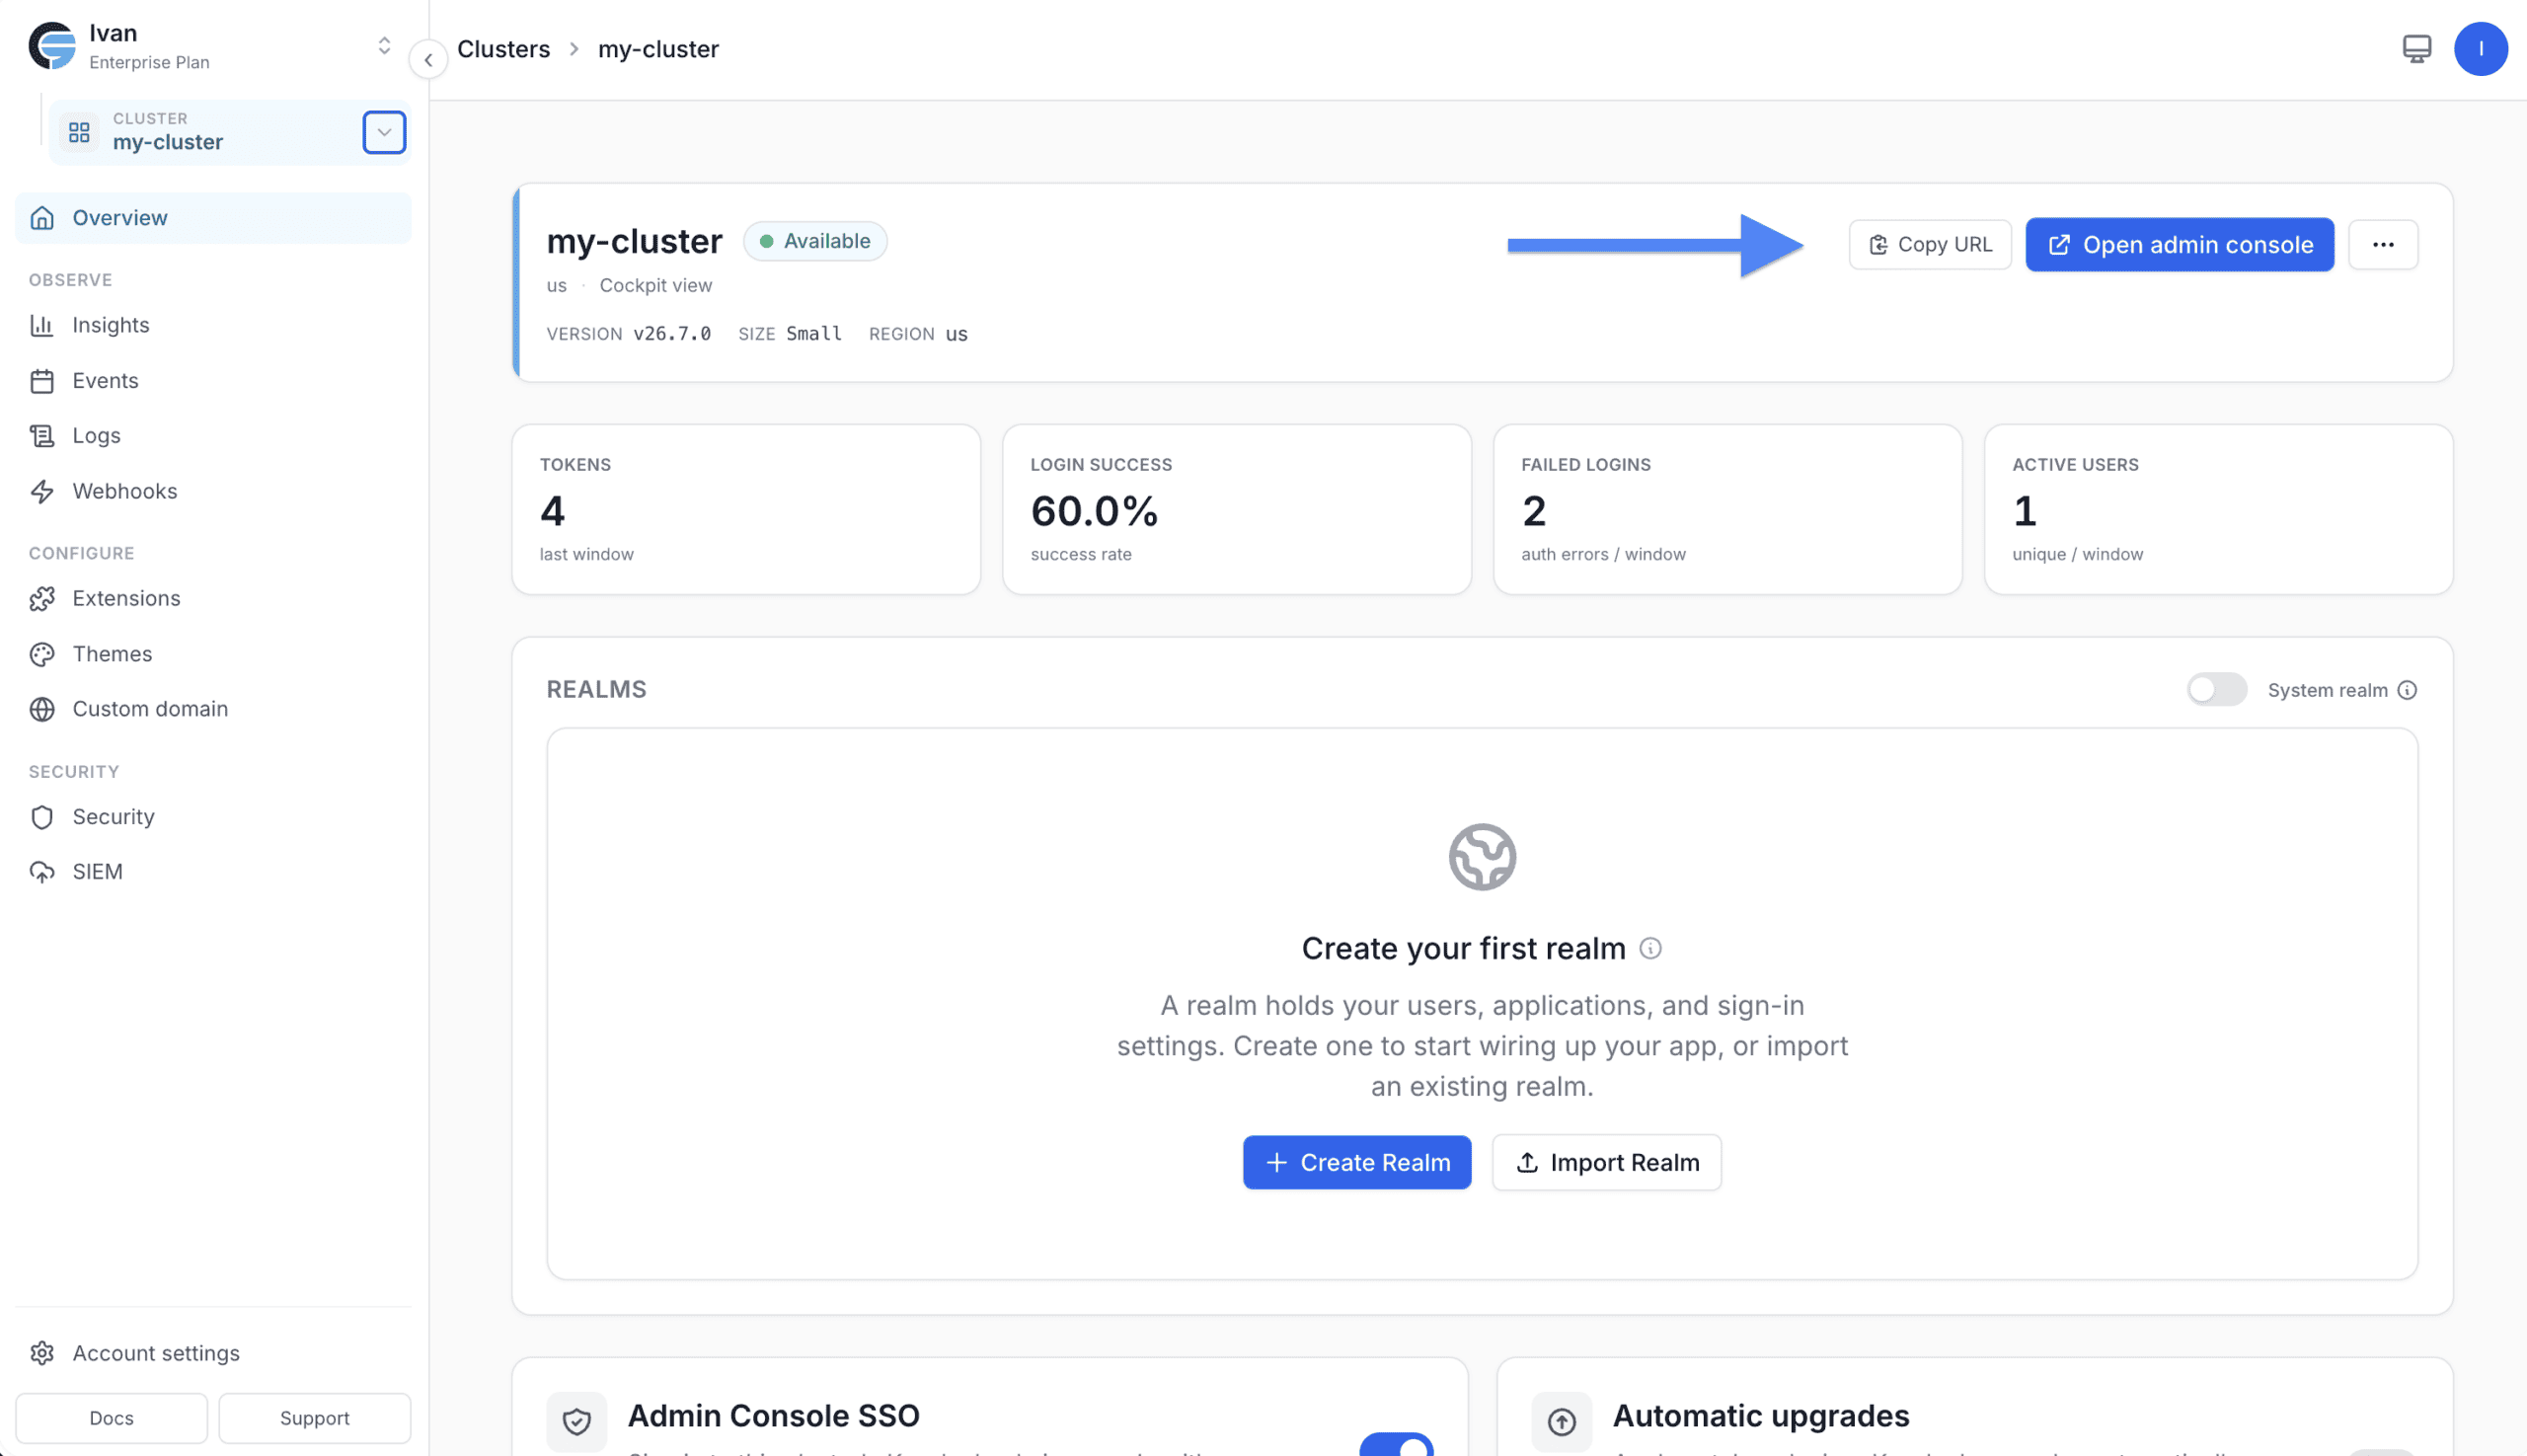
It looks like
https://xxxxxxxx.skycloak.io/admin/master/console/. You only need thehttps://xxxxxxxx.skycloak.iopart. - Open a terminal and export these variables, replacing the placeholders:
KEYCLOAK_HOST_PORT=https://xxxxxxxx.skycloak.io
KEYCLOAK_ADMIN_USERNAME=...
KEYCLOAK_ADMIN_PASSWORD=...
Everything below runs in this terminal.
Get an admin access token
curl -i -X POST "$KEYCLOAK_HOST_PORT/realms/master/protocol/openid-connect/token"
  -H "Content-Type: application/x-www-form-urlencoded"
  -d "username=${KEYCLOAK_ADMIN_USERNAME}"
  -d "password=${KEYCLOAK_ADMIN_PASSWORD}"
  -d 'grant_type=password'
  -d 'client_id=admin-cli'
The response looks like this:
HTTP/2 200
...
{
    "access_token": "eyJhbGciOiJSUzI1NiIsInR5cCIgOiA...",
    "expires_in": 1800,
    "refresh_expires_in": 1800,
    "refresh_token": "eyJhbGciOiJIUzUxMiIsInR5cCIgOiAi...",
    "token_type": "Bearer",
    "not-before-policy": 0,
    "session_state": "wyjNKv..",
    "scope": "email profile"
}
Note expires_in: 1800, the 30 minutes set earlier.
About
grant_type=password: this is the Resource Owner Password Credentials grant. It is convenient for scripts againstadmin-cliand it is what most Keycloak tutorials use, but it is on its way out. OAuth 2.1 drops it entirely, RFC 9700 says it must not be used, and Keycloak deprecated the grant in 26.2. It hands the user’s password straight to the client. For anything automated and long lived, create a dedicated client with service accounts enabled and usegrant_type=client_credentialsinstead. That service account also needs the relevantrealm-managementclient roles, such asview-usersandmanage-users, or every admin call comes back403 Forbidden.
Copy the access_token value into an environment variable, since nearly every request below needs it:
ADMIN_ACCESS_TOKEN=...Manage a realm
Create the realm “my-realm”
Create a realm named my-realm with enabled set to true:
curl -i -X POST "$KEYCLOAK_HOST_PORT/admin/realms"
  -H "Authorization: Bearer $ADMIN_ACCESS_TOKEN"
  -H "Content-Type: application/json"
  -d '{"realm": "my-realm", "enabled": true}'
Response:
HTTP/2 201
...
Update the realm “my-realm”
Set registrationAllowed to true:
curl -i -X PUT "$KEYCLOAK_HOST_PORT/admin/realms/my-realm"
  -H "Authorization: Bearer $ADMIN_ACCESS_TOKEN"
  -H "Content-Type: application/json"
  -d '{"registrationAllowed": true}'
Response:
HTTP/2 204
...
[Optional] Retrieve all realms
curl -i "$KEYCLOAK_HOST_PORT/admin/realms"
  -H "Authorization: Bearer $ADMIN_ACCESS_TOKEN"
If you have a lot of realms, users, or clients, this is where pagination matters. See Admin API pagination and bulk operations for the first and max parameters and how to get accurate total counts.
[Optional] Retrieve the realm “my-realm”
curl -i "$KEYCLOAK_HOST_PORT/admin/realms/my-realm"
  -H "Authorization: Bearer $ADMIN_ACCESS_TOKEN"
[Optional] Delete the realm “my-realm”
curl -i -X DELETE "$KEYCLOAK_HOST_PORT/admin/realms/my-realm"
  -H "Authorization: Bearer $ADMIN_ACCESS_TOKEN"
Manage a client
This assumes you created the realm my-realm above.
Create the client “my-client”
Create a client named my-client with redirectUris set to http://localhost:8080/*:
curl -i -X POST "$KEYCLOAK_HOST_PORT/admin/realms/my-realm/clients"
  -H "Authorization: Bearer $ADMIN_ACCESS_TOKEN"
  -H "Content-Type: application/json"
  -d '{"clientId": "my-client", "redirectUris": ["http://localhost:8080/*"]}'
Response:
HTTP/2 201
location: https://xxxxxxxx.skycloak.io/admin/realms/my-realm/clients/<my-client-id-generated-by-keycloak>
...
The client ID is in the Location header. Copy it into an environment variable:
MY_CLIENT_ID=<my-client-id-generated-by-keycloak>Update the client “my-client”
Set directAccessGrantsEnabled to true, which is what lets us request a user token later:
curl -i -X PUT "$KEYCLOAK_HOST_PORT/admin/realms/my-realm/clients/$MY_CLIENT_ID"
  -H "Authorization: Bearer $ADMIN_ACCESS_TOKEN"
  -H "Content-Type: application/json"
  -d '{"directAccessGrantsEnabled": true}'
Response:
HTTP/2 204
...
[Optional] Retrieve all clients
curl -i "$KEYCLOAK_HOST_PORT/admin/realms/my-realm/clients"
  -H "Authorization: Bearer $ADMIN_ACCESS_TOKEN"
[Optional] Retrieve the client “my-client”
curl -i "$KEYCLOAK_HOST_PORT/admin/realms/my-realm/clients/$MY_CLIENT_ID"
  -H "Authorization: Bearer $ADMIN_ACCESS_TOKEN"
[Optional] Delete the client “my-client”
curl -i -X DELETE "$KEYCLOAK_HOST_PORT/admin/realms/my-realm/clients/$MY_CLIENT_ID"
  -H "Authorization: Bearer $ADMIN_ACCESS_TOKEN"
Manage a client role
This assumes you created the realm my-realm and the client my-client.
Create the client role “MY_ROLE”
curl -i -X POST "$KEYCLOAK_HOST_PORT/admin/realms/my-realm/clients/$MY_CLIENT_ID/roles"
  -H "Authorization: Bearer $ADMIN_ACCESS_TOKEN"
  -H "Content-Type: application/json"
  -d '{"name": "MY_ROLE"}'
Response:
HTTP/2 201
...
[Optional] Retrieve all roles of the client “my-client”
curl -i "$KEYCLOAK_HOST_PORT/admin/realms/my-realm/clients/$MY_CLIENT_ID/roles"
  -H "Authorization: Bearer $ADMIN_ACCESS_TOKEN"
[Optional] Retrieve the role “MY_ROLE”
curl -i "$KEYCLOAK_HOST_PORT/admin/realms/my-realm/clients/$MY_CLIENT_ID/roles/MY_ROLE"
  -H "Authorization: Bearer $ADMIN_ACCESS_TOKEN"
[Optional] Delete the role “MY_ROLE”
curl -i -X DELETE "$KEYCLOAK_HOST_PORT/admin/realms/my-realm/clients/$MY_CLIENT_ID/roles/MY_ROLE"
  -H "Authorization: Bearer $ADMIN_ACCESS_TOKEN"
Manage a group
This assumes you created the realm my-realm, the client my-client, and the client role MY_ROLE.
Create the group “MY_GROUP”
curl -i -X POST "$KEYCLOAK_HOST_PORT/admin/realms/my-realm/groups"
  -H "Authorization: Bearer $ADMIN_ACCESS_TOKEN"
  -H "Content-Type: application/json"
  -d '{"name": "MY_GROUP"}'
Response:
HTTP/2 201
Location: https://xxxxxxxx.skycloak.io/admin/realms/my-realm/groups/<my-group-id-generated-by-keycloak>
...
Copy the group ID from the Location header:
MY_GROUP_ID=<my-group-id-generated-by-keycloak>Assign the client role “MY_ROLE” to the group “MY_GROUP”
Assigning a role to a group instead of to each user is what makes this scale. Every member of the group inherits the role, and you manage membership in one place.
First retrieve the role, because the mapping call needs the role’s internal id:
curl -i "$KEYCLOAK_HOST_PORT/admin/realms/my-realm/clients/$MY_CLIENT_ID/roles/MY_ROLE"
  -H "Authorization: Bearer $ADMIN_ACCESS_TOKEN"
Response:
{"id":"<my-role-id-generated-by-keycloak>","name":"MY_ROLE",...}Copy the id field:
MY_ROLE_ID=<my-role-id-generated-by-keycloak>Then perform the assignment:
curl -i -X POST "$KEYCLOAK_HOST_PORT/admin/realms/my-realm/groups/$MY_GROUP_ID/role-mappings/clients/$MY_CLIENT_ID"
  -H "Authorization: Bearer $ADMIN_ACCESS_TOKEN"
  -H "Content-Type: application/json"
  -d '[{"id": "'"$MY_ROLE_ID"'", "name": "MY_ROLE"}]'
Response:
HTTP/2 204
...
[Optional] Retrieve all groups
curl -i "$KEYCLOAK_HOST_PORT/admin/realms/my-realm/groups"
  -H "Authorization: Bearer $ADMIN_ACCESS_TOKEN"
[Optional] Retrieve the group “MY_GROUP”
curl -i "$KEYCLOAK_HOST_PORT/admin/realms/my-realm/groups/$MY_GROUP_ID"
  -H "Authorization: Bearer $ADMIN_ACCESS_TOKEN"
[Optional] Delete the group “MY_GROUP”
curl -i -X DELETE "$KEYCLOAK_HOST_PORT/admin/realms/my-realm/groups/$MY_GROUP_ID"
  -H "Authorization: Bearer $ADMIN_ACCESS_TOKEN"
Manage a user
This assumes you created the realm my-realm, the client my-client, the client role MY_ROLE, and the group MY_GROUP.
Create the user “my-user”
Set the password in an environment variable first. Use a strong one:
MY_USER_PASSWORD=<my-user-password>Then create the user:
curl -i -X POST "$KEYCLOAK_HOST_PORT/admin/realms/my-realm/users"
  -H "Authorization: Bearer $ADMIN_ACCESS_TOKEN"
  -H "Content-Type: application/json"
  -d '{"username": "my-user", "enabled": true, "credentials": [{"type": "password", "value": "'"$MY_USER_PASSWORD"'", "temporary": false}]}'
Response:
HTTP/2 201
Location: https://xxxxxxxx.skycloak.io/admin/realms/my-realm/users/<my-user-id-generated-by-keycloak>
...
Copy the user ID from the Location header:
MY_USER_ID=<my-user-id-generated-by-keycloak>Update the user “my-user”
Set the email property:
curl -i -X PUT "$KEYCLOAK_HOST_PORT/admin/realms/my-realm/users/$MY_USER_ID"
  -H "Authorization: Bearer $ADMIN_ACCESS_TOKEN"
  -H "Content-Type: application/json"
  -d '{"email": "my-user@test.com"}'
Response:
HTTP/2 204
...
User updates do not merge on Keycloak 24 and later. This works here only because my-user was created with nothing but a username. If your user already has a
firstNameandlastName, an email-onlyPUTclears them, which re-triggers the Verify Profile required action and breaks the token request later in this guide. Send the full user representation on every user update.
[Optional] Retrieve all users
curl -i "$KEYCLOAK_HOST_PORT/admin/realms/my-realm/users"
  -H "Authorization: Bearer $ADMIN_ACCESS_TOKEN"
[Optional] Retrieve the user “my-user”
curl -i "$KEYCLOAK_HOST_PORT/admin/realms/my-realm/users/$MY_USER_ID"
  -H "Authorization: Bearer $ADMIN_ACCESS_TOKEN"
Assign the group “MY_GROUP” to the user “my-user”
curl -i -X PUT "$KEYCLOAK_HOST_PORT/admin/realms/my-realm/users/$MY_USER_ID/groups/$MY_GROUP_ID"
  -H "Authorization: Bearer $ADMIN_ACCESS_TOKEN"
Response:
HTTP/2 204
...
[Optional] Get the groups of “my-user”
curl -i "$KEYCLOAK_HOST_PORT/admin/realms/my-realm/users/$MY_USER_ID/groups"
  -H "Authorization: Bearer $ADMIN_ACCESS_TOKEN"
[Optional] Delete the user “my-user”
curl -i -X DELETE "$KEYCLOAK_HOST_PORT/admin/realms/my-realm/users/$MY_USER_ID"
  -H "Authorization: Bearer $ADMIN_ACCESS_TOKEN"
Get a user access token
This assumes you created the realm my-realm, the client my-client, the client role MY_ROLE, the group MY_GROUP, and the user my-user.
Get the secret of the client “my-client”
curl -i "$KEYCLOAK_HOST_PORT/admin/realms/my-realm/clients/$MY_CLIENT_ID/client-secret"
  -H "Authorization: Bearer $ADMIN_ACCESS_TOKEN"
Response:
{"type":"secret","value":"<my-client-secret-generated-by-keycloak>"}Copy the value field:
MY_CLIENT_SECRET=<my-client-secret-generated-by-keycloak>Disable the Verify Profile required action
For testing, disable the Verify Profile required action. Without this, the token request in the next step fails because the user is prompted to complete their profile first:
curl -i -X PUT "$KEYCLOAK_HOST_PORT/admin/realms/my-realm/authentication/required-actions/VERIFY_PROFILE"
  -H "Authorization: Bearer $ADMIN_ACCESS_TOKEN"
  -H "Content-Type: application/json"
  -d '{"alias": "VERIFY_PROFILE", "name": "Verify Profile", "providerId": "VERIFY_PROFILE", "enabled": false, "defaultAction": false, "priority": 90, "config": {}}'
Response:
HTTP/2 204
...
The cleaner alternative, if you do not want to weaken the realm, is to set firstName, lastName, and email on the user when you create it, which satisfies the profile requirement without disabling anything.
Get the “my-user” access token
curl -i -X POST "$KEYCLOAK_HOST_PORT/realms/my-realm/protocol/openid-connect/token"
  -H "Content-Type: application/x-www-form-urlencoded"
  -d "username=my-user"
  -d "password=$MY_USER_PASSWORD"
  -d "grant_type=password"
  -d "client_secret=$MY_CLIENT_SECRET"
  -d "client_id=my-client"
Response:
HTTP/2 200
...
{
    "access_token": "eyJhbGciOiJSUzI1NiIsInR5cCIgOiAi...",
    "expires_in": 300,
    "refresh_expires_in": 1800,
    "refresh_token": "eyJhbGciOiJIUzUxMiIsInR5cCIgOiAi...",
    "token_type": "Bearer",
    "not-before-policy": 0,
    "session_state": "_tYhrCx0LZl7ykLnZvSkgp9V",
    "scope": "email profile"
}
Decode the access token with the Skycloak JWT Token Analyzer. The header and payload look like this:
Header:
{
  "alg": "RS256",
  "typ": "JWT",
  "kid": "Up-lNtCnF3dA1jk..."
}
Payload:
{
  "exp": 1786279370,
  "iat": 1786279070,
  "jti": "onrtro:cc9473d6-2813-7015-bb76-8407172ba633",
  "iss": "https://xxxxxxxx.skycloak.io/realms/my-realm",
  "aud": "account",
  "sub": "145d40e2-78c7-4a2c-897b-d01b92e24c6a",
  "typ": "Bearer",
  "azp": "my-client",
  "sid": "L8jI4MFwMyuLKrddhppXlHCC",
  "acr": "1",
  "allowed-origins": [
    "http://localhost:8080"
  ],
  "realm_access": {
    "roles": [
      "offline_access",
      "uma_authorization",
      "default-roles-my-realm"
    ]
  },
  "resource_access": {
    "my-client": {
      "roles": [
        "MY_ROLE"
      ]
    },
    "account": {
      "roles": [
        "manage-account",
        "manage-account-links",
        "view-profile"
      ]
    }
  },
  "scope": "profile email",
  "email_verified": false,
  "preferred_username": "my-user",
  "email": "my-user@test.com"
}
The important line is resource_access.my-client.roles, which contains MY_ROLE. The user never had that role assigned directly. It arrived through MY_GROUP, which proves the group role mapping worked.
Frequently asked questions
What is the base URL of the Keycloak Admin REST API?
It is https://<your-keycloak-host>/admin/realms. Since Keycloak 17, the old /auth path prefix is gone, so any tutorial using https://<host>/auth/admin/realms is written for a legacy version.
Why do I get 401 Unauthorized on every Admin API request?
Most often the admin access token expired. On the master realm it lasts only one minute by default, so a token you fetched a few minutes ago is already dead. Request a fresh one, or raise Access Token Lifespan in Realm settings > Tokens while you work.
How do I find the internal ID of a client, group, or role?
Keycloak returns it in the Location header of the 201 response when you create the object. If you did not keep it, list the collection and read the id field. Note that a client has both a clientId (the name you chose) and an id (the UUID Keycloak generated), and Admin API paths use the UUID.
Can I update just one field, or do I have to send the whole object?
It depends on the resource. Realms and clients merge a partial body and leave unset fields alone, which is why {"registrationAllowed": true} works on a realm without wiping the rest of its configuration.
Users are the exception. Since Keycloak 24, partial update of user attributes through the Admin API is no longer supported, so a PUT on a user clears any of firstName, lastName, or email you leave out of the body. Always send the full user representation when updating a user.
Should I use the Admin REST API or Terraform?
Use the API for one-off tasks, scripts, and anything dynamic such as creating a user on signup. Use Terraform when the configuration is something you want version controlled and reproducible across environments. The two work well together: Terraform for the durable structure, the API for what happens at runtime.
Does this work the same on managed Keycloak?
Yes. The Admin REST API is standard Keycloak, so every request here works the same on a managed instance. On Skycloak you point KEYCLOAK_HOST_PORT at your cluster URL and nothing else changes. Skycloak also exposes its own platform API for the layer above Keycloak, such as creating and scaling clusters.
Conclusion
We used the Keycloak Admin REST API to create a realm, a client, a client role, a group, and a user, wired the role to the user through the group, and then requested an access token that proved the whole chain.
Driving these tasks through the API instead of the console means you can:
- Set Keycloak up the same way in every environment
- Avoid the mistakes that come from clicking through forms
- Put realm configuration into CI/CD alongside the rest of your infrastructure
From here, Admin API pagination and bulk operations covers what changes once you are working with thousands of users rather than one, and the Skycloak Terraform provider covers the same configuration as version controlled code.