
Last updated: March 2026
I recently received the question: Can I use the Master Realm for my users? Let’s dive in to figure out whether it’s a good idea.
TL;DR: No with some proof.
Keycloak, a widely-used Identity and Access Management (IAM) solution, offers powerful capabilities for authenticating and managing users in your applications. One concept at the core of Keycloak’s design is the “realm.” Realms in Keycloak help to partition the system to support multi-tenancy. But there’s one realm that stands out from the others: the Master realm.
What is the Master Realm?
The Master realm is the default realm created when Keycloak is first set up. It’s essentially the administrative space containing configurations for the Keycloak instance itself, including realms, clients, and user management. Think of the Master realm as the control panel for the Keycloak server.
Should I Use the Master Realm for My Users?
It might be tempting to use the Master realm for your users due to its default presence and full range of capabilities. However, this is generally discouraged for several reasons:
- Security Risks: The Master realm has elevated privileges that are necessary for administering the entire Keycloak instance. By adding regular users to this realm, you could inadvertently grant them access to sensitive areas, posing a significant security risk.
- Best Practices: Keycloak advocates for the separation of concerns. The Master realm is intended solely for administration purposes, not for regular user management or authentication services.
- Scalability and Organization: Utilizing separate realms allows for better organization and scalability. As your application or organization grows, managing users, roles, clients, and permissions becomes more complex. Segregating users into different realms can help manage this complexity efficiently.
Best Practices for Using Realms in Keycloak
Instead of using the Master realm for regular users, follow these best practices:
- Create Dedicated Realms: For each application or user group, create a dedicated realm. This approach enhances security and allows for custom configurations tailored to each group’s needs.
- Use Fine-Grained Permissions: In the realms that you create for your users, employ fine-grained permissions to ensure users have only the access they require. This principle of least privilege helps to reduce the risk of security breaches. See our RBAC features for how Skycloak simplifies role-based access control.
- Centralize Administration: While separating user spaces, maintain a centralized administrative approach using the Master realm. This method keeps your Keycloak instance’s management organized and secure.
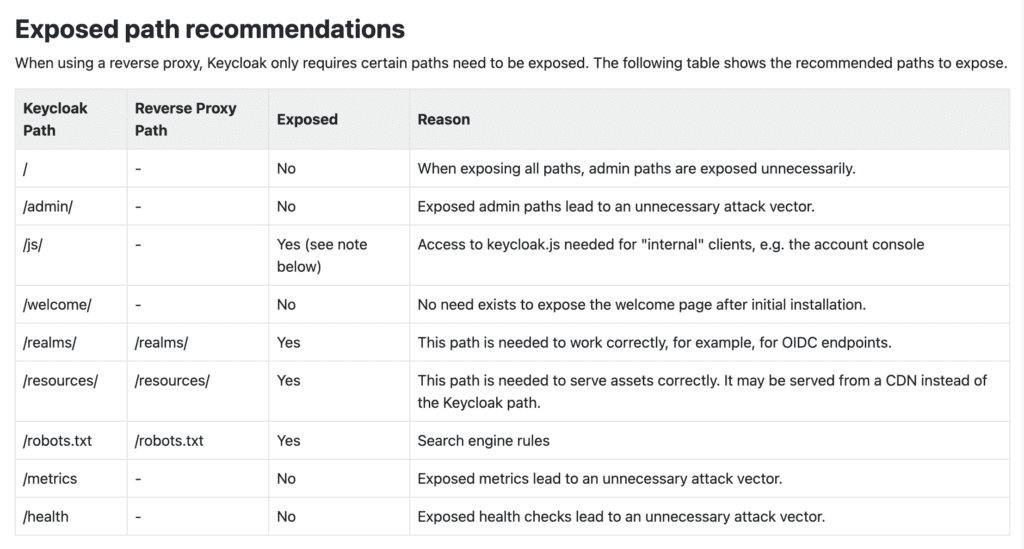
- Restrict Public Access to the Master Realm: For additional security, ensure that the path to the Master realm is not publicly accessible. Instead, it should only be accessible through private networks or secure VPNs. You can start by setting Keycloak behind a proxy. See the image below for some recommendations from Keycloak on what to allow and what to block.
- Regularly Review and Audit: Regularly review the configurations and permissions in all realms, including the Master realm, to ensure they are up-to-date and adhere to your security policies. Use audit logging to track changes and access events.
Blocking External Access to the Master Realm with Nginx
One of the most effective ways to protect the Master realm is to block external access at the reverse proxy level. Here is an Nginx configuration snippet that restricts access to the Master realm admin console to internal networks only:
server {
    listen 443 ssl;
    server_name keycloak.example.com;

    # SSL configuration
    ssl_certificate /etc/nginx/ssl/cert.pem;
    ssl_certificate_key /etc/nginx/ssl/key.pem;

    # Block external access to master realm admin paths
    location ~* ^/(auth/)?admin/master/ {
        allow 10.0.0.0/8;      # Internal network
        allow 172.16.0.0/12;   # Docker networks
        allow 192.168.0.0/16;  # Private networks
        deny all;

        proxy_pass http://keycloak-backend;
        proxy_set_header Host $host;
        proxy_set_header X-Real-IP $remote_addr;
        proxy_set_header X-Forwarded-For $proxy_add_x_forwarded_for;
        proxy_set_header X-Forwarded-Proto $scheme;
    }

    # Block direct access to master realm login page
    location ~* ^/(auth/)?realms/master/protocol/ {
        allow 10.0.0.0/8;
        allow 172.16.0.0/12;
        allow 192.168.0.0/16;
        deny all;

        proxy_pass http://keycloak-backend;
        proxy_set_header Host $host;
        proxy_set_header X-Real-IP $remote_addr;
        proxy_set_header X-Forwarded-For $proxy_add_x_forwarded_for;
        proxy_set_header X-Forwarded-Proto $scheme;
    }

    # Allow access to other realms
    location / {
        proxy_pass http://keycloak-backend;
        proxy_set_header Host $host;
        proxy_set_header X-Real-IP $remote_addr;
        proxy_set_header X-Forwarded-For $proxy_add_x_forwarded_for;
        proxy_set_header X-Forwarded-Proto $scheme;
    }
}
This configuration ensures that only requests from internal IP ranges can reach the Master realm admin interface, while all other realms remain accessible to the public.
Hardening the Master Realm Configuration
Beyond blocking external access, you should also harden the Master realm configuration within Keycloak itself:
Disable User Registration
In the Admin Console, navigate to Realm Settings > Login for the Master realm and ensure the following settings:
- User Registration: OFF
- Forgot Password: OFF (for the Master realm only)
- Remember Me: OFF
Enforce a Strong Password Policy
Under Authentication > Password Policy, add the following rules for the Master realm:
- Minimum Length: 14 characters
- Uppercase Characters: At least 1
- Lowercase Characters: At least 1
- Digits: At least 1
- Special Characters: At least 1
- Not Recently Used: Last 5 passwords
- Password Expiration: 90 days (or per your organization’s policy)
Enable Brute Force Detection
Navigate to Realm Settings > Security Defenses > Brute Force Detection and configure:
- Enabled: ON
- Max Login Failures: 3
- Wait Increment: 60 seconds
- Max Wait: 15 minutes
Limit Admin User Accounts
Keep the number of admin accounts in the Master realm to an absolute minimum. Follow the principle of least privilege — create realm-specific admin roles in each tenant realm rather than granting master realm access.
Monitoring Recommendations
Securing the Master realm is not a one-time activity. Ongoing monitoring is essential:
- Enable Event Logging: In the Master realm, navigate to Events > Config and enable both Login Events and Admin Events. Enable “Include Representation” for admin events to capture the full details of configuration changes.
- Set Up Alerts: Configure your monitoring system to alert on failed login attempts to the Master realm, especially from external IP addresses. Multiple failures in a short window should trigger an immediate investigation.
- Forward Events to a SIEM: Export Keycloak events to a centralized logging platform (ELK, Splunk, Datadog) for long-term retention and analysis. See our guides on forwarding Keycloak events to SIEM via HTTP webhook and integrating security logs using syslog.
- Regular Access Reviews: Conduct quarterly reviews of all accounts with access to the Master realm. Remove any accounts that no longer require administrative access.
For a broader look at hardening your Keycloak deployment, see our post on 8 default configurations to adjust right away on your Keycloak cluster.
Conclusion
While Keycloak’s Master realm is powerful and essential for the overall management of your Keycloak instance, it is not designed for handling regular users. Creating separate realms for different user groups or applications is a more secure and organized approach that adheres to best practices in identity and access management.
Remember, the goal is to make your IAM solution work for you in the most effective and secure way possible. By following the recommendations outlined in this post, you can leverage Keycloak’s capabilities while maintaining a robust security posture.
If you want to skip the operational complexity of securing and maintaining Keycloak yourself, Skycloak’s managed hosting handles all of these security hardening measures for you, with built-in monitoring, high availability, and SLA guarantees. Check out the documentation to learn more.

Ready to simplify your authentication?
Deploy production-ready Keycloak in minutes. Unlimited users, flat pricing, no SSO tax.


