
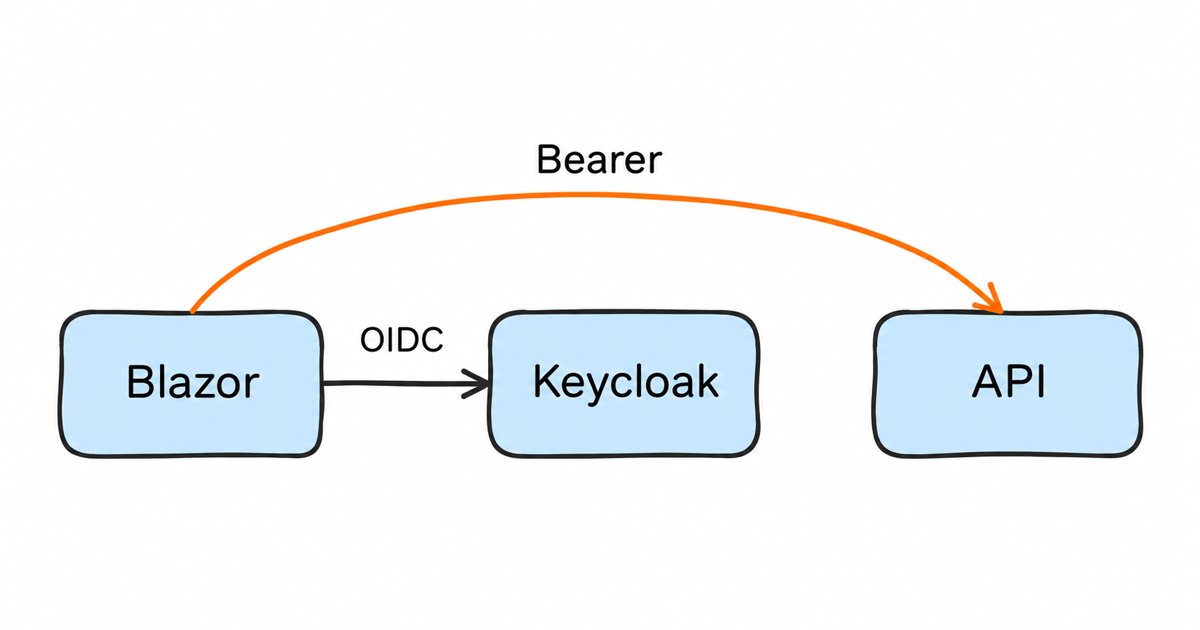
Keycloak Authentication in Blazor: Server, WASM and Web App. Add Keycloak login to Blazor on .NET 10: client settings, role mapping, token refresh, logout and API calls for Blazor Web App, Server and WebAssembly.
To add Keycloak login to Blazor, create an OpenID Connect (OIDC) client in your realm, then point Microsoft’s OpenID Connect handler (Blazor Web App or Blazor Server) or the WebAssembly authentication library (standalone WebAssembly, as a public client with PKCE) at the realm’s discovery URL. Then map Keycloak’s realm_access roles to .NET role claims so [Authorize(Roles = "...")] and AuthorizeView work.
Key Takeaways
- Blazor Web App and Blazor Server sign in on the server with ASP.NET Core’s OpenID Connect handler and a confidential Keycloak client, and keep the tokens in the server’s cookie.
- Standalone Blazor WebAssembly signs in from the browser with Microsoft’s WebAssembly authentication library and a public Keycloak client with PKCE.
- Add an Audience mapper so your API accepts the access token, and add realm role mappers to the ID token so
[Authorize(Roles = "...")]can see the roles.- Log out through Keycloak’s end-session endpoint, not only the local cookie.
No Keycloak-specific .NET package is involved: both sides speak plain OIDC. The work is in the details that Microsoft’s guides leave to the identity provider, and this post covers them for each hosting model: which kind of Keycloak client each one needs, the audience mapper that lets your API accept the token, role mapping, token refresh, logout, and calling a protected API. The code is written for .NET 10, a long-term support release (Microsoft’s .NET support policy lists .NET 10 as LTS, released November 11, 2025). Where .NET 8 differs, we say so. See also Keycloak Authentication in ASP.NET Core (.NET 8).
Which Keycloak client does each Blazor hosting model need?
Blazor runs your components either on the server, in the browser through WebAssembly, or both, and that decides where the tokens live and what kind of Keycloak client you register. Keycloak calls a client with Client authentication on a confidential client, meant “for server-side clients that perform browser logins and require client secrets”, and a client with it off a public client, “for client-side clients that perform browser logins”.
| Hosting model | Where login runs | Keycloak client | Where tokens live |
|---|---|---|---|
| Blazor Web App (.NET 8 and later, mixed render modes) | ASP.NET Core OIDC handler on the server | Confidential, with a secret | On the server, saved in the authentication cookie |
| Blazor Server (Interactive Server only) | ASP.NET Core OIDC handler on the server | Confidential, with a secret | On the server, saved in the authentication cookie |
| Standalone Blazor WebAssembly | Microsoft.AspNetCore.Components.WebAssembly.Authentication in the browser |
Public, PKCE required | In the browser |
With PKCE (Proof Key for Code Exchange), the app sends the code to the token endpoint with what RFC 7636 calls “a dynamically created cryptographically random key called ‘code verifier’”, and Keycloak’s docs say that if an attacker steals a client’s authorization code, PKCE “prevents the attacker from receiving the tokens”. The ASP.NET Core handler sends a PKCE challenge on its own, and a standalone WebAssembly app is a public client with no secret, so PKCE is what protects its authorization code. In both cases, set PKCE method to S256 on the client’s Advanced tab so that Keycloak requires it instead of merely accepting it. Related: Keycloak: How To Create A PKCE Authorization Flow Client?
Set up the Keycloak side once
The examples use one realm, myrealm, at https://keycloak.example.com/realms/myrealm. That URL is the authority you give .NET, and the handler reads everything else from Keycloak’s discovery document at /realms/{realm-name}/.well-known/openid-configuration. Leave out the old /auth/ prefix: under “Default context path changed”, Keycloak’s migration guide says: “By default, the new Quarkus distribution removes /auth from the context-path.”
The server-side client (Blazor Web App and Blazor Server)
Create a client called blazor-web with these settings:
- Client authentication: On, then copy the secret from the Credentials tab.
- Authentication flow: Standard flow only.
- Valid redirect URIs:
https://localhost:7001/signin-oidc - Valid post logout redirect URIs:
https://localhost:7001/signout-callback-oidc - Front channel logout: On, with Front-channel logout URL
https://localhost:7001/signout-oidc - Advanced, PKCE method:
S256
The three paths are the ASP.NET Core handler’s defaults: /signin-oidc receives the code, /signout-callback-oidc receives the user after Keycloak logs them out, and for /signout-oidc Microsoft says “requests received on this path cause the handler to invoke sign-out”. Keycloak has the browser load that last URL when the user logs out of another application in the realm, which is what front-channel logout means. If a login fails with “Invalid parameter: redirect_uri”, compare the URI the app sends with the registered one, character for character. Related: Keycloak Redirect URI Mismatch: Complete Troubleshooting Guide.
The browser client (standalone WebAssembly)
Create a second client, blazor-wasm:
- Client authentication: Off (public client, no secret).
- Authentication flow: Standard flow only.
- Valid redirect URIs:
https://localhost:7002/authentication/login-callback - Valid post logout redirect URIs:
https://localhost:7002/authentication/logout-callback - Web origins:
https://localhost:7002, the browser origin of the app. - Advanced, PKCE method:
S256
The two callback paths are the defaults of the WebAssembly library’s authentication/{action} routes.
Put the API in the token’s audience
The aud (audience) claim says which service a token is meant for, and the JWT specification (RFC 7519, section 4.1.3) says that when the claim is present and the recipient “does not identify itself with a value in the aud claim”, the JWT must be rejected. Keycloak does not add your API to the access token of a frontend client by default: its Audience Resolve mapper “checks for clients that have at least one client role available for the current token” and adds the ID of each such client as an audience, and the same section notes that “the frontend client itself is not automatically added to the access token audience”.
If your API is a client called orders-api, open each frontend client, go to Client scopes, open its dedicated scope (blazor-web-dedicated, blazor-wasm-dedicated), and add a mapper By configuration, Audience, with Included Client Audience set to orders-api. Keycloak documents this as the hardcoded audience, and it adds the audience to the access token only, which is all the API reads. Related: Keycloak Token Validation for APIs.
Put the roles in the ID token
Keycloak’s built-in role mappers in the roles client scope put realm roles in realm_access.roles and client roles in resource_access.{client_id}.roles (Keycloak docs). The docs describe the roles scope’s mappers as “used to add the roles of the user to the access token”, and in OIDCLoginProtocolFactory.java both built-in mappers are created with the access token switch on and the ID token switch off (the true, false arguments of their create calls, whose parameters are named accessToken and idToken in UserRealmRoleMappingMapper.java). That matters for Blazor, because both the server handler and the WebAssembly library build the signed-in user from the ID token.
So in each frontend client’s dedicated scope, add another mapper By configuration, User Realm Role, with Token Claim Name realm_access.roles, Multivalued on and Add to ID token on. Do the same with User Client Role and resource_access.${client_id}.roles if you use client roles. Adding the mappers to the dedicated scope changes only these clients, not every client that uses the shared roles scope. Related: Keycloak Client Scopes Explained: What They Are vs Roles.
Blazor Web App on .NET 10
A Blazor Web App renders on the server first and can then run components interactively on the server, in WebAssembly, or switch between them (the Auto render mode). Microsoft’s Blazor Web App OIDC guide does the login on the server and keeps the tokens there, and we follow it, swapping in Keycloak’s values.
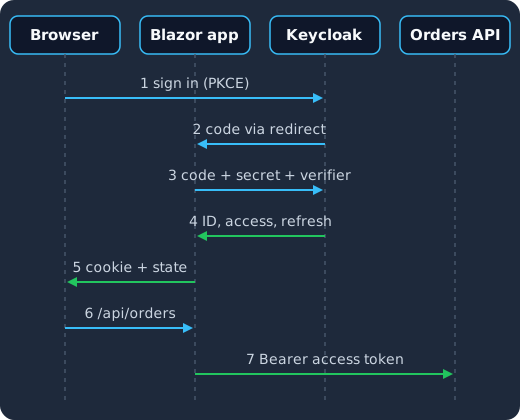
The browser signs in at Keycloak (1), which redirects back to the app with a code (2). The server sends the code, its secret and the PKCE verifier to Keycloak (3) and gets the ID, access and refresh tokens (4). The browser receives a cookie and the authentication state (5), a WebAssembly component calls the server’s own endpoint with that cookie (6), and the server calls the Orders API with the access token (7).
Project and packages
Start from the Blazor Web App template with the Auto render mode, which creates a server project and a .Client project, and add the OIDC handler to the server and the authentication package to the client:
dotnet new blazor --interactivity Auto -o BlazorApp
cd BlazorApp
dotnet add BlazorApp package Microsoft.AspNetCore.Authentication.OpenIdConnect
dotnet add BlazorApp.Client package Microsoft.AspNetCore.Components.WebAssembly.Authentication
Server Program.cs
using Microsoft.AspNetCore.Authentication;
using Microsoft.AspNetCore.Authentication.Cookies;
using Microsoft.IdentityModel.Protocols.OpenIdConnect;

const string KeycloakScheme = "Keycloak";

var builder = WebApplication.CreateBuilder(args);

builder.Services.AddAuthentication(KeycloakScheme)
    .AddOpenIdConnect(KeycloakScheme, options =>
    {
        options.SignInScheme = CookieAuthenticationDefaults.AuthenticationScheme;
        options.Authority = "https://keycloak.example.com/realms/myrealm";
        options.ClientId = "blazor-web";
        // The secret is read from Authentication:Schemes:Keycloak:ClientSecret
        options.ResponseType = OpenIdConnectResponseType.Code;
        options.UsePkce = true;
        options.MapInboundClaims = false;
        options.TokenValidationParameters.NameClaimType = "preferred_username";
        options.TokenValidationParameters.RoleClaimType = "role";
    })
    .AddCookie(CookieAuthenticationDefaults.AuthenticationScheme);

// Copied from Microsoft's sample: refreshes the tokens inside the cookie
builder.Services.ConfigureCookieOidc(CookieAuthenticationDefaults.AuthenticationScheme, KeycloakScheme);

builder.Services.AddTransient<IClaimsTransformation, KeycloakRolesTransformation>();
builder.Services.AddAuthorization();
builder.Services.AddCascadingAuthenticationState();

builder.Services.AddRazorComponents()
    .AddInteractiveServerComponents()
    .AddInteractiveWebAssemblyComponents()
    .AddAuthenticationStateSerialization();

builder.Services.AddHttpContextAccessor();
builder.Services.AddScoped<TokenHandler>();
builder.Services.AddHttpClient("OrdersApi",
        client => client.BaseAddress = new Uri("https://localhost:7003/"))
    .AddHttpMessageHandler<TokenHandler>();

var app = builder.Build();

app.UseHttpsRedirection();
app.UseAntiforgery();
app.MapStaticAssets();

app.MapRazorComponents<App>()
    .AddInteractiveServerRenderMode()
    .AddInteractiveWebAssemblyRenderMode()
    .AddAdditionalAssemblies(typeof(BlazorApp.Client._Imports).Assembly);

app.MapGroup("/authentication").MapLoginAndLogout();

app.MapGet("/api/orders", async (IHttpClientFactory factory) =>
{
    var json = await factory.CreateClient("OrdersApi").GetStringAsync("orders");
    return Results.Content(json, "application/json");
}).RequireAuthorization();

app.Run();
MapInboundClaims = false keeps Keycloak’s claim names as they are, and Microsoft notes it “must be set to false for most OIDC providers”. Keep the client secret out of source control: in development, dotnet user-secrets set "Authentication:Schemes:Keycloak:ClientSecret" "your-client-secret" puts it where the handler reads it, as the Microsoft guide describes for its own scheme name.
Three helper files come from Microsoft’s sample, unchanged apart from the scheme name: CookieOidcRefresher.cs, CookieOidcServiceCollectionExtensions.cs and LoginLogoutEndpointRouteBuilderExtensions.cs. Copy them into the server project, change their namespace lines to your project’s namespace, and in the last one replace "MicrosoftOidc" with "Keycloak" in the sign-out call. The sections below explain what each does with Keycloak and the one line you should change for Keycloak.
Map Keycloak roles to .NET role claims
With the ID token mappers above, the signed-in user carries realm_access and resource_access as claims whose values are JSON objects. The transformation below turns them into flat role claims. We use IClaimsTransformation rather than the handler’s OnTokenValidated event because the refresher replaces the user with the claims of each new ID token, and a transformation runs again on every authentication. Microsoft warns that it “can be called multiple times for a single request”, so it checks for existing role claims first.
using System.Security.Claims;
using System.Text.Json;
using Microsoft.AspNetCore.Authentication;

public sealed class KeycloakRolesTransformation : IClaimsTransformation
{
    public Task<ClaimsPrincipal> TransformAsync(ClaimsPrincipal principal)
    {
        if (principal.Identity is not ClaimsIdentity { IsAuthenticated: true } identity
            || identity.HasClaim(c => c.Type == identity.RoleClaimType))
        {
            return Task.FromResult(principal);
        }

        var clone = principal.Clone();
        var cloneIdentity = (ClaimsIdentity)clone.Identity!;
        foreach (var role in KeycloakRoles.Read(
                     identity.FindFirst("realm_access")?.Value,
                     identity.FindFirst("resource_access")?.Value))
        {
            cloneIdentity.AddClaim(new Claim(cloneIdentity.RoleClaimType, role));
        }

        return Task.FromResult(clone);
    }
}

public static class KeycloakRoles
{
    // Realm roles keep their name; client roles become "client-id:role".
    public static List<string> Read(string? realmAccessJson, string? resourceAccessJson)
    {
        var roles = new List<string>();

        if (realmAccessJson is not null)
        {
            using var realm = JsonDocument.Parse(realmAccessJson);
            AddRoles(realm.RootElement, prefix: null, roles);
        }

        if (resourceAccessJson is not null)
        {
            using var resources = JsonDocument.Parse(resourceAccessJson);
            foreach (var client in resources.RootElement.EnumerateObject())
            {
                AddRoles(client.Value, prefix: client.Name + ":", roles);
            }
        }

        return roles;
    }

    private static void AddRoles(JsonElement access, string? prefix, List<string> roles)
    {
        if (!access.TryGetProperty("roles", out var array)) return;
        foreach (var role in array.EnumerateArray())
        {
            var name = role.GetString();
            if (!string.IsNullOrWhiteSpace(name)) roles.Add(prefix + name);
        }
    }
}
Client roles get their client ID as a prefix (orders-api:reader), so a client role cannot be mistaken for a realm role of the same name. Drop the prefix if you would rather have plain role names.
Pass the authentication state to WebAssembly components
Components that run in WebAssembly cannot read the server’s cookie, so the server hands them a copy of the user. AddAuthenticationStateSerialization() on the server adds a provider that “uses PersistentComponentState to flow the authentication state to the client”, and the client project reads it back:
// BlazorApp.Client/Program.cs
using Microsoft.AspNetCore.Components.WebAssembly.Hosting;

var builder = WebAssemblyHostBuilder.CreateDefault(args);

builder.Services.AddAuthorizationCore();
builder.Services.AddCascadingAuthenticationState();
builder.Services.AddAuthenticationStateDeserialization();

builder.Services.AddScoped(sp =>
    new HttpClient { BaseAddress = new Uri(builder.HostEnvironment.BaseAddress) });

await builder.Build().RunAsync();
By default only the name and role claims make the trip, and Microsoft says “to include all claims, set SerializeAllClaims to true”. Because the transformation writes roles as the identity’s role claim type, AuthorizeView Roles="orders-reader" and [Authorize(Roles = "orders-reader")] work in WebAssembly components without anything more. The tokens themselves stay on the server, in line with Microsoft’s advice not to keep “private keys/tokens in client-side code, which is always insecure”.
On .NET 8 the serialization methods do not exist. The .NET 8 template uses a PersistingAuthenticationStateProvider on the server and a PersistentAuthenticationStateProvider in the client project to do the same job (Microsoft docs), so keep those two files if you are on .NET 8. Note that Microsoft’s .NET support policy lists November 10, 2026 as the end of support for .NET 8, which is a good reason to move to .NET 10.
Protect routes and send anonymous users to Keycloak
The Blazor Web App template created without authentication renders pages through RouteView, which does not check [Authorize] when the router changes pages in the browser. Add these lines to _Imports.razor in both projects:
@using Microsoft.AspNetCore.Authorization
@using Microsoft.AspNetCore.Components.Authorization
Then add a RedirectToLogin.razor component to the .Client project, so both render modes can use it. It sends the browser to the authentication/login endpoint that MapLoginAndLogout() maps, which starts the Keycloak login and returns to the current page:
@inject NavigationManager Navigation

@code {
    protected override void OnInitialized()
    {
        var returnUrl = "/" + Navigation.ToBaseRelativePath(Navigation.Uri);
        Navigation.NavigateTo(
            $"authentication/login?returnUrl={Uri.EscapeDataString(returnUrl)}",
            forceLoad: true);
    }
}
In Components/Routes.razor in the server project, replace RouteView with AuthorizeRouteView and keep the rest of the template’s Router as it is. A signed-in user who lacks the role gets a message instead of another trip to Keycloak, which would only sign them straight back in:
<Found Context="routeData">
    <AuthorizeRouteView RouteData="routeData" DefaultLayout="typeof(Layout.MainLayout)">
        <NotAuthorized>
            @if (context.User.Identity?.IsAuthenticated == true)
            {
                <p>You do not have access to this page.</p>
            }
            else
            {
                <BlazorApp.Client.RedirectToLogin />
            }
        </NotAuthorized>
    </AuthorizeRouteView>
    <FocusOnNavigate RouteData="routeData" Selector="h1" />
</Found>
Call a protected API from any render mode
The server keeps the access token in the cookie (SaveTokens = true), so API calls go through the server. The TokenHandler from Microsoft’s guide attaches the token to outgoing requests:
using System.Net.Http.Headers;
using Microsoft.AspNetCore.Authentication;

public class TokenHandler(IHttpContextAccessor httpContextAccessor) : DelegatingHandler
{
    protected override async Task<HttpResponseMessage> SendAsync(
        HttpRequestMessage request, CancellationToken cancellationToken)
    {
        if (httpContextAccessor.HttpContext is null)
        {
            throw new Exception("HttpContext not available");
        }

        var accessToken = await httpContextAccessor.HttpContext.GetTokenAsync("access_token");
        request.Headers.Authorization = new AuthenticationHeaderValue("Bearer", accessToken);

        return await base.SendAsync(request, cancellationToken);
    }
}
A WebAssembly component then calls the server’s /api/orders endpoint from Program.cs with the browser’s cookie, and the server forwards the call to the Orders API with the Bearer token. Because that endpoint runs inside a normal HTTP request, HttpContext is available and the cookie has just been validated (and refreshed if needed). We turn prerendering off on this component so it only calls the API from the browser:
@page "/orders"
@rendermode @(new InteractiveWebAssemblyRenderMode(prerender: false))
@attribute [Authorize(Roles = "orders-reader")]
@inject HttpClient Http

<h3>Orders</h3>
<pre>@orders</pre>

@code {
    private string? orders;

    protected override async Task OnInitializedAsync() =>
        orders = await Http.GetStringAsync("api/orders");
}
This is the backend for frontend (BFF) idea: the browser only ever holds a cookie, and the server holds the tokens. Related: Backend-for-Frontend (BFF) Pattern with Keycloak.
Token refresh, and why we drop offline_access
CookieOidcRefresher runs every time the cookie is validated. When the access token is within five minutes of expires_at, it posts the refresh token to Keycloak’s token endpoint, validates the new ID token, and stores the new tokens in the cookie. If Keycloak refuses the refresh, it calls RejectPrincipal(), which signs the user out (source). Microsoft notes that the refresher “expects to receive an ID token from the token endpoint in exchange for the refresh token”, and Keycloak does return one when the original login used the openid scope (source).
The one line to change is in CookieOidcServiceCollectionExtensions.cs: remove oidcOptions.Scope.Add(OpenIdConnectScope.OfflineAccess); and keep SaveTokens = true. Keycloak issues a refresh token for the standard flow anyway, and that token ends with the user’s Keycloak session. With offline_access, Keycloak issues an offline token instead, and its Offline access section says: “an offline token never expires and is not subject to the SSO Session Idle timeout and SSO Session Max lifespan. The offline token is valid after a user logout.” For a web app that should end when the Keycloak session ends, you want the ordinary refresh token. Related: Keycloak Refresh Token Rotation: Setup and Best Practices.
Logout through Keycloak
Logging out has to end both the local cookie and the Keycloak session, otherwise the next visit signs the user straight back in. The sample’s logout endpoint signs out of both schemes:
group.MapPost("/logout", ([FromForm] string? returnUrl) => TypedResults.SignOut(
    GetAuthProperties(returnUrl),
    [CookieAuthenticationDefaults.AuthenticationScheme, "Keycloak"]));
Post to it from a form with an antiforgery token, since it is a POST endpoint behind UseAntiforgery():
<form action="authentication/logout" method="post">
    <AntiforgeryToken />
    <input type="hidden" name="ReturnUrl" value="/" />
    <button type="submit">Log out</button>
</form>
The OIDC handler then redirects to Keycloak’s end-session endpoint with a post_logout_redirect_uri built from /signout-callback-oidc and the saved ID token as id_token_hint (source). Keycloak requires that URI to “match one of the Valid Post Logout Redirect URIs” of the client, which is why we registered it. The id_token_hint matters too: without it, Keycloak notes that “the user might be optionally requested to confirm the logout”. Both parameters come from the OpenID Connect RP-Initiated Logout specification.
Blazor Server (Interactive Server only)
An app that renders only on the server, whether it started from the older Blazor Server template or is a Blazor Web App with the Interactive Server render mode (dotnet new blazor --interactivity Server), has no .Client project. It needs only the Microsoft.AspNetCore.Authentication.OpenIdConnect package, the three helper files and the role transformation from the section above, and this Program.cs:
using Microsoft.AspNetCore.Authentication;
using Microsoft.AspNetCore.Authentication.Cookies;
using Microsoft.IdentityModel.Protocols.OpenIdConnect;

const string KeycloakScheme = "Keycloak";

var builder = WebApplication.CreateBuilder(args);

builder.Services.AddAuthentication(KeycloakScheme)
    .AddOpenIdConnect(KeycloakScheme, options =>
    {
        options.SignInScheme = CookieAuthenticationDefaults.AuthenticationScheme;
        options.Authority = "https://keycloak.example.com/realms/myrealm";
        options.ClientId = "blazor-web";
        options.ResponseType = OpenIdConnectResponseType.Code;
        options.UsePkce = true;
        options.MapInboundClaims = false;
        options.TokenValidationParameters.NameClaimType = "preferred_username";
        options.TokenValidationParameters.RoleClaimType = "role";
    })
    .AddCookie(CookieAuthenticationDefaults.AuthenticationScheme);

builder.Services.ConfigureCookieOidc(CookieAuthenticationDefaults.AuthenticationScheme, KeycloakScheme);

builder.Services.AddTransient<IClaimsTransformation, KeycloakRolesTransformation>();
builder.Services.AddAuthorization();
builder.Services.AddCascadingAuthenticationState();

builder.Services.AddRazorComponents()
    .AddInteractiveServerComponents();

builder.Services.AddHttpContextAccessor();
builder.Services.AddScoped<TokenHandler>();
builder.Services.AddHttpClient("OrdersApi",
        client => client.BaseAddress = new Uri("https://localhost:7003/"))
    .AddHttpMessageHandler<TokenHandler>();

var app = builder.Build();

app.UseHttpsRedirection();
app.UseAntiforgery();
app.MapStaticAssets();

app.MapRazorComponents<App>()
    .AddInteractiveServerRenderMode();

app.MapGroup("/authentication").MapLoginAndLogout();

app.Run();
Compared with the Blazor Web App, it drops AddInteractiveWebAssemblyComponents(), AddAuthenticationStateSerialization(), AddInteractiveWebAssemblyRenderMode() and AddAdditionalAssemblies(...), which all refer to the client project. The Keycloak client, logout form and TokenHandler stay the same. For routing, add the same _Imports.razor lines, RedirectToLogin.razor and AuthorizeRouteView change as in the Blazor Web App, with RedirectToLogin.razor in the server project since there is no .Client project.
Call the API from a Server-only app
TokenHandler reads the access token from HttpContext, and Microsoft says IHttpContextAccessor “generally should be avoided with interactive rendering because a valid HttpContext isn’t always available”, while it “can be used during static server-side rendering (static SSR)”. So the dependable path in a Server-only app is a page without a @rendermode, which renders during an ordinary HTTP request: the cookie has just been validated (and refreshed if needed), TokenHandler finds the access token, and the OrdersApi client sends it as a Bearer token. [StreamRendering] shows the page while the call runs:
@page "/orders"
@attribute [Authorize(Roles = "orders-reader")]
@attribute [StreamRendering]
@inject IHttpClientFactory HttpClientFactory

<h3>Orders</h3>
<pre>@(orders ?? "Loading...")</pre>

@code {
    private string? orders;

    protected override async Task OnInitializedAsync()
    {
        var client = HttpClientFactory.CreateClient("OrdersApi");
        orders = await client.GetStringAsync("orders");
    }
}
Keep the API calls in pages like this one, and give interactive components the data they need from them, rather than calling OrdersApi from inside an interactive server component.
Session expiry works differently, though. An interactive server component runs over a long-lived SignalR connection between the browser and the server, called a circuit,, and Microsoft says “the authentication context is only established when the app starts” and is “maintained for the lifetime of the connection”. The cookie refresher only runs on HTTP requests, so when the Keycloak session ends, an open circuit keeps showing the old user until the next page load, reconnect or call to a server endpoint, which then fails the refresh and signs the user out.
If a circuit has to notice a logout sooner, derive from RevalidatingServerAuthenticationStateProvider, which Microsoft describes as a way to update the user’s authentication state “at any time on the server”, with a shorter RevalidationInterval and a check that suits your app, such as a server-side record of Keycloak back-channel logouts. A simpler option is to keep the cookie lifetime no longer than the Keycloak session and to handle 401 responses from the API.
Standalone Blazor WebAssembly with Keycloak
A standalone WebAssembly app has no server of its own, so the browser does the login as a public client and holds the tokens. The package is Microsoft.AspNetCore.Components.WebAssembly.Authentication, and in the generic OIDC case it drives the oidc-client JavaScript library.
Configuration
Create the project from the WebAssembly template with individual authentication, which adds the Microsoft.AspNetCore.Components.WebAssembly.Authentication package and the Authentication.razor page, then add Microsoft.Extensions.Http, the package that provides AddHttpClient and IHttpClientFactory:
dotnet new blazorwasm -au Individual -o BlazorWasm
cd BlazorWasm
dotnet add package Microsoft.Extensions.Http
wwwroot/appsettings.json holds the provider settings under Local, as in Microsoft’s walkthrough:
{
  "Local": {
    "Authority": "https://keycloak.example.com/realms/myrealm",
    "ClientId": "blazor-wasm",
    "ResponseType": "code",
    "RedirectUri": "https://localhost:7002/authentication/login-callback",
    "PostLogoutRedirectUri": "https://localhost:7002/authentication/logout-callback"
  }
}
There is no client secret, since anything shipped to the browser can be read: Microsoft’s rule is to “never place sensitive data into a Blazor WebAssembly app”. The Authentication.razor page with RemoteAuthenticatorView that the template creates handles the callbacks.
Program.cs and role mapping
The library’s default user factory does not understand Keycloak’s role claims. It adds one claim per top-level ID token property and uses the property’s JSON text as the value (source), so realm_access arrives as a single claim holding {"roles":[...]} and no role check matches. A custom factory fixes that, reusing the KeycloakRoles helper from the Blazor Web App section (copy the class into the WebAssembly project):
using System.Security.Claims;
using System.Text.Json;
using Microsoft.AspNetCore.Components.WebAssembly.Authentication;
using Microsoft.AspNetCore.Components.WebAssembly.Authentication.Internal;

public sealed class KeycloakAccountFactory(IAccessTokenProviderAccessor accessor)
    : AccountClaimsPrincipalFactory<RemoteUserAccount>(accessor)
{
    public override async ValueTask<ClaimsPrincipal> CreateUserAsync(
        RemoteUserAccount account, RemoteAuthenticationUserOptions options)
    {
        var user = await base.CreateUserAsync(account, options);
        if (user.Identity is not ClaimsIdentity { IsAuthenticated: true } identity)
        {
            return user;
        }

        account.AdditionalProperties.TryGetValue("realm_access", out var realm);
        account.AdditionalProperties.TryGetValue("resource_access", out var resources);

        foreach (var role in KeycloakRoles.Read(
                     (realm as JsonElement?)?.GetRawText(),
                     (resources as JsonElement?)?.GetRawText()))
        {
            identity.AddClaim(new Claim(identity.RoleClaimType, role));
        }

        return user;
    }
}
// Program.cs (standalone WebAssembly)
using Microsoft.AspNetCore.Components.Web;
using Microsoft.AspNetCore.Components.WebAssembly.Authentication;
using Microsoft.AspNetCore.Components.WebAssembly.Hosting;
var builder = WebAssemblyHostBuilder.CreateDefault(args);
builder.RootComponents.Add<App>("#app");
builder.RootComponents.Add<HeadOutlet>("head::after");
builder.Services.AddOidcAuthentication(options =>
{
builder.Configuration.Bind("Local", options.ProviderOptions);
options.UserOptions.NameClaim = "preferred_username";
options.UserOptions.RoleClaim = "role";
})
.AddAccountClaimsPrincipalFactory<KeycloakAccountFactory>();
builder.Services.AddTransient<OrdersApiHandler>();
builder.Services.AddHttpClient("OrdersApi",
client => client.BaseAddress = new Uri("https://localhost:7003/"))
.AddHttpMessageHandler<OrdersApiHandler>();
await builder.Build().RunAsync();As with the server, the roles only reach the ID token once the User Realm Role mapper with Add to ID token is on the blazor-wasm client’s dedicated scope.
Calling the API with the access token
The library adds the access token only to requests whose address you authorize. Microsoft’s pattern is a custom AuthorizationMessageHandler:
using Microsoft.AspNetCore.Components;
using Microsoft.AspNetCore.Components.WebAssembly.Authentication;

public sealed class OrdersApiHandler : AuthorizationMessageHandler
{
    public OrdersApiHandler(IAccessTokenProvider provider, NavigationManager navigation)
        : base(provider, navigation)
    {
        ConfigureHandler(authorizedUrls: ["https://localhost:7003"]);
    }
}
In the component, catch the case where no token can be had and send the user to Keycloak:
try
{
    var client = HttpClientFactory.CreateClient("OrdersApi");
    orders = await client.GetStringAsync("orders");
}
catch (AccessTokenNotAvailableException exception)
{
    exception.Redirect();
}
The Orders API must allow the Authorization header from https://localhost:7002 in its CORS policy, as Microsoft points out, and its JWT validation must expect orders-api as the audience, which the audience mapper provides.
Token renewal and its limits in the browser
When a component asks for a token and the current one has expired, the library tries to get a new one without user interaction through oidc-client’s signinSilent (source). If that fails, the request throws AccessTokenNotAvailableException, and Redirect() “navigates to AccessTokenResult.InteractiveRequestUrl”, which sends the browser to Keycloak to sign in again.
Silent checks that run in a hidden frame depend on the browser sending Keycloak’s cookie to that frame, and Keycloak’s JavaScript adapter docs say that in browsers that block third-party cookies, “Silent check-sso is not supported and falls back to regular (non-silent) check-sso by default”, and that “An affected browser is for example Safari starting with version 13.1.” Plan for the redirect path rather than treating it as an error. Microsoft also says refresh tokens “can’t be secured in Blazor WebAssembly apps”, and recommends short-lived, rotated ones if you use them. If your app can have a server, the Blazor Web App approach above keeps every token off the browser, and that is the safer default.
Logout
Call Navigation.NavigateToLogout("authentication/logout") from your logout button. The library sends the browser to Keycloak’s end-session endpoint and back to authentication/logout-callback, which must be in the client’s Valid post logout redirect URIs.
The pattern above, already wired up
Skycloak gives you a managed Keycloak with OIDC and SAML, social and enterprise identity providers, MFA and fine-grained roles configured and running. Pick your framework during onboarding and you get a working sign-in in about three minutes.
Check that it works
Run these checks for your hosting model before you ship. Each step lists what you should see.
Blazor Web App
- Open
/orderssigned out. The browser goes to Keycloak’s login page, and after you sign in it comes back to/orders. - Sign in as a user without
orders-reader. The orders never appear: a link to/ordersinside the app shows “You do not have access to this page.”, and a full page load gets ASP.NET Core’s access-denied response. - Sign in as a user with
orders-reader. The page loads the orders through/api/orders, and the browser’s network tab shows noAuthorizationheader and no token, only the cookie. - Shorten the client’s Access Token Lifespan in Keycloak to a few minutes, wait past it, and reload. The page still loads, and the Keycloak Sessions tab of the user still shows one session.
- Log out with the form. The browser passes through Keycloak and returns to the app, and opening
/ordersagain asks for the Keycloak password.
Blazor Server
- Repeat steps 1, 2, 4 and 5 above; the results are the same.
- Open
/ordersas a user withorders-reader. The orders appear once the call finishes, and the Orders API’s log shows a request with a valid Bearer token. - End the user’s session in the Keycloak admin console, wait past the access token lifespan, then reload the page. The refresh fails and the app sends you back to Keycloak’s login page.
Standalone WebAssembly
- Click the login link. The browser goes to Keycloak and returns to
authentication/login-callback, then to the app, signed in. - Call the Orders API as a user with
orders-reader. The network tab shows the request tohttps://localhost:7003carryingAuthorization: Bearer, and the API answers200. - Wait past the access token lifespan and call the API again. Either the call succeeds with a new token, or the app redirects to Keycloak and comes back signed in.
- Log out. The browser passes through Keycloak’s end-session endpoint and lands on
authentication/logout-callback.
Troubleshooting Keycloak and Blazor
IDX10214: Audience validation failedin the API. The access token does not nameorders-api. Add the audience mapper to the frontend client’s dedicated scope, then sign in again so the app gets a new access token.AuthorizeView Rolesnever matches. Either the roles are not in the ID token (check the Add to ID token switch on the User Realm Role mapper) or the role claim type does not match. Keycloak’s client Evaluate tab under Client scopes shows a generated ID token for a user without logging in.- Users are signed out after a few minutes on the Web App. The refresh failed, so
CookieOidcRefresherrejected the cookie. Check the server log for the token endpoint’s response; a missing client secret and an ended Keycloak session are two causes to rule out first. - Logout shows a Keycloak confirmation page. The end-session request lacked
id_token_hint. On the server, check thatSaveTokensis on so the ID token is stored. - Users stay signed in after logging out of Keycloak. Check three things: whether the scopes still request
offline_access(remove it as described above), whether an open Blazor Server circuit is still showing the old user (see the Blazor Server section), and whether the cookie lifetime outlasts the Keycloak session.
FAQ
Does Keycloak have an SDK for Blazor?
You do not need one. Blazor Web App and Blazor Server use ASP.NET Core’s built-in OpenID Connect handler, and standalone WebAssembly uses Microsoft’s WebAssembly authentication package. Both work with any OIDC provider, and Keycloak is configured through the client settings in this post.
How do I use Keycloak with Blazor WebAssembly?
Register a public client in Keycloak (Client authentication off, PKCE method S256, redirect URI authentication/login-callback), then call AddOidcAuthentication with the realm URL as Authority and the client ID. Add a custom AccountClaimsPrincipalFactory to turn realm_access into role claims, and an AuthorizationMessageHandler to send the access token to your API.
Should my Blazor app use a confidential or public Keycloak client?
Use a confidential client whenever the login runs on a server, which covers Blazor Web App and Blazor Server, because the server can keep a secret. Use a public client only for standalone WebAssembly, where the code runs in the browser and nothing in it stays private.
Does the Blazor Web App send the access token to the browser?
Not in the setup shown here. The tokens are stored in the server-side auth cookie, WebAssembly components receive only the user’s name and role claims, and API calls go through a server endpoint that adds the Bearer token.
What changes on .NET 8?
The Keycloak client settings in this post stay as they are. In a Blazor Web App, replace AddAuthenticationStateSerialization and AddAuthenticationStateDeserialization with the .NET 8 template’s persisting authentication state providers, and in Program.cs use app.UseStaticFiles() where this post uses MapStaticAssets(), which .NET 8 does not have. .NET 8 support ends on November 10, 2026 (.NET support policy), so new projects should start on .NET 10.
Sources
Retrieved November 2026.
- Keycloak, Server Administration Guide: client types, PKCE, audience mappers, role mappers, offline access, logout.
- Keycloak, Securing applications, OpenID Connect layers: endpoints and JavaScript adapter.
- Microsoft Learn, Secure an ASP.NET Core Blazor Web App with OpenID Connect.
- Microsoft Learn, ASP.NET Core Blazor authentication and authorization.
- Microsoft Learn, Secure a standalone Blazor WebAssembly app with the Authentication library and additional security scenarios.
- Microsoft, .NET support policy.
- GitHub, dotnet/blazor-samples, dotnet/aspnetcore and keycloak/keycloak source code.
- IETF, RFC 7636: Proof Key for Code Exchange; OpenID Foundation, OpenID Connect Core 1.0 and OpenID Connect RP-Initiated Logout 1.0.
Next steps
Start with the Keycloak side: the two clients, the audience mapper and the ID token role mappers. Then pick the section for your hosting model and test the full loop of login, a role-protected page, an API call, a token refresh and a logout. If you are building the API at the same time, see Keycloak Authentication in ASP.NET Core (.NET 8).
If you would rather not operate Keycloak yourself, you can run your Blazor app against a realm on managed Keycloak hosting from Skycloak, with no cluster to run.