Introduction
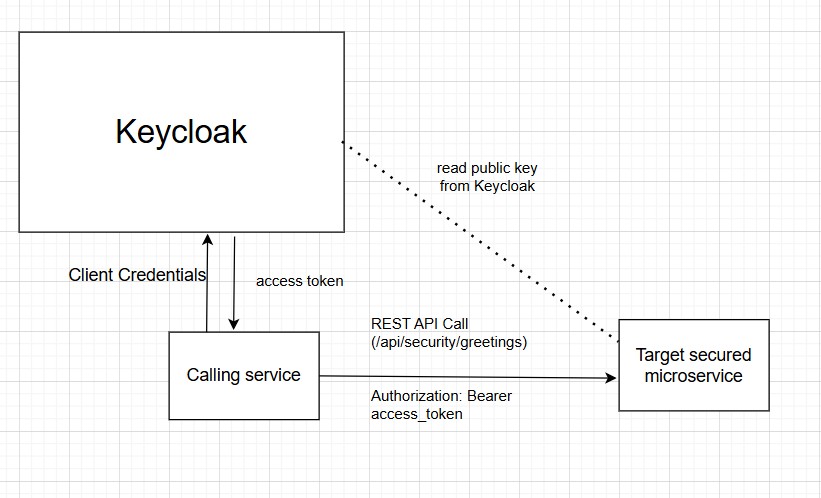
In this article, I will demonstrate how to access secured RESTful endpoints of a microservice using an access token issued by Skycloak or Keycloak.
Skycloak is a managed Keycloak cloud service that provides a production-ready Keycloak IAM deployment capable of scaling as per your requirements in a cost-effective way.
Obtain an access token for accessing secured REST endpoints
Now, let us look at how we can access secured RESTful endpoints of a microservice successfully.
You can obtain an access token with the required roles using different grant types when working with OpenID Connect (OIDC). (Roles are required if your microservice checks for specific roles to give access to the RESTful endpoints).
For example:
- For Single Page Applications (SPA) or mobile applications, the Authorization Code + PKCE flow is widely used.
- In Backend-for-Frontend (BFF) applications where UI interaction is possible, Authorization Code + Client Secret + PKCE, or at least Authorization Code + Client Secret, to obtain an access token from Keycloak is widely used.
- For service-to-service or microservice-to-microservice communication, the Client Credentials Grant is recommended.
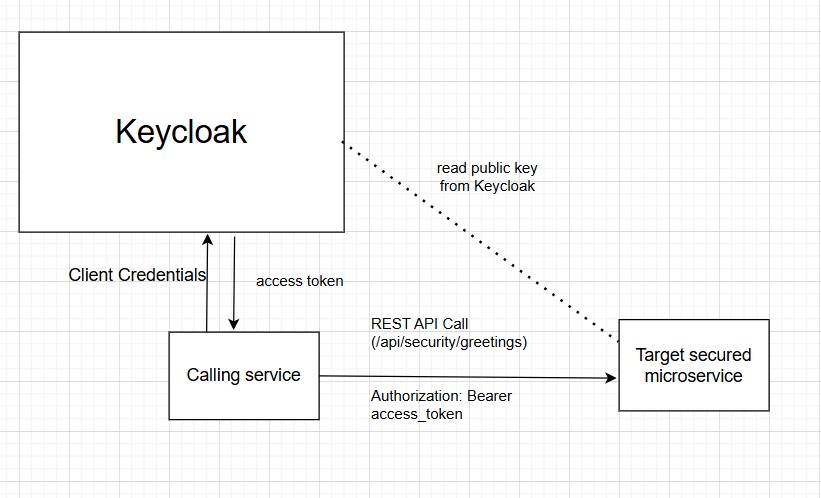
Once you receive the access token using any of the above methods, REST API calls should be made with the access token included as a Bearer token in the Authorization header of the request to the microservice.
In this article, we will not discuss how to obtain an access token through application code using the above approaches. Instead, we will create an OAuth 2.0 client in Keycloak using the Client Credentials Grant, and then use cURL to obtain an access token from Keycloak.
If you do not have cURL installed, you can use Postman as well.

Creating an OAuth or OpenID Connect Client in Keycloak
Clients can be created in Keycloak using the Clients menu available in the left pane of the Keycloak console. Make sure you are in the correct realm
Alternatively, you can use the Skycloak console to create clients by navigating to the Applications menu
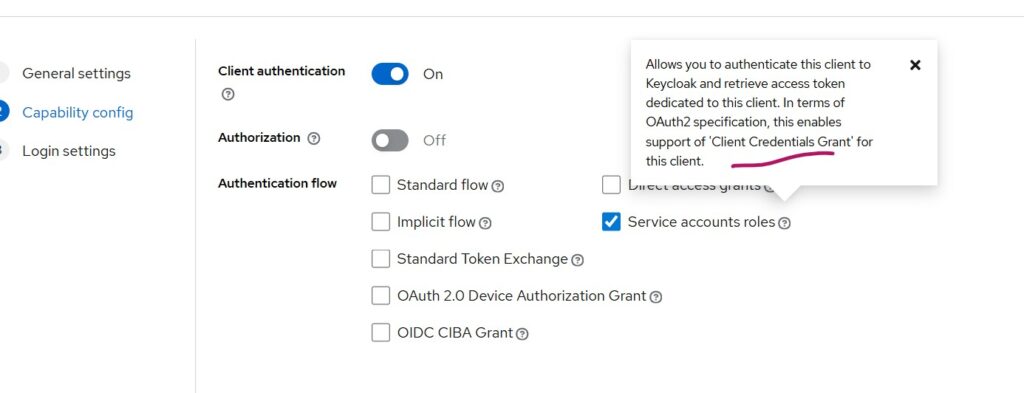
In this case, we will go with the Client Credentials Grant flow, which, as discussed earlier, is used when no user interaction is required to obtain an access token. I will not go into detailed steps for creating a client, since the UI is mostly self-explanatory.
in Skycloak, if you navigate to Applications → Create Client → Machine-to-Machine, you will be using the Client Credentials Grant flow.
If you are using Keycloak directly, the following screenshot shows the Client Credentials grant flow being selected and I could do this after Client authentication being turned ON. Since I don’t intend to use this client for other grant types, this configuration works fine for me.

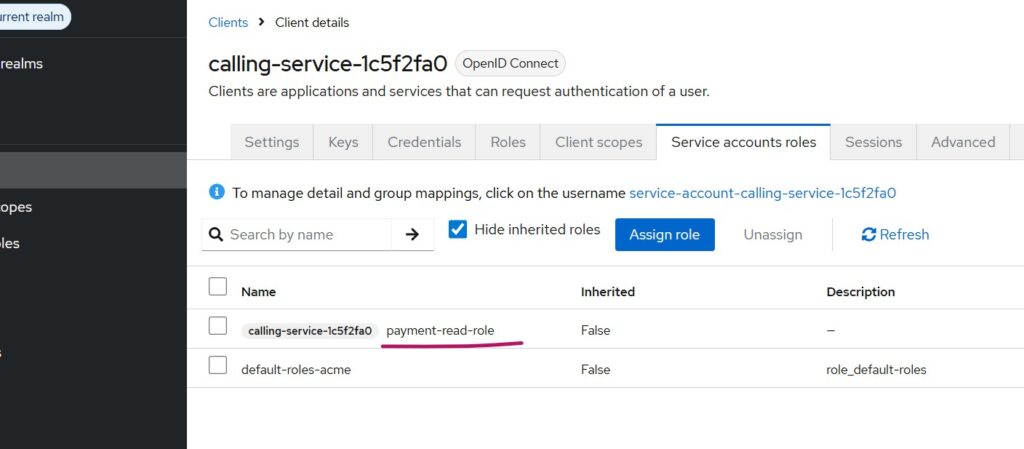
Next, we will create a client role named payment-read-role for the client we have already created. This role then needs to be assigned from the Service account roles tab (refer to the figure below). The Spring Boot code will be discussed later; this role is required by the microservice code written to access its /api/secure/greetings endpoint.

Testing Client Credentials grant using cURL
By now, we already have created a client at Keycloak. Now, let us try to make cURL request to Keycloak using the client we have just created.
Syntax of the cURL request looks as below:
```bash
curl -X POST \
  https://your_skycloak_hostname/realms/your_realm/protocol/openid-connect/token \
  -H "Content-Type: application/x-www-form-urlencoded" \
  -d "grant_type=client_credentials" \
  -d "client_id=your_client_name" \
  -d "client_secret=your_client_secret"
```
Note: Make sure to substitute the place holders like your_skycloak_hostname, your_relam etc. with correct values when making the cURL request. The request is split into multiple lines, separated by “\” character, just for the readability.
If everything is configured correctly, we will get an access token (among other details) in the response to the cURL request to Keycloak.
If we load the access token with a JWT debugger tool, it should show the role payment-read-role under the client name similar to below, among other payload details.
```bash
  "resource_access": {
    "calling-service-1c5f2fa0": {
      "roles": [
        "payment-read-role"
      ]
    },
```
Creating a Secured Spring Boot Application
Now, let’s create a secured microservice using Spring Boot. Our goal is to make a RESTful API call to this microservice by using the access token from Keycloak as a Bearer token to the secured REST endpoint that requires payment-read-role in the token.
I will not go into much detail about creating the Spring Boot service. You can generate a new project using https://start.spring.io by selecting the following dependencies:
- Spring Web
- Spring Security
- OAuth2 Resource Server
I have used Spring Boot 3.5.7, and you will also need a compatible version of Java for this project to work properly.
Following is the API endpoint:
@RestController
@RequestMapping("/api")
public class PaymentController {

    // Authenticated endpoint — token required, no specific role
    @GetMapping("/secure/data")
    public String secureData() {
        return "This is a secure endpoint requiring authentication.";
    }

    // Role-protected endpoint
    @GetMapping("/secure/greetings")
    @PreAuthorize("hasAuthority('ROLE_payment-read-role')")
    public String greeting() {
        return "Welcome from payment service!";
    }
}
Resource Server Configuration
@Configuration
@EnableMethodSecurity
public class ResourceServerConfig {
	 @Bean
	    public SecurityFilterChain securityFilterChain(HttpSecurity http) throws Exception {

	        http
	            .authorizeHttpRequests(auth -> auth
	                // Secure /api/secure/** (requires authentication)
	                .requestMatchers("/api/secure/**").authenticated()

	                // Any other endpoints also require authentication
	                .anyRequest().authenticated()
	            )
	            .oauth2ResourceServer(oauth2 -> oauth2
	                .jwt(jwt -> jwt
	                    .jwtAuthenticationConverter(new KeycloakClientRoleConverter())
	                )
	            );

	        return http.build();
	    }
}
As per the above code, /api/secure/data only requires a valid access token for accessing that endpoint. It does not check for the role we have created in Keycloak.
However, /api/secure/greetings requires ROLE_payment-read-role, and for this URL, we are enforcing RBAC.
The custom converter class
In the custom converter, we append the prefix ROLE_ to each client role from the access token.
This is necessary because Spring Security expects roles to be prefixed with ROLE_ when performing authorization checks using annotations like @PreAuthorize("hasAuthority('ROLE_payment-read-role')").
public class KeycloakClientRoleConverter implements Converter {

    private static final String TARGET_CLIENT_ID = "calling-service-1c5f2fa0";

    @Override
    public AbstractAuthenticationToken convert(Jwt jwt) {
        Collection authorities = extractRoles(jwt);

        JwtAuthenticationConverter jwtAuthConverter = new JwtAuthenticationConverter();
        jwtAuthConverter.setJwtGrantedAuthoritiesConverter(token -> authorities);

        return jwtAuthConverter.convert(jwt);
    }

    private Collection extractRoles(Jwt jwt) {
        Set authorities = new HashSet<>();

        // Client-level roles (resource_access)
        Map resourceAccess = jwt.getClaim("resource_access");
        if (resourceAccess != null) {

            // Specific client: calling-service-1c5f2fa0
            Map client = (Map) resourceAccess.get(TARGET_CLIENT_ID);
            if (client != null && client.get("roles") instanceof Collection) {
                Collection clientRoles = (Collection) client.get("roles");
                authorities.addAll(
                    clientRoles.stream()
                        .map(role -> new SimpleGrantedAuthority("ROLE_" + role))
                        .collect(Collectors.toSet())
                );
            }

        }

        return authorities;
    }
}
application.properties
server.port=9090
spring.application.name=paymentservice
spring.security.oauth2.resourceserver.jwt.issuer-uri=https://your_skycloak_hostname/realms/your_realm
Testing the Spring Boot microservice
Now it’s time to call our REST endpoint.
First, obtain an access token from Keycloak (as discussed in Testing Client Credentials Grant using cURL) and extract the access token
Then, make a cURL request similar to the one below to the Spring Boot microservice:
```bash
curl -X GET http://localhost:9090/api/secure/greetings \
  -H "Authorization: Bearer eyJhbGciOiJSUzI1NiIsInR5cCIgOiAiSldUIn0...."
```
If the token is valid and contains the role payment-read-role (with prefix ROLE_ applied in our converter), we will get:
Welcome from payment service!If you use an invalid or expired token, the API will return a 401 Unauthorized HTTP response.
You can verify this using the -i option in curl to view response headers.
The /api/secure/data endpoint should also be accessible with any valid token.
However, if you remove the payment-read-role from Keycloak and fetch the access token again, calling /api/secure/greetings will return an Unauthorized error.
Note: If your microservice is exposed to the internet, its mandatory to enable https
Summary
In this article, we explored how to obtain an access token from Skycloak using the Client Credentials Grant, with a specific client role included in the token. In a real-world scenario, an application (for example, the calling microservice) typically performs this step.
We then demonstrated how to use this token to access a secured REST API endpoint of a Spring Boot microservice that required that specific role in the access token (the /api/secure/greetings URL).
If the token is invalid or expired, the API responds with an Unauthorized error.
We also looked at the /api/secure/data endpoint where no specific role is checked, but access is still protected by a valid Keycloak access token.
This approach is widely adopted for microservice-to-microservice communication.
Further enhancements, such as using the token introspection endpoint or mTLS, can be implemented for stronger security.
If you’re new to Skycloak, visit the Skycloak Getting Started Guide to learn more.

