Last updated: March 2026
The default Keycloak login page tells your users nothing about your brand. It works, but it looks like a generic authentication form. When users encounter it, they have no visual confirmation they are logging into your application. For some, that hesitation is enough to abandon the flow.
This guide walks through the complete process of creating a custom Keycloak theme — from understanding the directory structure to deploying a fully branded login experience with custom colors, logos, CSS, and JavaScript. All examples target Keycloak 26+ running on Quarkus.
Theme Architecture
Keycloak organizes themes into five types:
| Type | Controls |
|---|---|
login |
Login, registration, password reset, OTP, WebAuthn pages |
account |
User self-service account management |
admin |
Admin console appearance |
email |
Email templates (verification, password reset, OTP) |
welcome |
Keycloak welcome page |
Each theme type has its own directory and can extend a parent theme. The default parent is keycloak (which itself extends base). You typically only customize login, account, and email — leave admin and welcome alone unless you have specific reasons.
Directory Structure
A custom theme lives in Keycloak’s themes directory:
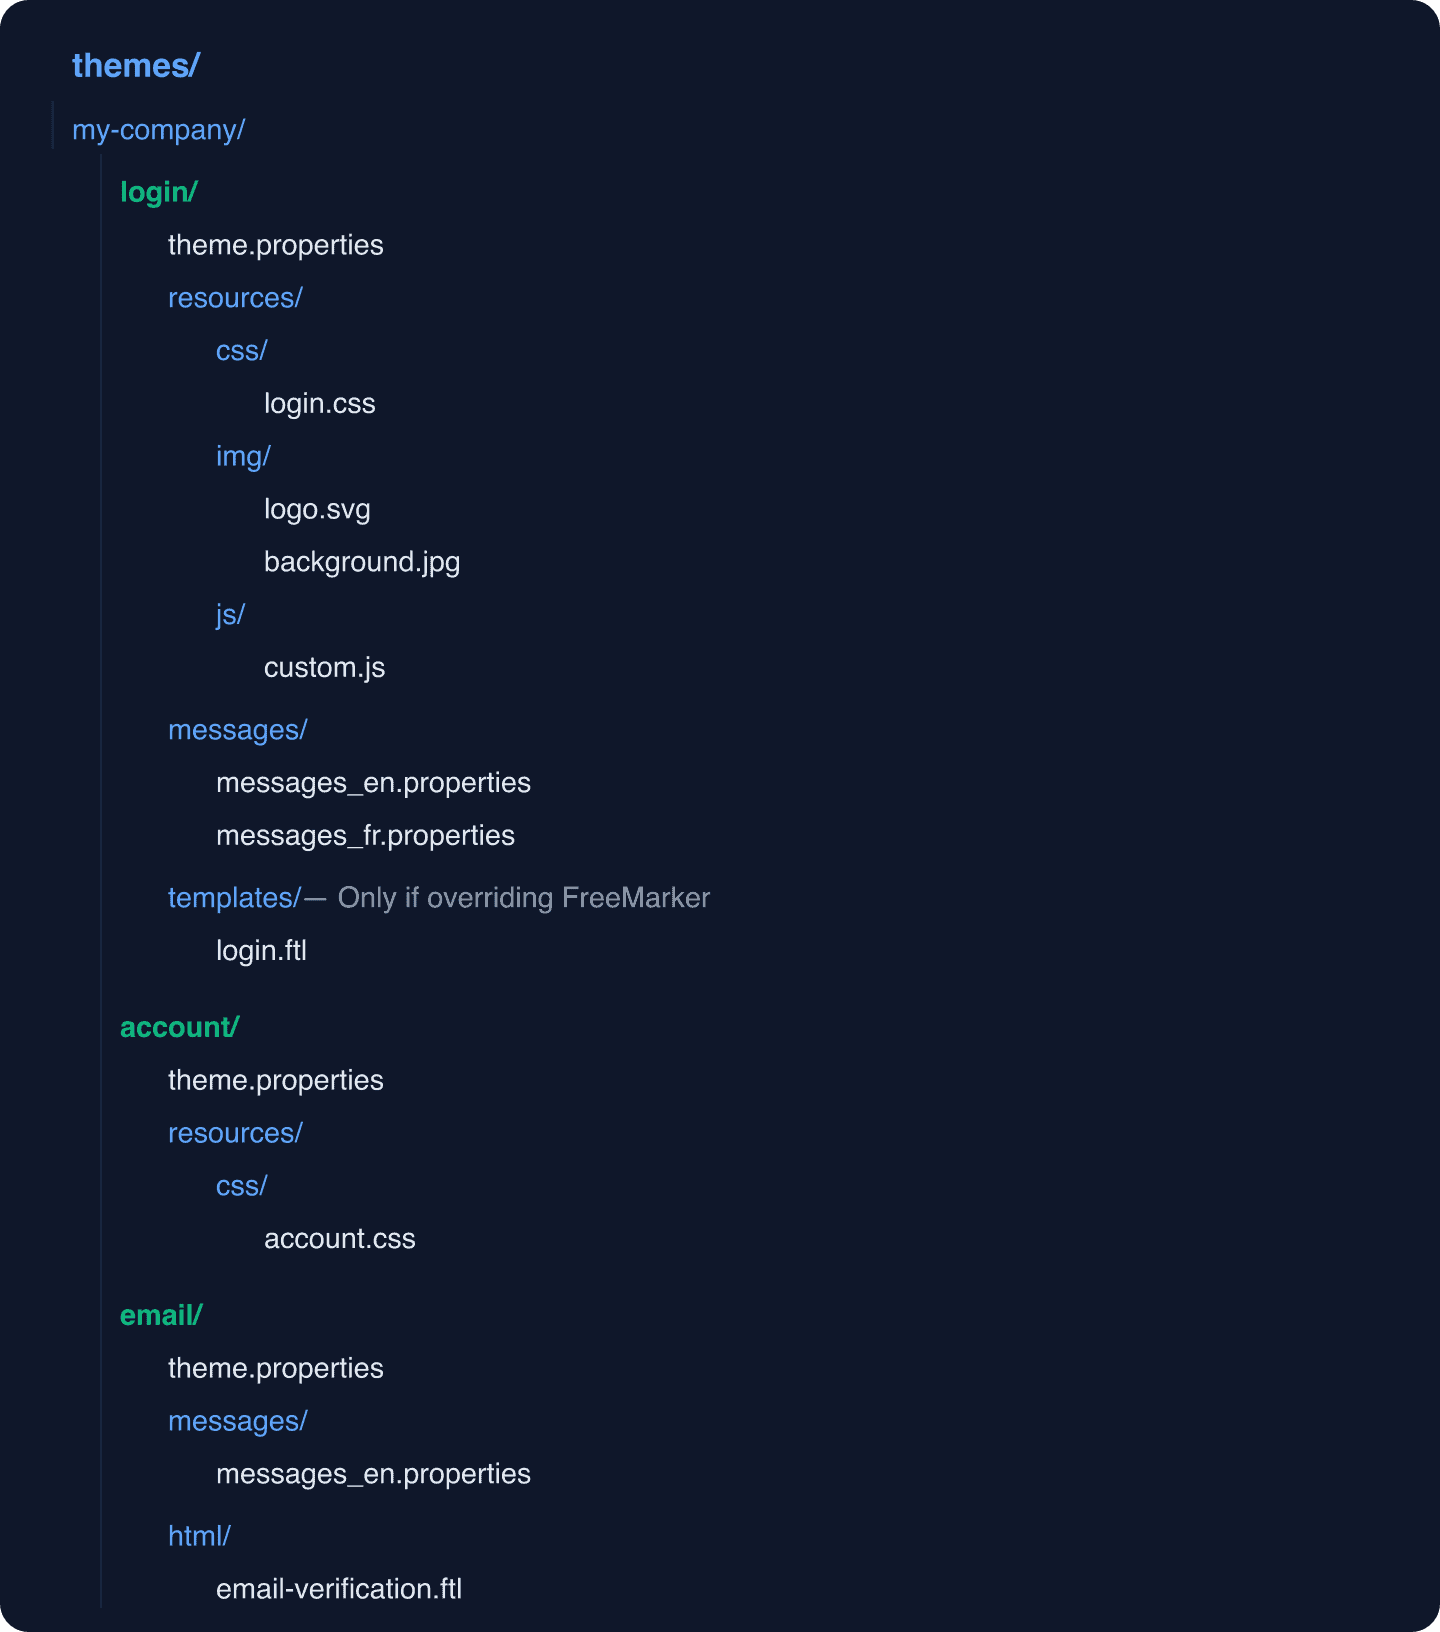
The theme.properties file in each type directory is the entry point. It tells Keycloak what parent theme to extend and what resources to load.
Creating the Login Theme
Step 1: theme.properties
Create themes/my-company/login/theme.properties:
parent=keycloak
import=common/keycloak

styles=css/login.css
scripts=js/custom.js

# Cache settings (disable during development)
cacheTemplates=true
cacheThemes=true
The parent=keycloak line means your theme inherits everything from the default Keycloak theme. You only override what you want to change.
Step 2: Custom CSS
Create themes/my-company/login/resources/css/login.css:
/* ==========================================================================
   Custom Keycloak Login Theme
   ========================================================================== */

/* ---------- Background ---------- */
.login-pf body {
    background: linear-gradient(135deg, #0f172a 0%, #1e293b 100%);
    background-attachment: fixed;
}

/* ---------- Login Card ---------- */
#kc-login {
    background: #ffffff;
    border-radius: 12px;
    box-shadow: 0 20px 60px rgba(0, 0, 0, 0.3);
    padding: 40px;
    max-width: 440px;
    margin: 0 auto;
}

/* ---------- Logo ---------- */
#kc-header-wrapper {
    text-align: center;
    padding-bottom: 24px;
}

#kc-header-wrapper::before {
    content: '';
    display: block;
    width: 180px;
    height: 48px;
    margin: 0 auto 16px;
    background-image: url('../img/logo.svg');
    background-size: contain;
    background-repeat: no-repeat;
    background-position: center;
}

/* Hide default Keycloak title text if using logo */
#kc-page-title {
    font-size: 1.25rem;
    font-weight: 600;
    color: #1e293b;
    margin-bottom: 8px;
}

/* ---------- Form Fields ---------- */
#kc-form input[type="text"],
#kc-form input[type="password"],
#kc-form input[type="email"] {
    width: 100%;
    padding: 12px 16px;
    border: 1px solid #e2e8f0;
    border-radius: 8px;
    font-size: 14px;
    transition: border-color 0.2s ease;
    background: #f8fafc;
}

#kc-form input[type="text"]:focus,
#kc-form input[type="password"]:focus,
#kc-form input[type="email"]:focus {
    border-color: #3b82f6;
    outline: none;
    box-shadow: 0 0 0 3px rgba(59, 130, 246, 0.15);
    background: #ffffff;
}

/* ---------- Labels ---------- */
#kc-form label {
    font-size: 13px;
    font-weight: 500;
    color: #475569;
    margin-bottom: 6px;
    display: block;
}

/* ---------- Primary Button ---------- */
#kc-login input[type="submit"],
#kc-form-buttons input[type="submit"] {
    width: 100%;
    padding: 12px;
    background: linear-gradient(135deg, #3b82f6 0%, #1e40af 100%);
    color: #ffffff;
    border: none;
    border-radius: 8px;
    font-size: 15px;
    font-weight: 600;
    cursor: pointer;
    transition: all 0.2s ease;
}

#kc-login input[type="submit"]:hover,
#kc-form-buttons input[type="submit"]:hover {
    background: linear-gradient(135deg, #60a5fa 0%, #3b82f6 100%);
    transform: translateY(-1px);
    box-shadow: 0 4px 12px rgba(59, 130, 246, 0.3);
}

/* ---------- Links ---------- */
#kc-form a,
#kc-registration a {
    color: #3b82f6;
    text-decoration: none;
    font-size: 13px;
}

#kc-form a:hover,
#kc-registration a:hover {
    color: #1e40af;
    text-decoration: underline;
}

/* ---------- Social Buttons ---------- */
#kc-social-providers ul {
    padding: 0;
    list-style: none;
}

#kc-social-providers li {
    margin-bottom: 8px;
}

#kc-social-providers a {
    display: flex;
    align-items: center;
    justify-content: center;
    padding: 10px 16px;
    border: 1px solid #e2e8f0;
    border-radius: 8px;
    background: #ffffff;
    color: #1e293b;
    text-decoration: none;
    font-size: 14px;
    transition: all 0.2s ease;
}

#kc-social-providers a:hover {
    background: #f1f5f9;
    border-color: #cbd5e1;
}

/* ---------- Error Messages ---------- */
.alert-error {
    background: #fef2f2;
    border: 1px solid #fecaca;
    color: #991b1b;
    border-radius: 8px;
    padding: 12px 16px;
    font-size: 13px;
    margin-bottom: 16px;
}

/* ---------- Responsive ---------- */
@media (max-width: 480px) {
    #kc-login {
        margin: 16px;
        padding: 24px;
    }
}
Step 3: Add Your Logo
Place your logo SVG at themes/my-company/login/resources/img/logo.svg. Use SVG format for crisp rendering at any resolution.
Step 4: Custom JavaScript (Optional)
Create themes/my-company/login/resources/js/custom.js for enhancements like password visibility toggles or input validation:
document.addEventListener('DOMContentLoaded', function () {
    // Add password visibility toggle
    const passwordFields = document.querySelectorAll('input[type="password"]');

    passwordFields.forEach(function (field) {
        const wrapper = document.createElement('div');
        wrapper.style.position = 'relative';
        field.parentNode.insertBefore(wrapper, field);
        wrapper.appendChild(field);

        const toggle = document.createElement('button');
        toggle.type = 'button';
        toggle.textContent = 'Show';
        toggle.setAttribute('aria-label', 'Toggle password visibility');
        toggle.style.cssText = 'position:absolute;right:12px;top:50%;transform:translateY(-50%);background:none;border:none;color:#64748b;cursor:pointer;font-size:12px;';

        toggle.addEventListener('click', function () {
            if (field.type === 'password') {
                field.type = 'text';
                toggle.textContent = 'Hide';
            } else {
                field.type = 'password';
                toggle.textContent = 'Show';
            }
        });

        wrapper.appendChild(toggle);
    });
});
Customizing Internationalization Messages
You can override any text string that Keycloak displays without touching FreeMarker templates. This is the recommended approach for text changes.
Create themes/my-company/login/messages/messages_en.properties:
# Override the login page title
loginTitle=Sign in to {0}
loginTitleHtml={0}

# Override button text
doLogIn=Sign In
doRegister=Create Account

# Override the "Remember me" label
rememberMe=Keep me signed in

# Override error messages
invalidUserMessage=We could not find an account with those credentials.
accountDisabledMessage=This account has been suspended. Contact support for assistance.

# Override registration labels
registerTitle=Create your account
emailLabel=Email address
usernameLabel=Username
firstNameLabel=First name
lastNameLabel=Last name
passwordLabel=Password
passwordConfirmLabel=Confirm password
For additional languages, create messages_fr.properties, messages_de.properties, etc. Keycloak selects the right file based on the user’s browser language or the realm’s default locale.
See the Keycloak source code for the complete list of message keys you can override.
Overriding FreeMarker Templates
For changes that go beyond CSS and message text — like restructuring the HTML layout — you need to override the FreeMarker templates.
Copy the template you want to modify from the Keycloak source into your theme’s templates directory:
# Find the template in the Keycloak source
# https://github.com/keycloak/keycloak/tree/main/themes/src/main/resources/theme/base/login

# Copy login.ftl to your theme
cp login.ftl themes/my-company/login/templates/login.ftl
Here is an example of a customized login.ftl that adds a marketing sidebar:
<#import "template.ftl" as layout>
<@layout.registrationLayout displayMessage=!messagesPerField.existsError('username','password') displayInfo=realm.password && realm.registrationAllowed && !registrationDisabled??; section>
    <#if section = "header">
        ${msg("loginAccountTitle")}
    <#elseif section = "form">
        <div id="kc-form">
            <div id="kc-form-wrapper">
                <#if realm.password>
                    <form id="kc-form-login" onsubmit="login.disabled = true; return true;"
                          action="${url.loginAction}" method="post">

                        <#if !usernameHidden??>
                            <div class="form-group">
                                <label for="username">
                                    <#if !realm.loginWithEmailAllowed>
                                        ${msg("username")}
                                    <#elseif !realm.registrationEmailAsUsername>
                                        ${msg("usernameOrEmail")}
                                    <#else>
                                        ${msg("email")}
                                    </#if>
                                </label>
                                <input tabindex="1" id="username" name="username"
                                       value="${(login.username!'')}" type="text"
                                       autofocus autocomplete="off"
                                       aria-invalid="<#if messagesPerField.existsError('username','password')>true</#if>" />

                                <#if messagesPerField.existsError('username','password')>
                                    <span class="input-error" aria-live="polite">
                                        ${kcSanitize(messagesPerField.getFirstError('username','password'))?no_esc}
                                    </span>
                                </#if>
                            </div>
                        </#if>

                        <div class="form-group">
                            <label for="password">${msg("password")}</label>
                            <input tabindex="2" id="password" name="password"
                                   type="password" autocomplete="off"
                                   aria-invalid="<#if messagesPerField.existsError('username','password')>true</#if>" />
                        </div>

                        <div class="form-group form-options">
                            <#if realm.rememberMe && !usernameHidden??>
                                <div class="checkbox">
                                    <label>
                                        <#if login.rememberMe??>
                                            <input tabindex="3" id="rememberMe" name="rememberMe"
                                                   type="checkbox" checked>
                                        <#else>
                                            <input tabindex="3" id="rememberMe" name="rememberMe"
                                                   type="checkbox">
                                        </#if>
                                        ${msg("rememberMe")}
                                    </label>
                                </div>
                            </#if>

                            <#if realm.resetPasswordAllowed>
                                <span class="forgot-password">
                                    <a tabindex="5" href="${url.loginResetCredentialsUrl}">
                                        ${msg("doForgotPassword")}
                                    </a>
                                </span>
                            </#if>
                        </div>

                        <div id="kc-form-buttons" class="form-group">
                            <input type="hidden" id="id-hidden-input" name="credentialId"
                                   <#if auth.selectedCredential?has_content>
                                       value="${auth.selectedCredential}"
                                   </#if>/>
                            <input tabindex="4" name="login" id="kc-login" type="submit"
                                   value="${msg("doLogIn")}" />
                        </div>
                    </form>
                </#if>
            </div>
        </div>
    <#elseif section = "info">
        <#if realm.password && realm.registrationAllowed && !registrationDisabled??>
            <div id="kc-registration-container">
                <div id="kc-registration">
                    <span>${msg("noAccount")}
                        <a tabindex="6" href="${url.registrationUrl}">
                            ${msg("doRegister")}
                        </a>
                    </span>
                </div>
            </div>
        </#if>
    </#if>
</@layout.registrationLayout>
Important: Only override templates when CSS and message changes are not enough. Overriding templates means you take responsibility for keeping them updated when Keycloak changes the template structure in future versions.
Account Theme Customization
Keycloak 26 uses a React-based account console (Account Console v3). Customizing it requires a different approach than the FreeMarker-based login theme.
For the account theme, create themes/my-company/account/theme.properties:
parent=keycloak.v3To customize styles, you can add a CSS override:
parent=keycloak.v3
styles=css/account.css
Create themes/my-company/account/resources/css/account.css:
/* Override account console header */
.pf-v5-c-masthead {
    background: linear-gradient(135deg, #0f172a 0%, #1e293b 100%);
}

/* Adjust sidebar */
.pf-v5-c-nav__link.pf-m-current {
    border-left-color: #3b82f6;
}
For Skycloak managed clusters, the Branding feature provides a UI for uploading logos and selecting colors without editing theme files directly.
Email Theme Customization
Email themes use FreeMarker templates to generate HTML emails. Customize these to match your brand.
Create themes/my-company/email/theme.properties:
parent=keycloakOverride the email verification template at themes/my-company/email/html/email-verification.ftl:
<html>
<head>
    <style>
        body { font-family: -apple-system, BlinkMacSystemFont, 'Segoe UI', Roboto, sans-serif; background: #f1f5f9; margin: 0; padding: 20px; }
        .container { max-width: 560px; margin: 0 auto; background: #ffffff; border-radius: 12px; overflow: hidden; }
        .header { background: linear-gradient(135deg, #0f172a 0%, #1e293b 100%); padding: 32px; text-align: center; }
        .header img { height: 40px; }
        .content { padding: 32px; color: #1e293b; line-height: 1.6; }
        .button { display: inline-block; padding: 12px 32px; background: linear-gradient(135deg, #3b82f6, #1e40af); color: #ffffff; text-decoration: none; border-radius: 8px; font-weight: 600; margin: 16px 0; }
        .footer { padding: 24px 32px; color: #64748b; font-size: 13px; border-top: 1px solid #e2e8f0; }
    </style>
</head>
<body>
    <div class="container">
        <div class="header">
            <img src="https://your-domain.com/logo-white.svg" alt="Company Logo" />
        </div>
        <div class="content">
            <h2>Verify your email address</h2>
            <p>Hi ${user.firstName!"there"},</p>
            <p>Please verify your email address by clicking the button below. This link will expire in ${linkExpirationFormatter(linkExpiration)}.</p>
            <p style="text-align: center;">
                <a href="${link}" class="button">Verify Email</a>
            </p>
            <p>If you did not create an account, you can safely ignore this email.</p>
        </div>
        <div class="footer">
            <p>This email was sent by Your Company. If you have questions, contact [email protected].</p>
        </div>
    </div>
</body>
</html>
For email configuration (SMTP setup), see Keycloak Email Configuration: SMTP Setup and Templates.
Deployment Methods
Method 1: Volume Mount (Development)
Mount your theme directory directly into the container:
docker run -p 8080:8080
  -v /path/to/themes/my-company:/opt/keycloak/themes/my-company
  -e KC_BOOTSTRAP_ADMIN_USERNAME=admin
  -e KC_BOOTSTRAP_ADMIN_PASSWORD=admin
  quay.io/keycloak/keycloak:26.1.0 start-dev
Method 2: Custom Docker Image (Production)
Build your theme into the Keycloak image:
FROM quay.io/keycloak/keycloak:26.1.0 AS builder

# Copy custom theme
COPY themes/my-company /opt/keycloak/themes/my-company

ENV KC_DB=postgres
ENV KC_HEALTH_ENABLED=true

RUN /opt/keycloak/bin/kc.sh build

FROM quay.io/keycloak/keycloak:26.1.0
COPY --from=builder /opt/keycloak/ /opt/keycloak/

ENTRYPOINT ["/opt/keycloak/bin/kc.sh"]
CMD ["start", "--optimized"]
Method 3: JAR Theme (Reusable)
Package your theme as a JAR file and drop it in the providers directory:
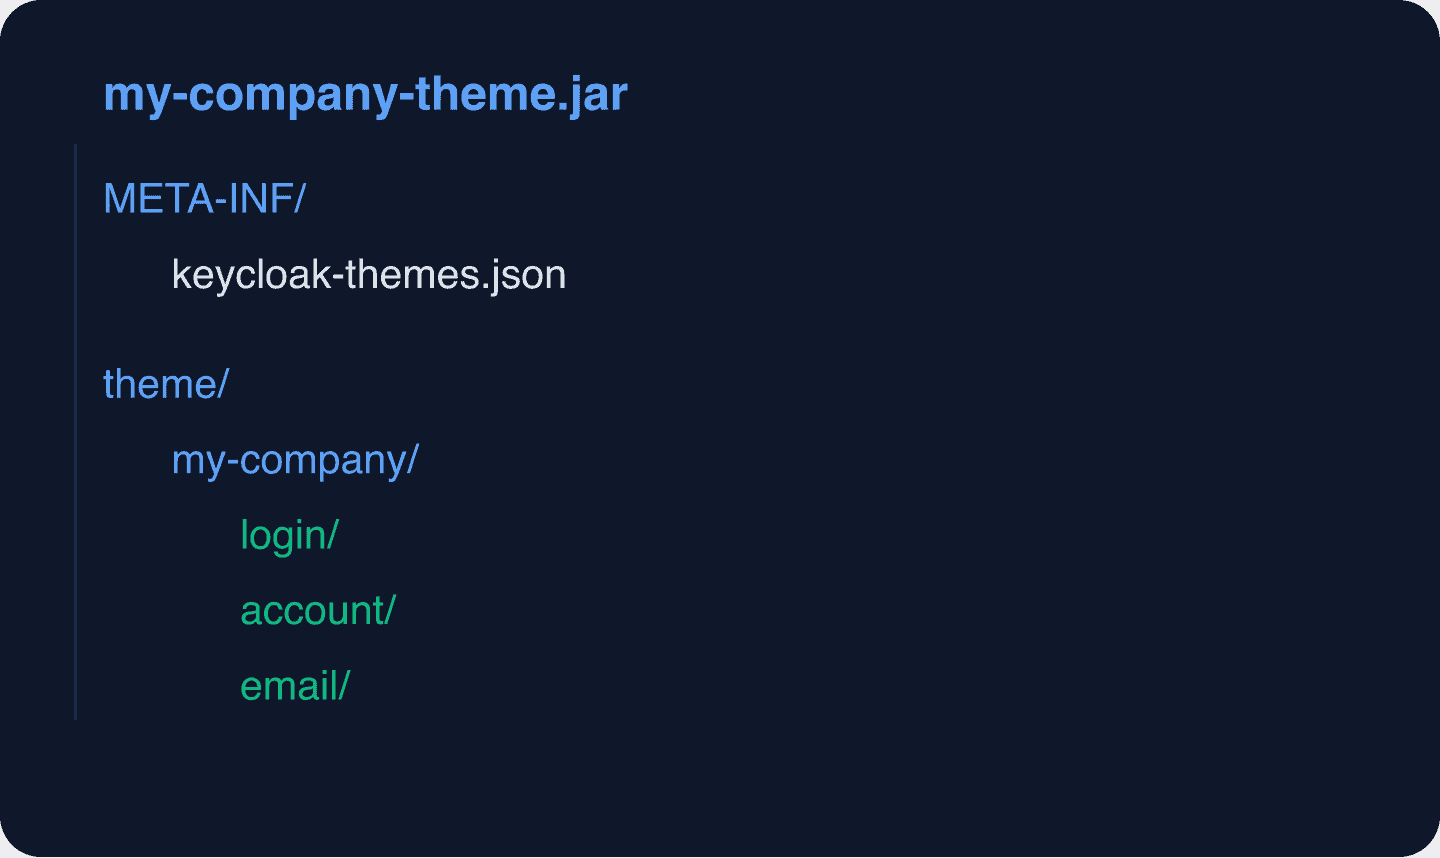
Create META-INF/keycloak-themes.json:
{
    "themes": [
        {
            "name": "my-company",
            "types": ["login", "account", "email"]
        }
    ]
}
Build the JAR:
jar cf my-company-theme.jar -C theme-src .Copy it to Keycloak’s providers directory:
cp my-company-theme.jar /opt/keycloak/providers/
/opt/keycloak/bin/kc.sh build
Activating the Theme
After deploying, activate the theme in the Keycloak admin console:
- Navigate to Realm Settings > Themes.
- Set Login Theme to
my-company. - Set Account Theme to
my-company. - Set Email Theme to
my-company. - Click Save.
Or configure via the Admin REST API:
curl -X PUT https://keycloak.example.com/admin/realms/myrealm
  -H "Authorization: Bearer $ADMIN_TOKEN"
  -H "Content-Type: application/json"
  -d '{
    "loginTheme": "my-company",
    "accountTheme": "my-company",
    "emailTheme": "my-company"
  }'
Theme Development Workflow
For fast iteration during development:
- Start Keycloak in dev mode (
start-dev) — this disables theme caching. - Mount your theme directory as a volume.
- Edit CSS/templates and refresh the browser to see changes immediately.
If you are using production mode and need to test theme changes:
# Disable theme caching temporarily
KC_SPI_THEME_STATIC_MAX_AGE=-1
KC_SPI_THEME_CACHE_THEMES=false
KC_SPI_THEME_CACHE_TEMPLATES=false
Never disable caching in production. It significantly impacts performance.
Testing Themes
Test your theme across all user-facing pages:
- [ ] Login page (username/password)
- [ ] Login with social providers (if configured)
- [ ] Registration page
- [ ] Password reset request page
- [ ] Password reset confirmation
- [ ] OTP/TOTP verification (MFA flows)
- [ ] WebAuthn/Passkey enrollment
- [ ] Error pages (invalid credentials, expired link)
- [ ] Account console (profile, password, sessions, 2FA)
- [ ] Email templates (verification, password reset)
- [ ] Mobile responsiveness (test at 375px and 768px widths)
Use the Keycloak Config Generator to quickly create test realms with various configurations to exercise all theme pages.
Common Pitfalls
1. CSS specificity conflicts. The default Keycloak theme uses PatternFly classes with high specificity. You may need to use more specific selectors or (sparingly) !important to override styles.
2. Template version drift. If you override FreeMarker templates, you must check them against each Keycloak version upgrade. Template changes can break your customization.
3. Missing responsive styles. The default Keycloak theme is responsive. If you override the layout significantly, test on mobile devices.
4. Broken social login buttons. Social login buttons have their own styling. Make sure your CSS handles the identity provider icons correctly.
5. Caching in production. After deploying theme changes, users may see the old theme due to browser caching. Set appropriate Cache-Control headers at the reverse proxy level. The session management behavior is not affected by theme changes.
Next Steps
- Keycloak Email Configuration for SMTP and email template setup
- Keycloak Production Ready Checklist for deployment best practices
- Skycloak Branding Feature for managed theme deployment
- Keycloak Themes Documentation for the official reference
Want branded login pages without managing theme deployments? Skycloak provides managed Keycloak with a branding feature that lets you upload logos and configure colors through a simple UI. Check our pricing to get started.

Ready to simplify your authentication?
Deploy production-ready Keycloak in minutes. Unlimited users, flat pricing, no SSO tax.
