Last updated: March 2026
If you have followed our introductory guide on using Terraform with Keycloak, you know the basics: provisioning realms, clients, and roles using the Keycloak Terraform provider. But as your IAM infrastructure grows across multiple environments, teams, and applications, you need more structured patterns to keep things maintainable.
This guide covers advanced Terraform patterns for Keycloak: reusable modules, workspace-per-environment strategies, remote state management, sensitive value handling, importing existing configurations, and CI/CD integration with Terraform Cloud and Atlantis.
Managing a Skycloak-hosted Keycloak? The patterns below use the community Keycloak provider, which configures a Keycloak you run. If Skycloak manages your Keycloak, the Skycloak Terraform provider applies these same module and workspace patterns and also manages the platform layer the admin API cannot reach: clusters, custom domains, WAF, SIEM destinations, and branding, all from one provider. See how the two providers compare and combine in Skycloak vs the community Keycloak Terraform provider.
Why You Need Advanced Patterns
A single main.tf file works fine when you have one realm and a handful of clients. But production Keycloak deployments typically involve:
- Multiple realms (one per tenant, or separate realms for internal vs. external users)
- Dozens of OIDC and SAML clients across different applications
- Complex role-based access control hierarchies with composite roles
- Environment parity across dev, staging, and production
- Multiple teams contributing configurations
Without structure, Terraform codebases become difficult to review, test, and maintain. Modules and workspaces solve this.
Reusable Terraform Modules
Module Structure
A well-organized Keycloak Terraform project looks like this:
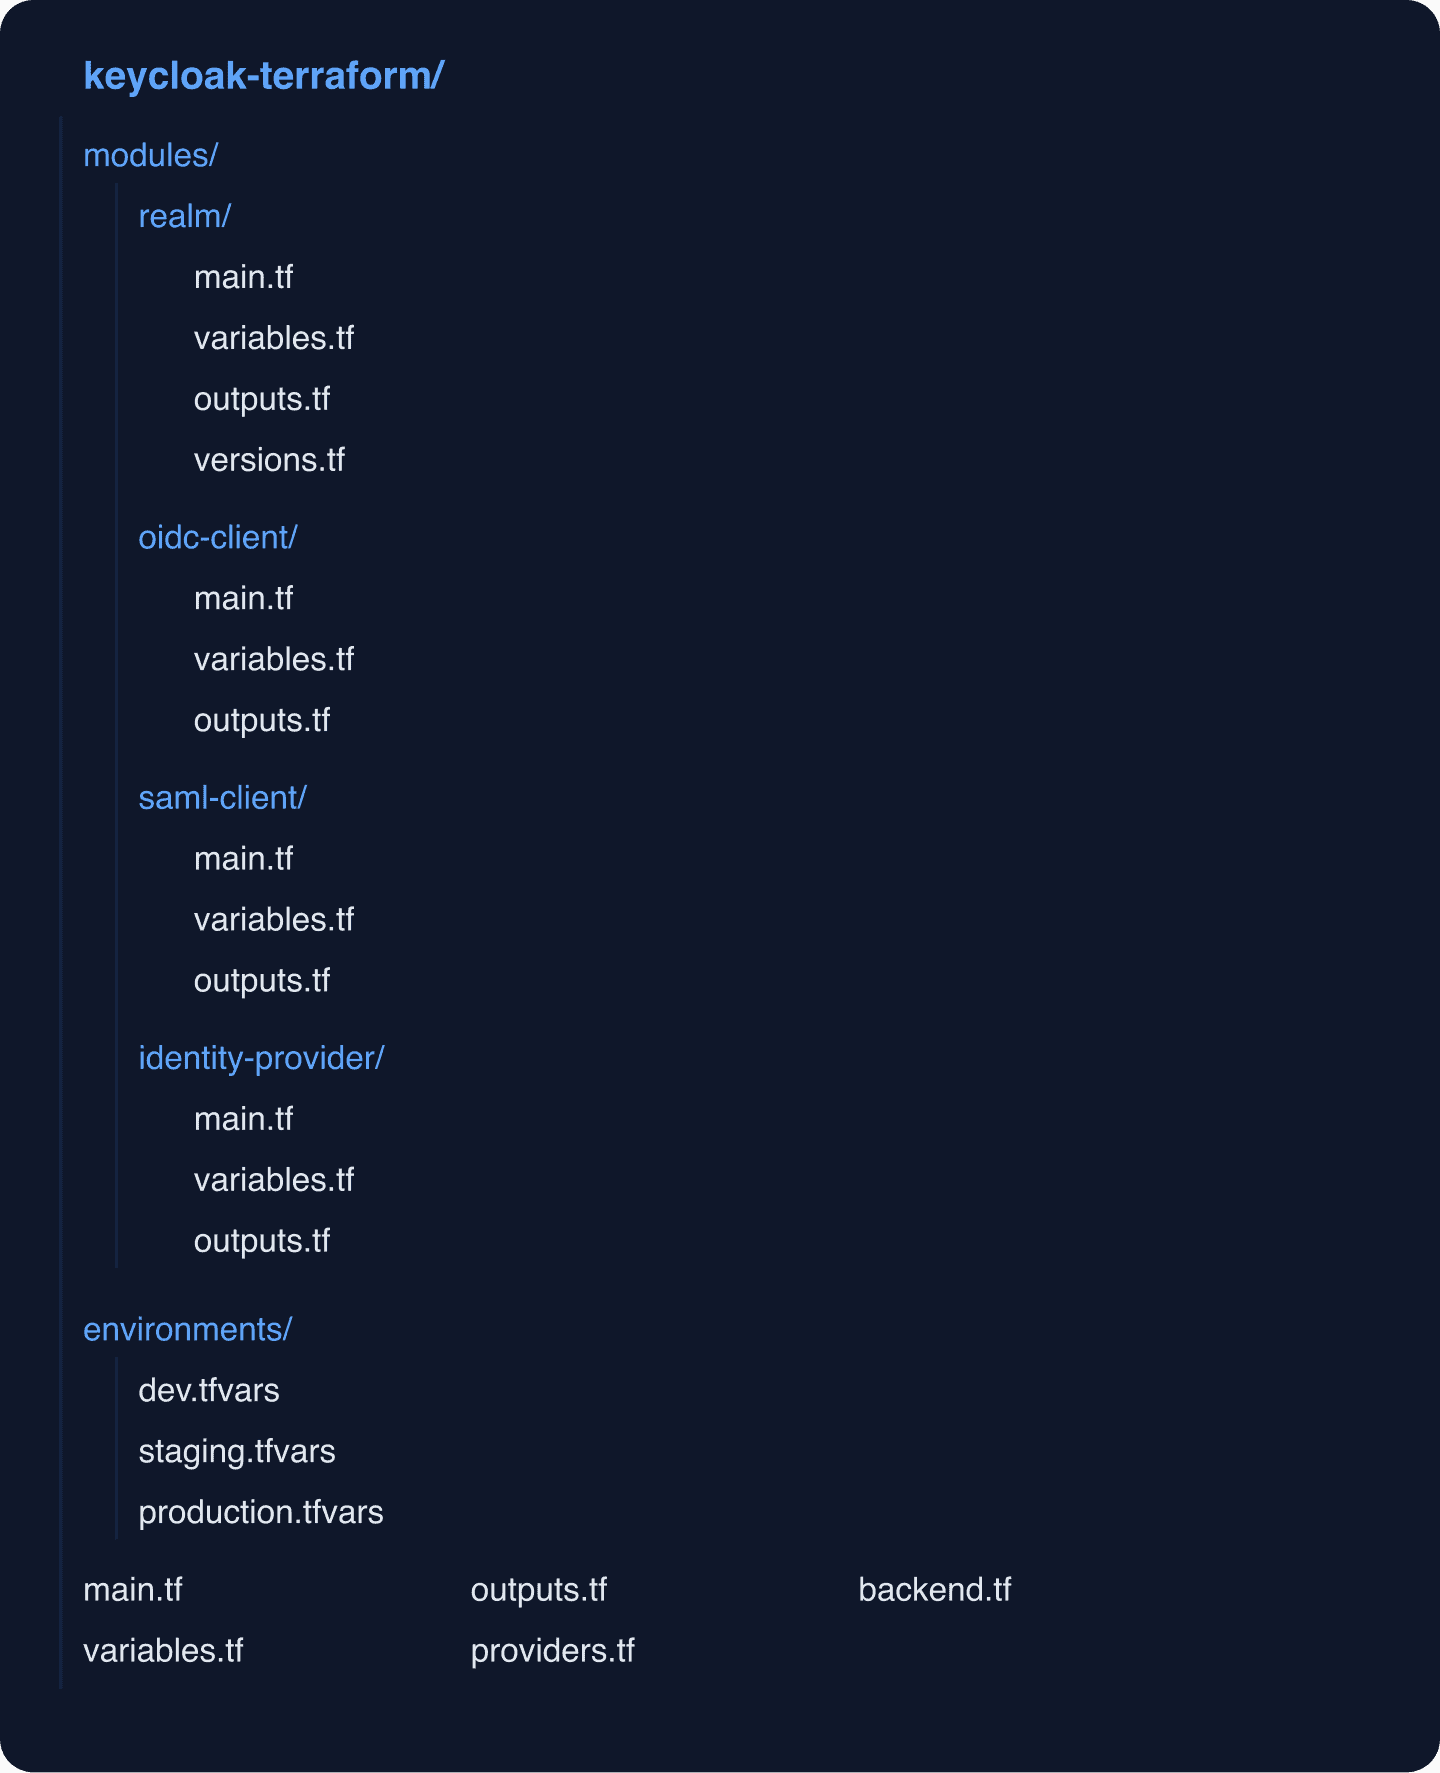
Realm Module
The realm module encapsulates all the configuration needed for a fully configured Keycloak realm:
# modules/realm/variables.tf
variable "realm_name" {
  description = "Name of the Keycloak realm"
  type        = string
}

variable "display_name" {
  description = "Display name for the realm"
  type        = string
}

variable "enabled" {
  description = "Whether the realm is enabled"
  type        = bool
  default     = true
}

variable "registration_allowed" {
  description = "Allow user self-registration"
  type        = bool
  default     = false
}

variable "password_policy" {
  description = "Password policy string"
  type        = string
  default     = "length(12) and upperCase(1) and lowerCase(1) and specialChars(1) and digits(1)"
}

variable "login_theme" {
  description = "Theme for login pages"
  type        = string
  default     = "keycloak"
}

variable "smtp_config" {
  description = "SMTP configuration for the realm"
  type = object({
    host     = string
    port     = string
    from     = string
    username = string
    password = string
    ssl      = bool
    starttls = bool
  })
  default = null
}

variable "brute_force_detection" {
  description = "Brute force detection settings"
  type = object({
    enabled              = bool
    max_login_failures   = number
    wait_increment       = number
    max_failure_wait     = number
    permanent_lockout    = bool
  })
  default = {
    enabled              = true
    max_login_failures   = 5
    wait_increment       = 60
    max_failure_wait     = 900
    permanent_lockout    = false
  }
}
# modules/realm/main.tf
terraform {
required_providers {
keycloak = {
source = "mrparkers/keycloak"
version = ">= 4.4.0"
}
}
}
resource "keycloak_realm" "this" {
realm = var.realm_name
enabled = var.enabled
display_name = var.display_name
login_theme = var.login_theme
ssl_required = "external"
registration_allowed = var.registration_allowed
login_with_email_allowed = true
duplicate_emails_allowed = false
edit_username_allowed = false
password_policy = var.password_policy
security_defenses {
headers {
content_security_policy = "frame-src 'self'; frame-ancestors 'self'; object-src 'none';"
x_content_type_options = "nosniff"
x_frame_options = "SAMEORIGIN"
x_robots_tag = "none"
}
brute_force_detection {
permanent_lockout = var.brute_force_detection.permanent_lockout
max_login_failures = var.brute_force_detection.max_login_failures
wait_increment_seconds = var.brute_force_detection.wait_increment
max_failure_wait_seconds = var.brute_force_detection.max_failure_wait
}
}
dynamic "smtp_server" {
for_each = var.smtp_config != null ? [var.smtp_config] : []
content {
host = smtp_server.value.host
port = smtp_server.value.port
from = smtp_server.value.from
auth {
username = smtp_server.value.username
password = smtp_server.value.password
}
ssl = smtp_server.value.ssl
starttls = smtp_server.value.starttls
}
}
}
# Default client scopes that every realm should have
resource "keycloak_openid_client_scope" "roles_scope" {
realm_id = keycloak_realm.this.id
name = "roles"
description = "OpenID Connect scope for roles"
include_in_token_scope = true
}# modules/realm/outputs.tf
output "realm_id" {
description = "The ID of the created realm"
value = keycloak_realm.this.id
}
output "realm_name" {
description = "The name of the created realm"
value = keycloak_realm.this.realm
}OIDC Client Module
The OIDC client module handles the common patterns for single sign-on client registration:
# modules/oidc-client/variables.tf
variable "realm_id" {
  description = "ID of the Keycloak realm"
  type        = string
}

variable "client_id" {
  description = "Client ID for the OIDC client"
  type        = string
}

variable "name" {
  description = "Display name for the client"
  type        = string
}

variable "access_type" {
  description = "Access type: PUBLIC, CONFIDENTIAL, or BEARER-ONLY"
  type        = string
  default     = "CONFIDENTIAL"

  validation {
    condition     = contains(["PUBLIC", "CONFIDENTIAL", "BEARER-ONLY"], var.access_type)
    error_message = "access_type must be PUBLIC, CONFIDENTIAL, or BEARER-ONLY."
  }
}

variable "redirect_uris" {
  description = "Valid redirect URIs"
  type        = list(string)
  default     = []
}

variable "web_origins" {
  description = "Allowed web origins for CORS"
  type        = list(string)
  default     = []
}

variable "service_account_enabled" {
  description = "Enable service account for client credentials grant"
  type        = bool
  default     = false
}

variable "roles" {
  description = "Map of client roles to create"
  type        = map(string)  # role_name => description
  default     = {}
}
# modules/oidc-client/main.tf
resource "keycloak_openid_client" "this" {
realm_id = var.realm_id
client_id = var.client_id
name = var.name
enabled = true
access_type = var.access_type
standard_flow_enabled = var.access_type != "BEARER-ONLY"
direct_access_grants_enabled = false
service_accounts_enabled = var.service_account_enabled
valid_redirect_uris = var.redirect_uris
web_origins = var.web_origins
pkce_code_challenge_method = var.access_type == "PUBLIC" ? "S256" : ""
login_theme = "keycloak"
}
resource "keycloak_role" "client_roles" {
for_each = var.roles
realm_id = var.realm_id
client_id = keycloak_openid_client.this.id
name = each.key
description = each.value
}# modules/oidc-client/outputs.tf
output "client_id" {
value = keycloak_openid_client.this.client_id
}
output "client_secret" {
value = keycloak_openid_client.this.client_secret
sensitive = true
}
output "resource_id" {
value = keycloak_openid_client.this.id
}
output "role_ids" {
value = { for k, v in keycloak_role.client_roles : k => v.id }
}Using Modules Together
Compose the modules in your root main.tf:
# main.tf
module "realm" {
  source = "./modules/realm"

  realm_name            = "${var.app_name}-${var.environment}"
  display_name          = "${var.app_name} (${var.environment})"
  registration_allowed  = var.environment == "dev"
  password_policy       = var.environment == "production" ? "length(14) and upperCase(1) and lowerCase(1) and specialChars(1) and digits(1) and notUsername" : "length(8)"
}

module "frontend_client" {
  source = "./modules/oidc-client"

  realm_id      = module.realm.realm_id
  client_id     = "frontend"
  name          = "Frontend Application"
  access_type   = "PUBLIC"
  redirect_uris = var.frontend_redirect_uris
  web_origins   = var.frontend_web_origins

  roles = {
    admin  = "Full application access"
    editor = "Content editing access"
    viewer = "Read-only access"
  }
}

module "backend_client" {
  source = "./modules/oidc-client"

  realm_id                = module.realm.realm_id
  client_id               = "backend-api"
  name                    = "Backend API"
  access_type             = "CONFIDENTIAL"
  service_account_enabled = true
  redirect_uris           = []
  web_origins             = []
}
Workspace-Per-Environment Strategy
Terraform workspaces let you manage multiple environments from the same codebase. This is cleaner than duplicating configurations across directories.
Setting Up Workspaces
terraform workspace new dev
terraform workspace new staging
terraform workspace new production
Environment-Specific Variables
Create .tfvars files per environment:
# environments/dev.tfvars
app_name    = "myapp"
environment = "dev"

frontend_redirect_uris = [
  "http://localhost:3000/*",
  "https://dev-app.example.com/*",
]
frontend_web_origins = [
  "http://localhost:3000",
  "https://dev-app.example.com",
]

keycloak_url = "https://dev-keycloak.skycloak.io"
# environments/production.tfvars
app_name = "myapp"
environment = "production"
frontend_redirect_uris = [
"https://app.example.com/*",
]
frontend_web_origins = [
"https://app.example.com",
]
keycloak_url = "https://prod-keycloak.skycloak.io"Deploy to a Specific Environment
terraform workspace select staging
terraform apply -var-file=environments/staging.tfvars
Workspace-Aware Provider Configuration
# providers.tf
provider "keycloak" {
  client_id     = "admin-cli"
  client_secret = var.keycloak_client_secret
  url           = var.keycloak_url
}
Each workspace maintains its own state file, so resources in dev and production are completely isolated.
Remote State Management
For team environments, remote state is essential. Configure an S3 backend with DynamoDB locking:
# backend.tf
terraform {
  backend "s3" {
    bucket         = "mycompany-terraform-state"
    key            = "keycloak/terraform.tfstate"
    region         = "us-east-1"
    encrypt        = true
    dynamodb_table = "terraform-locks"
  }
}
When using workspaces, Terraform automatically prefixes the state key with the workspace name, keeping state files separate.
Cross-Project State References
If your Keycloak cluster infrastructure lives in a separate Terraform project, reference its outputs:
data "terraform_remote_state" "keycloak_infra" {
  backend = "s3"
  config = {
    bucket = "mycompany-terraform-state"
    key    = "env:/${terraform.workspace}/keycloak-infra/terraform.tfstate"
    region = "us-east-1"
  }
}

provider "keycloak" {
  client_id     = "admin-cli"
  client_secret = var.keycloak_client_secret
  url           = data.terraform_remote_state.keycloak_infra.outputs.keycloak_url
}
Handling Sensitive Values
Keycloak configuration involves many secrets: client secrets, SMTP passwords, identity provider credentials. Handle them carefully.
Using Variables with sensitive = true
variable "keycloak_client_secret" {
  description = "Client secret for Terraform provider authentication"
  type        = string
  sensitive   = true
}

variable "smtp_password" {
  description = "SMTP server password"
  type        = string
  sensitive   = true
}
Integrating with HashiCorp Vault
For production environments, pull secrets from Vault instead of .tfvars files:
provider "vault" {
  address = "https://vault.example.com"
}

data "vault_generic_secret" "keycloak" {
  path = "secret/keycloak/${terraform.workspace}"
}

provider "keycloak" {
  client_id     = "admin-cli"
  client_secret = data.vault_generic_secret.keycloak.data["client_secret"]
  url           = data.vault_generic_secret.keycloak.data["url"]
}
Using Environment Variables
For CI/CD pipelines, pass secrets through environment variables:
export TF_VAR_keycloak_client_secret="your-secret"
terraform apply -var-file=environments/production.tfvars
Never commit secrets to version control. For more on securing your IAM infrastructure, see our security practices page.
Importing Existing Keycloak Configuration
If you have an existing Keycloak instance with manually configured resources, you can bring them under Terraform management using terraform import.
Import a Realm
terraform import 'module.realm.keycloak_realm.this' my-realmImport a Client
terraform import 'module.frontend_client.keycloak_openid_client.this' my-realm/client-uuidGenerating Configuration from Imports
With Terraform 1.5+, use import blocks and terraform plan -generate-config-out:
import {
  to = keycloak_realm.imported
  id = "existing-realm"
}

import {
  to = keycloak_openid_client.imported_client
  id = "existing-realm/client-uuid-here"
}
terraform plan -generate-config-out=generated.tfThis generates HCL for the imported resources, giving you a starting point to refactor into modules. You can find resource UUIDs in the Keycloak admin console URL or through the Keycloak Admin API.
CI/CD Pipeline Integration
Terraform Cloud
Terraform Cloud provides remote execution, state management, and team access controls. Configure it as a backend:
terraform {
  cloud {
    organization = "my-org"
    workspaces {
      tags = ["keycloak"]
    }
  }
}
In Terraform Cloud, create workspace-specific variables for each environment and configure VCS-driven runs to trigger on pull requests.
GitHub Actions Pipeline
Here is a complete pipeline that runs plan on PRs and apply on merge:
name: Keycloak Terraform
on:
  pull_request:
    paths: ['keycloak-terraform/**']
  push:
    branches: [main]
    paths: ['keycloak-terraform/**']

env:
  TF_VAR_keycloak_client_secret: ${{ secrets.KEYCLOAK_CLIENT_SECRET }}
  AWS_ACCESS_KEY_ID: ${{ secrets.AWS_ACCESS_KEY_ID }}
  AWS_SECRET_ACCESS_KEY: ${{ secrets.AWS_SECRET_ACCESS_KEY }}

jobs:
  plan:
    if: github.event_name == 'pull_request'
    runs-on: ubuntu-latest
    strategy:
      matrix:
        environment: [dev, staging, production]
    steps:
      - uses: actions/checkout@v4
      - uses: hashicorp/setup-terraform@v3
        with:
          terraform_version: "1.7"
      - name: Terraform Init
        working-directory: keycloak-terraform
        run: terraform init
      - name: Select Workspace
        working-directory: keycloak-terraform
        run: terraform workspace select ${{ matrix.environment }} || terraform workspace new ${{ matrix.environment }}
      - name: Terraform Plan
        working-directory: keycloak-terraform
        run: terraform plan -var-file=environments/${{ matrix.environment }}.tfvars -no-color
        continue-on-error: true

  apply:
    if: github.event_name == 'push' && github.ref == 'refs/heads/main'
    runs-on: ubuntu-latest
    strategy:
      matrix:
        environment: [dev, staging, production]
      max-parallel: 1
    steps:
      - uses: actions/checkout@v4
      - uses: hashicorp/setup-terraform@v3
        with:
          terraform_version: "1.7"
      - name: Terraform Init
        working-directory: keycloak-terraform
        run: terraform init
      - name: Select Workspace
        working-directory: keycloak-terraform
        run: terraform workspace select ${{ matrix.environment }}
      - name: Terraform Apply
        working-directory: keycloak-terraform
        run: terraform apply -var-file=environments/${{ matrix.environment }}.tfvars -auto-approve
Note the max-parallel: 1 on the apply job. This ensures environments are updated sequentially (dev first, then staging, then production), giving you a chance to catch issues before they reach production.
Atlantis Integration
For teams that prefer PR-based Terraform workflows, Atlantis provides plan-and-apply directly from pull request comments:
# atlantis.yaml
version: 3
projects:
  - name: keycloak-dev
    dir: keycloak-terraform
    workspace: dev
    terraform_version: v1.7.0
    autoplan:
      when_modified: ["*.tf", "environments/dev.tfvars"]
      enabled: true
  - name: keycloak-staging
    dir: keycloak-terraform
    workspace: staging
    terraform_version: v1.7.0
    autoplan:
      when_modified: ["*.tf", "environments/staging.tfvars"]
      enabled: true
  - name: keycloak-production
    dir: keycloak-terraform
    workspace: production
    terraform_version: v1.7.0
    autoplan:
      when_modified: ["*.tf", "environments/production.tfvars"]
      enabled: true
    apply_requirements: [approved, mergeable]
With this setup, opening a PR automatically runs terraform plan. Reviewers can comment atlantis apply -p keycloak-production to apply changes after approval.
Data-Driven Client Provisioning
For organizations managing many clients, define them in a structured variable and iterate:
variable "clients" {
  description = "Map of OIDC clients to provision"
  type = map(object({
    name                    = string
    access_type             = string
    redirect_uris           = list(string)
    web_origins             = list(string)
    service_account_enabled = optional(bool, false)
    roles                   = optional(map(string), {})
  }))
}
# environments/production.tfvars
clients = {
"dashboard" = {
name = "Dashboard"
access_type = "PUBLIC"
redirect_uris = ["https://dashboard.example.com/*"]
web_origins = ["https://dashboard.example.com"]
roles = {
admin = "Dashboard administrator"
viewer = "Dashboard viewer"
}
}
"api-gateway" = {
name = "API Gateway"
access_type = "CONFIDENTIAL"
redirect_uris = []
web_origins = []
service_account_enabled = true
}
"mobile-app" = {
name = "Mobile Application"
access_type = "PUBLIC"
redirect_uris = ["com.example.mobile:/callback"]
web_origins = []
}
}module "clients" {
source = "./modules/oidc-client"
for_each = var.clients
realm_id = module.realm.realm_id
client_id = each.key
name = each.value.name
access_type = each.value.access_type
redirect_uris = each.value.redirect_uris
web_origins = each.value.web_origins
service_account_enabled = each.value.service_account_enabled
roles = each.value.roles
}This pattern scales cleanly. Adding a new application is a matter of adding an entry to the .tfvars file. You can also use the Keycloak Config Generator to prototype client settings before adding them to your Terraform configuration.
Best Practices Summary
-
Module everything: Create modules for realms, clients, identity providers, and authentication flows. Small, focused modules are easier to test and review.
-
One workspace per environment: Keep dev, staging, and production isolated through workspaces with matching
.tfvarsfiles. -
Lock state with DynamoDB: Prevent concurrent modifications that can corrupt state.
-
Review plans on every PR: Use Atlantis or GitHub Actions to surface Terraform plans in code reviews.
-
Separate infra from config: Keep Keycloak cluster provisioning in a different project from realm configuration (as discussed in our introductory Terraform post).
-
Use
movedblocks for refactoring: When restructuring modules, usemovedblocks to avoid destroying and recreating resources. -
Monitor for drift: Schedule periodic
terraform planruns to detect manual changes made outside Terraform. Correlate these with your audit logs to understand what changed.
Conclusion
Advanced Terraform patterns transform Keycloak configuration management from a manual, error-prone process into a structured, reviewable, and automated workflow. Modules provide reusability, workspaces enforce environment isolation, and CI/CD integration ensures that every change goes through code review. The Keycloak Admin REST API documentation is an essential reference for understanding the resources you can manage through Terraform.
For teams that want infrastructure as code benefits without managing Keycloak servers, Skycloak’s managed hosting handles the operational layer while you maintain full control over realm configuration through the admin console or Terraform. See our pricing plans to find the right fit, or consult the Skycloak documentation for integration guides.
