Last updated: March 2026
Role-based access control works until it does not. At some point, every growing application hits the moment where “admin” and “editor” roles are not granular enough. You need rules like “managers can approve expenses under $10,000 in their own department” or “users can edit documents they created, but only during business hours in their region.” That is when you need attribute-based access control (ABAC) or relationship-based access control (ReBAC), and Open Policy Agent (OPA) is the leading open-source engine for implementing it.
This guide shows how to integrate OPA with Keycloak to build fine-grained authorization that goes beyond what RBAC alone can achieve. We will cover the architectural patterns, write real Rego policies, and implement the integration in Go and Node.js.
Where RBAC Falls Short
Keycloak has excellent built-in RBAC support. The Keycloak authorization services documentation covers the built-in policy system. You define roles (realm roles, client roles, composite roles), assign them to users, and check them in your application. This works well for coarse-grained access control, but it breaks down in several common scenarios.
The Role Explosion Problem
Consider a multi-tenant SaaS application with these requirements:
- Users belong to organizations
- Each organization has projects
- Users can be viewers, editors, or admins per project
- Some resources within projects have additional restrictions (budget documents are restricted to project admins and finance team members)
With pure RBAC, you end up with roles like org-acme-project-alpha-editor and org-acme-project-alpha-budget-viewer. For 100 organizations with 10 projects each and 4 role levels, that is 4,000 roles. This is unmanageable.
Context-Dependent Access
RBAC cannot express rules that depend on runtime context:
- “Allow access only during business hours”
- “Allow editing only if the resource was created less than 24 hours ago”
- “Allow approval only if the amount is below the user’s approval limit”
- “Deny access from IP addresses outside the corporate network”
These rules require evaluating attributes of the user, the resource, and the environment at decision time.
OPA and Rego: A Quick Primer
Open Policy Agent (OPA) is a general-purpose policy engine that decouples authorization decisions from application code. Policies are written in Rego, a declarative language designed for querying nested data structures.
Core Concepts
| Concept | Description |
|---|---|
| Policy | A set of rules written in Rego |
| Input | JSON data provided at query time (user info, resource info, action) |
| Data | Static or semi-static JSON (org structure, resource metadata) |
| Decision | The result of evaluating a policy against input and data |
Basic Rego Syntax
package authz

# Default deny
default allow := false

# Allow if user has admin role
allow if {
    input.user.roles[_] == "admin"
}

# Allow if user owns the resource
allow if {
    input.resource.owner == input.user.id
}
OPA evaluates all rules simultaneously. If any allow rule evaluates to true, the overall result is true.
Architecture: Keycloak + OPA Integration Patterns
There are several ways to integrate Keycloak with OPA. The choice depends on your architecture.
Pattern 1: Sidecar / Gateway
OPA runs as a sidecar alongside your API or as part of your API gateway. Your application extracts the Keycloak JWT from the request, passes it (along with resource information) to OPA, and enforces the decision.
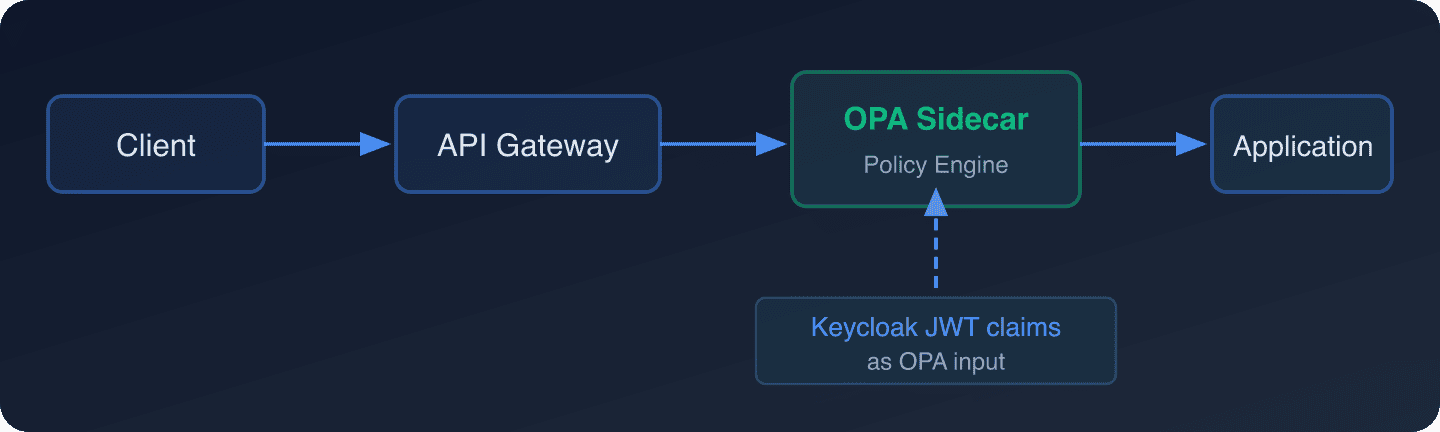
This is the most common pattern and works with any language or framework.
Pattern 2: Envoy External Authorization
If you use Envoy proxy (common in service mesh architectures), OPA has a built-in Envoy plugin that implements the External Authorization API. Envoy sends every request to OPA for a decision before forwarding it to the upstream service.
Pattern 3: Application-Embedded
OPA can be embedded as a library (Go) or queried via HTTP from any language. Your application calls OPA for every authorization decision.
For this guide, we will implement Pattern 1 (sidecar) and Pattern 3 (application-embedded).
Setting Up OPA
Running OPA with Docker
docker run -d
--name opa
-p 8181:8181
-v $(pwd)/policies:/policies
openpolicyagent/opa:latest
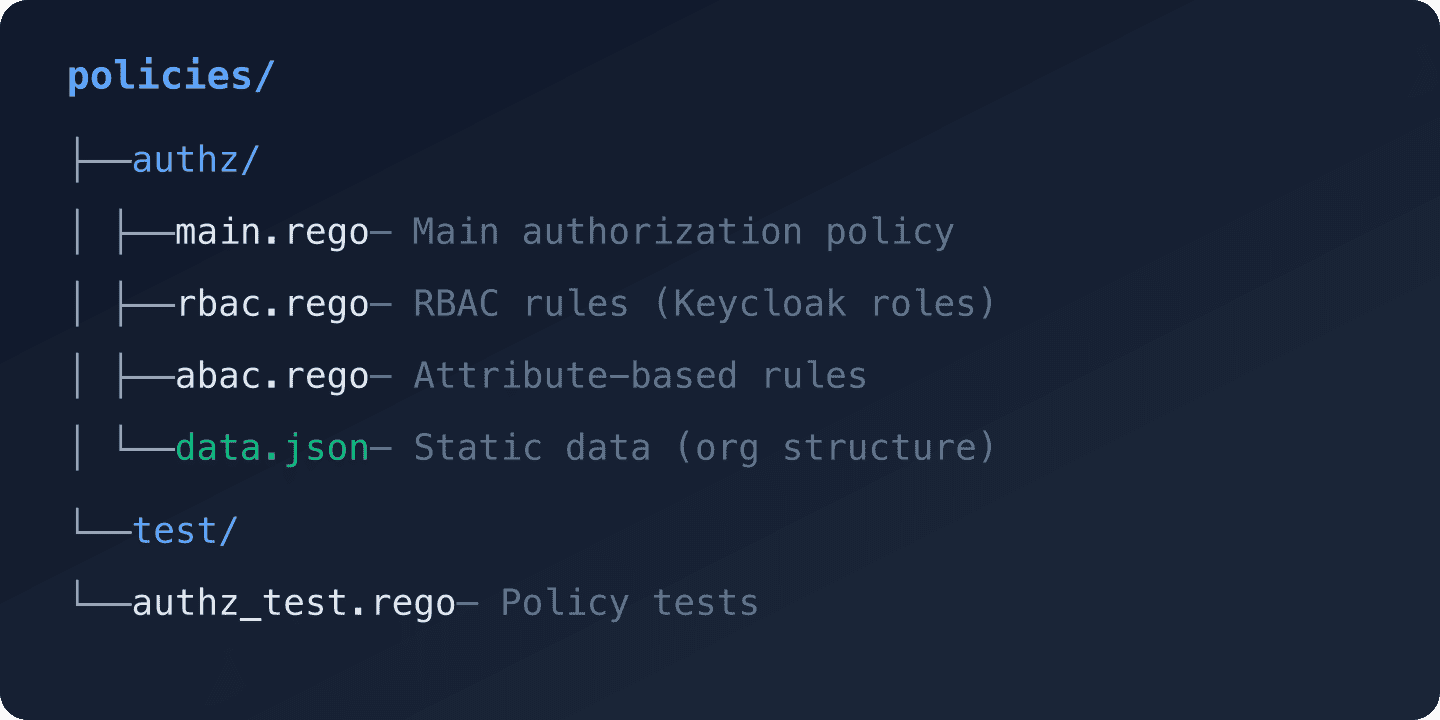
run --server /policiesDirectory Structure
Writing Rego Policies with Keycloak Claims
The key insight is that Keycloak JWT claims become the input to OPA policies. A Keycloak access token contains user identity, roles, groups, and any custom attributes you have added via protocol mappers.
Keycloak Token Claims as OPA Input
A typical Keycloak access token (decoded with the JWT Token Analyzer) contains:
{
  "sub": "user-uuid-123",
  "email": "[email protected]",
  "realm_access": {
    "roles": ["default-roles-my-app", "user"]
  },
  "resource_access": {
    "my-api": {
      "roles": ["editor"]
    }
  },
  "groups": ["/acme/engineering"],
  "department": "engineering",
  "approval_limit": 5000,
  "org_id": "acme"
}
To add custom claims like department, approval_limit, and org_id, use Keycloak protocol mappers. For a detailed guide on custom attributes, see using custom user attributes in Keycloak tokens.
Main Authorization Policy
package authz

import rego.v1

# Default deny all
default allow := false

# Superadmins bypass all checks
allow if {
    "admin" in input.user.realm_roles
}

# RBAC: Check client-specific roles
allow if {
    required_role := required_roles[input.action][input.resource.type]
    required_role in input.user.client_roles
}

# ABAC: Resource owner can always access their own resources
allow if {
    input.resource.owner == input.user.sub
}

# ABAC: Department-scoped access
allow if {
    input.action == "read"
    input.resource.department == input.user.department
}

# ABAC: Approval with spending limits
allow if {
    input.action == "approve"
    input.resource.type == "expense"
    input.resource.amount <= input.user.approval_limit
    input.resource.department == input.user.department
}

# ABAC: Time-based access (business hours UTC)
allow if {
    input.action == "edit"
    input.resource.type == "document"
    hour := time.clock(time.now_ns())[0]
    hour >= 8
    hour < 18
}

# Role-to-permission mapping
required_roles := {
    "read": {
        "document": "viewer",
        "project": "viewer",
        "expense": "viewer"
    },
    "write": {
        "document": "editor",
        "project": "editor"
    },
    "delete": {
        "document": "admin",
        "project": "admin"
    }
}
Relationship-Based Rules (ReBAC)
For ReBAC, you model relationships in OPA’s data and query them:
package authz

import rego.v1

# Data loaded into OPA (via bundle or API)
# {
#   "project_members": {
#     "project-alpha": {
#       "user-123": "editor",
#       "user-456": "viewer"
#     }
#   }
# }

# Allow based on project membership relationship
allow if {
    input.resource.type == "project_resource"
    project_id := input.resource.project_id
    user_role := data.project_members[project_id][input.user.sub]
    has_permission(user_role, input.action)
}

has_permission(role, action) if {
    role == "editor"
    action in {"read", "write", "comment"}
}

has_permission(role, action) if {
    role == "admin"
    action in {"read", "write", "comment", "delete", "manage"}
}

has_permission(role, _) if {
    role == "viewer"
    _ == "read"
}
Go Implementation: Embedded OPA
In Go, you can embed OPA directly using the rego package, avoiding the HTTP overhead:
package authz

import (
    "context"
    "encoding/json"
    "fmt"
    "strings"

    "github.com/golang-jwt/jwt/v5"
    "github.com/open-policy-agent/opa/rego"
)

type AuthzService struct {
    query rego.PreparedEvalQuery
}

type AuthzInput struct {
    User     UserInfo     `json:"user"`
    Action   string       `json:"action"`
    Resource ResourceInfo `json:"resource"`
}

type UserInfo struct {
    Sub           string   `json:"sub"`
    Email         string   `json:"email"`
    RealmRoles    []string `json:"realm_roles"`
    ClientRoles   []string `json:"client_roles"`
    Groups        []string `json:"groups"`
    Department    string   `json:"department"`
    ApprovalLimit float64  `json:"approval_limit"`
    OrgID         string   `json:"org_id"`
}

type ResourceInfo struct {
    Type       string  `json:"type"`
    ID         string  `json:"id"`
    Owner      string  `json:"owner"`
    Department string  `json:"department"`
    Amount     float64 `json:"amount,omitempty"`
    ProjectID  string  `json:"project_id,omitempty"`
}

func NewAuthzService(policyPath string) (*AuthzService, error) {
    ctx := context.Background()

    query, err := rego.New(
        rego.Query("data.authz.allow"),
        rego.Load([]string{policyPath}, nil),
    ).PrepareForEval(ctx)

    if err != nil {
        return nil, fmt.Errorf("failed to prepare OPA query: %w", err)
    }

    return &AuthzService{query: query}, nil
}

// ExtractUserFromToken parses a Keycloak JWT and extracts user info
func ExtractUserFromToken(claims jwt.MapClaims) UserInfo {
    user := UserInfo{
        Sub:   getStringClaim(claims, "sub"),
        Email: getStringClaim(claims, "email"),
    }

    // Extract realm roles
    if realmAccess, ok := claims["realm_access"].(map[string]interface{}); ok {
        if roles, ok := realmAccess["roles"].([]interface{}); ok {
            for _, r := range roles {
                user.RealmRoles = append(user.RealmRoles, r.(string))
            }
        }
    }

    // Extract client roles
    if resourceAccess, ok := claims["resource_access"].(map[string]interface{}); ok {
        for _, client := range resourceAccess {
            if clientMap, ok := client.(map[string]interface{}); ok {
                if roles, ok := clientMap["roles"].([]interface{}); ok {
                    for _, r := range roles {
                        user.ClientRoles = append(user.ClientRoles, r.(string))
                    }
                }
            }
        }
    }

    // Extract custom attributes
    user.Department = getStringClaim(claims, "department")
    user.OrgID = getStringClaim(claims, "org_id")
    if limit, ok := claims["approval_limit"].(float64); ok {
        user.ApprovalLimit = limit
    }

    return user
}

func (s *AuthzService) IsAllowed(ctx context.Context, input AuthzInput) (bool, error) {
    inputMap, err := structToMap(input)
    if err != nil {
        return false, err
    }

    results, err := s.query.Eval(ctx, rego.EvalInput(inputMap))
    if err != nil {
        return false, fmt.Errorf("OPA evaluation failed: %w", err)
    }

    if len(results) == 0 {
        return false, nil
    }

    allowed, ok := results[0].Expressions[0].Value.(bool)
    return ok && allowed, nil
}

func structToMap(v interface{}) (map[string]interface{}, error) {
    data, err := json.Marshal(v)
    if err != nil {
        return nil, err
    }
    var result map[string]interface{}
    err = json.Unmarshal(data, &result)
    return result, err
}

func getStringClaim(claims jwt.MapClaims, key string) string {
    if val, ok := claims[key].(string); ok {
        return val
    }
    return ""
}
Using the Go Authorization Service
func main() {
    authzService, err := NewAuthzService("./policies/authz")
    if err != nil {
        log.Fatal(err)
    }

    // In your HTTP handler:
    http.HandleFunc("/api/expenses/approve", func(w http.ResponseWriter, r *http.Request) {
        // Extract and validate Keycloak JWT (using your JWT validation middleware)
        claims := r.Context().Value("jwt_claims").(jwt.MapClaims)
        user := ExtractUserFromToken(claims)

        // Build resource info from the request
        resource := ResourceInfo{
            Type:       "expense",
            ID:         r.URL.Query().Get("id"),
            Department: "engineering", // loaded from database
            Amount:     4500.00,       // loaded from database
        }

        allowed, err := authzService.IsAllowed(r.Context(), AuthzInput{
            User:     user,
            Action:   "approve",
            Resource: resource,
        })

        if err != nil || !allowed {
            http.Error(w, "Forbidden", http.StatusForbidden)
            return
        }

        // Process the approval...
    })
}
Node.js Implementation: OPA HTTP Client
For Node.js, query OPA’s REST API:
// authz-client.js
const OPA_URL = process.env.OPA_URL || 'http://localhost:8181';

class OPAClient {
  /**
   * Check if an action is allowed.
   * @param {object} user - User info extracted from Keycloak JWT
   * @param {string} action - The action being performed
   * @param {object} resource - The resource being accessed
   * @returns {Promise<boolean>}
   */
  async isAllowed(user, action, resource) {
    const input = { user, action, resource };

    try {
      const response = await fetch(`${OPA_URL}/v1/data/authz/allow`, {
        method: 'POST',
        headers: { 'Content-Type': 'application/json' },
        body: JSON.stringify({ input })
      });

      if (!response.ok) {
        console.error(`OPA returned ${response.status}`);
        return false; // Fail closed
      }

      const result = await response.json();
      return result.result === true;
    } catch (err) {
      console.error('OPA query failed:', err.message);
      return false; // Fail closed
    }
  }

  /**
   * Extract user info from a decoded Keycloak JWT.
   */
  extractUser(decodedToken) {
    return {
      sub: decodedToken.sub,
      email: decodedToken.email,
      realm_roles: decodedToken.realm_access?.roles || [],
      client_roles: Object.values(decodedToken.resource_access || {})
        .flatMap(client => client.roles || []),
      groups: decodedToken.groups || [],
      department: decodedToken.department,
      approval_limit: decodedToken.approval_limit,
      org_id: decodedToken.org_id
    };
  }
}

module.exports = { OPAClient };
Express Middleware
const { OPAClient } = require('./authz-client');
const opa = new OPAClient();

function authorize(action, getResource) {
  return async (req, res, next) => {
    const user = opa.extractUser(req.user); // req.user from JWT middleware
    const resource = await getResource(req);

    const allowed = await opa.isAllowed(user, action, resource);

    if (!allowed) {
      return res.status(403).json({
        error: 'Forbidden',
        message: 'You do not have permission to perform this action'
      });
    }

    next();
  };
}

// Usage
app.post('/api/expenses/:id/approve',
  requireAuth, // Keycloak JWT validation middleware
  authorize('approve', async (req) => {
    const expense = await db.expenses.findById(req.params.id);
    return {
      type: 'expense',
      id: expense.id,
      owner: expense.created_by,
      department: expense.department,
      amount: expense.amount
    };
  }),
  async (req, res) => {
    // Handle approval - we know the user is authorized
    res.json({ status: 'approved' });
  }
);
Decision Logging
OPA has built-in decision logging that records every policy evaluation. This is essential for auditing and debugging.
Enabling Decision Logs
Create an OPA configuration file:
# opa-config.yaml
decision_logs:
  console: true  # Log to stdout (useful for development)
  reporting:
    min_delay_seconds: 5
    max_delay_seconds: 10

# For production, send logs to a remote endpoint:
# decision_logs:
#   service: log-service
#   reporting:
#     min_delay_seconds: 5
#     max_delay_seconds: 30
Start OPA with the config:
docker run -d
  --name opa
  -p 8181:8181
  -v $(pwd)/policies:/policies
  -v $(pwd)/opa-config.yaml:/config.yaml
  openpolicyagent/opa:latest
  run --server --config-file=/config.yaml /policies
Decision Log Entry Example
Each log entry captures the complete decision context:
{
  "decision_id": "a1b2c3d4",
  "timestamp": "2026-05-13T10:30:00Z",
  "path": "authz/allow",
  "input": {
    "user": { "sub": "user-123", "department": "engineering" },
    "action": "approve",
    "resource": { "type": "expense", "amount": 4500 }
  },
  "result": true,
  "metrics": {
    "timer_rego_query_eval_ns": 125000
  }
}
Combine OPA decision logs with Keycloak’s audit logging to get a complete picture of who authenticated (Keycloak) and what they were authorized to do (OPA). For centralized log analysis, see our guide on integrating security logs with Syslog.
Testing Rego Policies
OPA includes a built-in test framework. Write tests alongside your policies:
# test/authz_test.rego
package authz_test

import rego.v1
import data.authz

# Test: Admin users are always allowed
test_admin_allowed if {
    authz.allow with input as {
        "user": {
            "sub": "admin-user",
            "realm_roles": ["admin"],
            "client_roles": [],
            "department": "engineering"
        },
        "action": "delete",
        "resource": {"type": "project", "id": "p1"}
    }
}

# Test: Regular user cannot delete
test_regular_user_cannot_delete if {
    not authz.allow with input as {
        "user": {
            "sub": "regular-user",
            "realm_roles": ["user"],
            "client_roles": ["viewer"],
            "department": "engineering"
        },
        "action": "delete",
        "resource": {"type": "project", "id": "p1"}
    }
}

# Test: Expense approval within limit
test_expense_approval_within_limit if {
    authz.allow with input as {
        "user": {
            "sub": "manager-1",
            "realm_roles": ["user"],
            "client_roles": [],
            "department": "engineering",
            "approval_limit": 5000
        },
        "action": "approve",
        "resource": {
            "type": "expense",
            "amount": 4500,
            "department": "engineering"
        }
    }
}

# Test: Expense approval over limit denied
test_expense_approval_over_limit if {
    not authz.allow with input as {
        "user": {
            "sub": "manager-1",
            "realm_roles": ["user"],
            "client_roles": [],
            "department": "engineering",
            "approval_limit": 5000
        },
        "action": "approve",
        "resource": {
            "type": "expense",
            "amount": 7500,
            "department": "engineering"
        }
    }
}
Run the tests:
opa test policies/ -vPerformance Considerations
OPA is designed for low-latency decisions. A typical policy evaluation takes microseconds to low milliseconds. However, consider these factors:
- Embed OPA in Go services for sub-millisecond evaluations (no HTTP overhead)
- Use partial evaluation for complex policies to pre-compute parts of the decision
- Bundle data rather than loading it per-request. OPA can periodically sync data bundles from an HTTP endpoint
- Cache decisions for identical inputs if your policies are deterministic and data changes infrequently
When to Use OPA vs Keycloak’s Built-In Authorization
| Scenario | Recommendation |
|---|---|
| Simple role checks | Keycloak RBAC |
| Resource-level permissions | OPA |
| Cross-cutting concerns (rate limits, IP rules) | OPA at the gateway |
| Fine-grained resource ownership | OPA with ReBAC data |
| Compliance policies (SOX, HIPAA) | OPA with auditable policies |
| Single Sign-On decisions | Keycloak SSO |
For many applications, a combination works best: Keycloak handles authentication and coarse-grained RBAC, while OPA handles fine-grained authorization decisions at the application or gateway layer.
Next Steps
Start by identifying the authorization rules in your application that cannot be expressed with simple roles. Write those as Rego policies, test them locally, then deploy OPA alongside your services.
For Keycloak’s built-in fine-grained authorization features, see our guide on fine-grained authorization in Keycloak. If you are looking for insights into how your authorization policies are performing, Skycloak’s Insights dashboard provides visibility into authentication and authorization patterns.
To get started with Keycloak in a managed environment where you can focus on policy design rather than infrastructure, explore Skycloak’s managed hosting with plans that fit teams of every size on our pricing page.

