
Last updated: March 2026
If you’re building a Next.js application and need enterprise-grade authentication, Keycloak is one of the strongest open-source options available. It gives you single sign-on (SSO), multi-factor authentication, social login, and identity federation out of the box — without locking you into a proprietary vendor.
This tutorial walks through integrating Keycloak with a Next.js 14+ App Router application using Auth.js v5 (the successor to NextAuth.js). By the end, you’ll have working authentication with protected routes, server component auth, middleware-based route protection, automatic token refresh, and role-based access control.
Prerequisites
Before starting, you’ll need:
- Node.js 18.17+ and npm 10+
- Next.js 14 or 15 with App Router
- A running Keycloak instance (version 22+). You can use our Docker Compose Generator to spin one up quickly, or use a managed Keycloak hosting service like Skycloak.
Step 1: Set Up a Keycloak Client
In the Keycloak Admin Console, create a new client for your Next.js app:
- Navigate to Clients > Create client
- Set Client ID to
nextjs-app - Set Client type to
OpenID Connect - Enable Client authentication (this makes it a confidential client)
- Under Valid redirect URIs, add
http://localhost:3000/api/auth/callback/keycloak - Under Valid post logout redirect URIs, add
http://localhost:3000 - Under Web origins, add
http://localhost:3000
After saving, go to the Credentials tab and copy the Client secret. You’ll need it for your environment variables.
If you want to configure roles, go to the Roles tab within your client and create roles like admin and user. Then assign them to users under Users > Role mappings. For a deeper understanding of role-based access in Keycloak, see our RBAC feature overview or our post on understanding RBAC.
Step 2: Install Dependencies
npm install next-auth@betaAuth.js v5 is published under the next-auth@beta tag. The @beta tag provides the v5 release with full App Router support.
Your package.json dependencies should look something like:
{
  "dependencies": {
    "next": "^14.2.0",
    "next-auth": "^5.0.0-beta.25",
    "react": "^18.3.0",
    "react-dom": "^18.3.0"
  }
}
Step 3: Configure Environment Variables
Create a .env.local file in your project root:
# Auth.js
AUTH_SECRET="your-random-secret-at-least-32-characters"

# Keycloak
AUTH_KEYCLOAK_ID="nextjs-app"
AUTH_KEYCLOAK_SECRET="your-client-secret-from-keycloak"
AUTH_KEYCLOAK_ISSUER="http://localhost:8080/realms/your-realm"

# App
NEXTAUTH_URL="http://localhost:3000"
Generate a strong AUTH_SECRET with:
openssl rand -base64 32The AUTH_KEYCLOAK_ISSUER must point to your Keycloak realm’s issuer URL. This is the base URL that Auth.js uses for OIDC Discovery to find the authorization, token, and userinfo endpoints automatically.
Step 4: Create the Auth Configuration
Create auth.ts in your project root:
// auth.ts
import NextAuth from "next-auth";
import Keycloak from "next-auth/providers/keycloak";

declare module "next-auth" {
  interface Session {
    accessToken?: string;
    roles?: string[];
    error?: string;
  }
}

declare module "next-auth" {
  interface JWT {
    accessToken?: string;
    refreshToken?: string;
    expiresAt?: number;
    roles?: string[];
    error?: string;
  }
}

export const { handlers, signIn, signOut, auth } = NextAuth({
  providers: [
    Keycloak({
      clientId: process.env.AUTH_KEYCLOAK_ID!,
      clientSecret: process.env.AUTH_KEYCLOAK_SECRET!,
      issuer: process.env.AUTH_KEYCLOAK_ISSUER!,
    }),
  ],
  callbacks: {
    async jwt({ token, account }) {
      // On initial sign-in, persist the tokens
      if (account) {
        token.accessToken = account.access_token;
        token.refreshToken = account.refresh_token;
        token.expiresAt = account.expires_at;

        // Extract roles from the access token
        const decoded = JSON.parse(
          Buffer.from(account.access_token!.split(".")[1], "base64").toString()
        );
        token.roles = [
          ...(decoded.realm_access?.roles || []),
          ...(decoded.resource_access?.["nextjs-app"]?.roles || []),
        ];

        return token;
      }

      // Return the token if it hasn't expired
      if (Date.now() < (token.expiresAt as number) * 1000) {
        return token;
      }

      // Token has expired, attempt to refresh
      return await refreshAccessToken(token);
    },
    async session({ session, token }) {
      session.accessToken = token.accessToken as string;
      session.roles = token.roles as string[];
      if (token.error) {
        session.error = token.error as string;
      }
      return session;
    },
  },
});

async function refreshAccessToken(token: any) {
  try {
    const response = await fetch(
      `${process.env.AUTH_KEYCLOAK_ISSUER}/protocol/openid-connect/token`,
      {
        method: "POST",
        headers: { "Content-Type": "application/x-www-form-urlencoded" },
        body: new URLSearchParams({
          client_id: process.env.AUTH_KEYCLOAK_ID!,
          client_secret: process.env.AUTH_KEYCLOAK_SECRET!,
          grant_type: "refresh_token",
          refresh_token: token.refreshToken as string,
        }),
      }
    );

    const refreshed = await response.json();

    if (!response.ok) {
      throw new Error("Token refresh failed");
    }

    return {
      ...token,
      accessToken: refreshed.access_token,
      refreshToken: refreshed.refresh_token ?? token.refreshToken,
      expiresAt: Math.floor(Date.now() / 1000) + refreshed.expires_in,
    };
  } catch (error) {
    console.error("Error refreshing access token:", error);
    return { ...token, error: "RefreshAccessTokenError" };
  }
}
This configuration does several important things:
- Persists Keycloak tokens in the JWT session on initial sign-in
- Extracts roles from both realm-level and client-level role mappings
- Automatically refreshes expired tokens using the refresh token flow
- Surfaces token errors to the session so your UI can handle re-authentication
For a deeper understanding of token lifecycle management, see our guide on JWT token lifecycle management.
Step 5: Set Up the Route Handler
Create the API route that Auth.js uses for authentication callbacks:
// app/api/auth/[...nextauth]/route.ts
import { handlers } from "@/auth";

export const { GET, POST } = handlers;
This single file handles all of the OAuth 2.0 / OIDC flow endpoints — authorization redirects, callback processing, session management, and sign-out.
Step 6: Add the Session Provider
Create a client-side session provider component:
// app/providers.tsx
"use client";

import { SessionProvider } from "next-auth/react";

export function Providers({ children }: { children: React.ReactNode }) {
  return <SessionProvider>{children}</SessionProvider>;
}
Then wrap your root layout:
// app/layout.tsx
import { Providers } from "./providers";

export default function RootLayout({
  children,
}: {
  children: React.ReactNode;
}) {
  return (
    <html lang="en">
      <body>
        <Providers>{children}</Providers>
      </body>
    </html>
  );
}
Step 7: Protect Routes with Middleware
Create middleware.ts in your project root to protect routes at the edge:
// middleware.ts
import { auth } from "@/auth";

export default auth((req) => {
  const isLoggedIn = !!req.auth;
  const isOnDashboard = req.nextUrl.pathname.startsWith("/dashboard");
  const isOnAdmin = req.nextUrl.pathname.startsWith("/admin");
  const isOnAuthPage = req.nextUrl.pathname.startsWith("/api/auth");

  // Allow auth API routes
  if (isOnAuthPage) return;

  // Redirect unauthenticated users to sign in
  if ((isOnDashboard || isOnAdmin) && !isLoggedIn) {
    return Response.redirect(new URL("/api/auth/signin", req.nextUrl));
  }

  // Check for admin role on admin routes
  if (isOnAdmin && isLoggedIn) {
    const roles = req.auth?.roles || [];
    if (!roles.includes("admin")) {
      return Response.redirect(new URL("/unauthorized", req.nextUrl));
    }
  }
});

export const config = {
  matcher: ["/dashboard/:path*", "/admin/:path*"],
};
The middleware runs at the edge before your page renders, so unauthorized users never even hit your server components. This gives you both a security boundary and a clean user experience.
Step 8: Use Auth in Server Components
One of the biggest advantages of Auth.js v5 with App Router is native server component support. You can call auth() directly in any server component:
// app/dashboard/page.tsx
import { auth } from "@/auth";
import { redirect } from "next/navigation";

export default async function DashboardPage() {
  const session = await auth();

  if (!session) {
    redirect("/api/auth/signin");
  }

  // Handle token refresh errors
  if (session.error === "RefreshAccessTokenError") {
    redirect("/api/auth/signin");
  }

  return (
    <div>
      <h1>Dashboard</h1>
      <p>Welcome, {session.user?.name}</p>
      <p>Email: {session.user?.email}</p>

      <h2>Your Roles</h2>
      <ul>
        {session.roles?.map((role) => (
          <li key={role}>{role}</li>
        ))}
      </ul>

      {session.roles?.includes("admin") && (
        <div>
          <h2>Admin Section</h2>
          <p>You have admin access.</p>
        </div>
      )}
    </div>
  );
}
No useSession hook, no loading states, no hydration mismatch — the session data is available synchronously on the server.
Step 9: Use Auth in Client Components
For client components that need session data, use the useSession hook:
// components/UserMenu.tsx
"use client";

import { useSession, signIn, signOut } from "next-auth/react";

export function UserMenu() {
  const { data: session, status } = useSession();

  if (status === "loading") {
    return <div>Loading...</div>;
  }

  if (!session) {
    return (
      <button onClick={() => signIn("keycloak")}>
        Sign in with Keycloak
      </button>
    );
  }

  return (
    <div>
      <span>Signed in as {session.user?.email}</span>
      <button onClick={() => signOut()}>Sign out</button>
    </div>
  );
}
Step 10: Protect API Routes
Create protected API routes that validate the session and use the Keycloak access token to call downstream services:
// app/api/protected/route.ts
import { auth } from "@/auth";
import { NextResponse } from "next/server";

export const GET = auth(async function GET(req) {
  if (!req.auth) {
    return NextResponse.json({ error: "Unauthorized" }, { status: 401 });
  }

  // Use the access token to call a backend API
  const backendResponse = await fetch("https://api.example.com/data", {
    headers: {
      Authorization: `Bearer ${req.auth.accessToken}`,
    },
  });

  const data = await backendResponse.json();
  return NextResponse.json(data);
});
You can use our JWT Token Analyzer to inspect the access tokens Keycloak issues and verify they contain the claims and roles you expect.
Step 11: Handle Keycloak Logout Properly
Keycloak requires a backchannel logout to fully terminate the session. Without this, the user’s session remains active in Keycloak even after they sign out of your app:
// app/api/auth/logout/route.ts
import { auth } from "@/auth";
import { redirect } from "next/navigation";

export async function GET() {
  const session = await auth();

  if (!session) {
    redirect("/");
  }

  // Build the Keycloak logout URL
  const issuer = process.env.AUTH_KEYCLOAK_ISSUER!;
  const logoutUrl = new URL(`${issuer}/protocol/openid-connect/logout`);
  logoutUrl.searchParams.set(
    "post_logout_redirect_uri",
    process.env.NEXTAUTH_URL!
  );
  logoutUrl.searchParams.set("client_id", process.env.AUTH_KEYCLOAK_ID!);

  redirect(logoutUrl.toString());
}
Then update your sign-out button to hit this endpoint instead of using the default signOut():
<a href="/api/auth/logout">Sign out</a>This ensures the user’s session is terminated on both the application side and the Keycloak side.
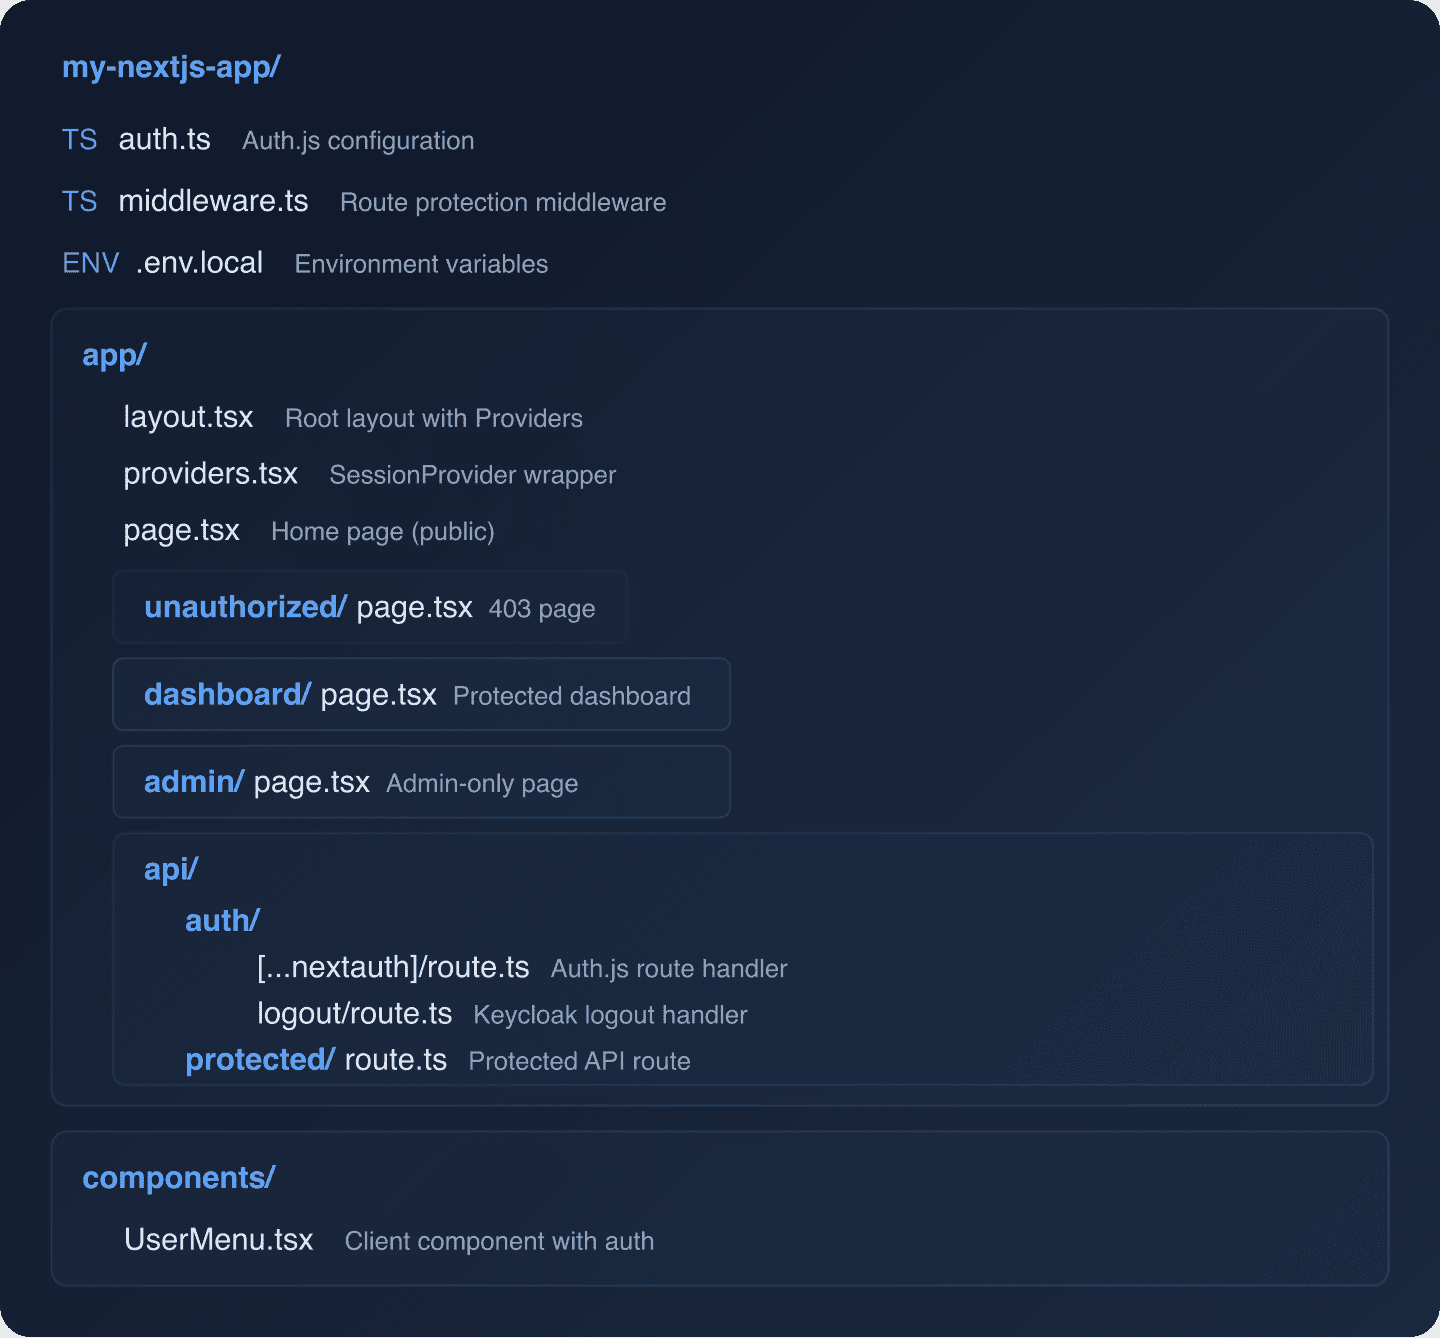
Complete Project Structure
Here’s what your project should look like when everything is wired up:
Troubleshooting Common Issues
“OIDC Discovery failed”: Make sure your AUTH_KEYCLOAK_ISSUER URL is correct and accessible from your Next.js server. It should look like http://localhost:8080/realms/my-realm (not /auth/realms/ which was the old Keycloak path format).
Roles not appearing: Ensure your client has the proper role scope mappings. In Keycloak, go to Client Scopes > roles > Mappers and verify that the realm roles and client roles mappers are configured and that “Add to access token” is enabled.
Token refresh failing: Check that your client’s refresh token settings are correct. In your client configuration under Advanced > Advanced Settings, ensure the refresh token lifespan is set appropriately. See our post on configuring CORS with Keycloak if you’re seeing CORS errors during refresh.
Redirect URI mismatch: The redirect URI registered in Keycloak must exactly match what Auth.js sends. For local development, it should be http://localhost:3000/api/auth/callback/keycloak.
Security Considerations
A few things to keep in mind for production deployments:
- Always use HTTPS in production. Keycloak should be behind TLS, and your Next.js app should be served over HTTPS.
- Rotate your
AUTH_SECRETperiodically. This secret is used to encrypt session cookies. - Set appropriate token lifetimes in Keycloak. Short-lived access tokens (5-15 minutes) with refresh tokens are the recommended pattern.
- Enable audit logging in Keycloak to track authentication events. This is critical for compliance and incident response — see our guide on auditing in Keycloak.
- Consider MFA for sensitive operations. Keycloak supports step-up authentication where you can require a second factor for specific actions.
What’s Next
With authentication in place, you can extend your setup by:
- Adding social login providers like Google, GitHub, or Microsoft
- Implementing SCIM user provisioning for enterprise customers
- Setting up Keycloak Organizations for multi-tenant SaaS applications
- Monitoring auth patterns with Keycloak Insights
For the complete Keycloak documentation on OIDC clients, see the Keycloak Server Administration Guide.
Ready to skip the Keycloak infrastructure work? Skycloak gives you a fully managed Keycloak instance with built-in high availability, automated upgrades, and enterprise-grade security. See our pricing to get started.

Ready to simplify your authentication?
Deploy production-ready Keycloak in minutes. Unlimited users, flat pricing, no SSO tax.