Last updated: March 2026
While Terraform and Pulumi are the go-to tools for declaring infrastructure as code, many organizations rely on Ansible for configuration management. If your team already uses Ansible for server provisioning, application deployment, or compliance automation, extending it to manage Keycloak realms, clients, and users is a natural fit.
Ansible provides a procedural, agentless approach to Keycloak automation through the community.general collection’s Keycloak modules. This guide covers inventory setup, complete playbook examples, role-based organization, idempotent configuration patterns, and secrets management with Ansible Vault.
Why Ansible for Keycloak?
Ansible fills a different niche than Terraform. Where Terraform excels at declaring desired state and letting the provider reconcile differences, Ansible provides step-by-step task execution with built-in idempotency. This makes it suitable for:
- Day-2 operations: Ongoing user provisioning, client updates, and configuration changes
- Runbook automation: Turning manual admin console workflows into repeatable playbooks
- Cross-tool orchestration: Managing Keycloak alongside application deployments, database migrations, and server configuration in a single workflow
- Teams already using Ansible: If Ansible is your standard, adding Keycloak modules avoids introducing another tool
For teams evaluating Terraform vs. Ansible for Keycloak, our posts on Terraform basics and advanced Terraform patterns provide the other perspective.
Prerequisites
You need:
- Ansible 2.14+ installed
- The
community.generalcollection (version 7.0+) - A running Keycloak instance (or a managed Keycloak cluster)
- Admin credentials or a service account with appropriate permissions
Install the collection:
ansible-galaxy collection install community.generalInventory Setup
Define your Keycloak environments in an inventory file:
# inventory/hosts.yml
all:
  children:
    keycloak:
      hosts:
        keycloak_dev:
          keycloak_url: "https://dev-keycloak.skycloak.io"
          keycloak_realm: "master"
          keycloak_env: "dev"
        keycloak_staging:
          keycloak_url: "https://staging-keycloak.skycloak.io"
          keycloak_realm: "master"
          keycloak_env: "staging"
        keycloak_production:
          keycloak_url: "https://prod-keycloak.skycloak.io"
          keycloak_realm: "master"
          keycloak_env: "production"
      vars:
        ansible_connection: local
        keycloak_admin_user: "admin"
Note ansible_connection: local because we are making API calls to Keycloak, not SSHing into servers.
Secrets Management with Ansible Vault
Store credentials encrypted with Ansible Vault:
ansible-vault create inventory/group_vars/keycloak/vault.yml# inventory/group_vars/keycloak/vault.yml (encrypted)
vault_keycloak_admin_password: "your-admin-password"
vault_smtp_password: "smtp-secret"
vault_google_client_secret: "google-oauth-secret"Reference vaulted variables in your group vars:
# inventory/group_vars/keycloak/vars.yml
keycloak_admin_password: "{{ vault_keycloak_admin_password }}"
smtp_password: "{{ vault_smtp_password }}"
google_client_secret: "{{ vault_google_client_secret }}"
Run playbooks with the vault password:
ansible-playbook playbooks/configure-realm.yml --ask-vault-passOr use a vault password file for CI/CD:
ansible-playbook playbooks/configure-realm.yml --vault-password-file=~/.vault_passCore Playbook: Realm Provisioning
Here is a complete playbook that creates and configures a Keycloak realm with security best practices:
# playbooks/configure-realm.yml

---

- name: Configure Keycloak Realm
  hosts: keycloak
  gather_facts: false

  vars:
    realm_name: "my-application"
    realm_display_name: "My Application"

  tasks:
    - name: Obtain admin access token
      ansible.builtin.uri:
        url: "{{ keycloak_url }}/realms/master/protocol/openid-connect/token"
        method: POST
        body_format: form-urlencoded
        body:
          grant_type: "password"
          client_id: "admin-cli"
          username: "{{ keycloak_admin_user }}"
          password: "{{ keycloak_admin_password }}"
        status_code: 200
      register: token_response
      no_log: true

    - name: Set access token fact
      ansible.builtin.set_fact:
        keycloak_token: "{{ token_response.json.access_token }}"
      no_log: true

    - name: Create or update realm
      community.general.keycloak_realm:
        auth_keycloak_url: "{{ keycloak_url }}"
        auth_realm: "master"
        token: "{{ keycloak_token }}"
        id: "{{ realm_name }}"
        realm: "{{ realm_name }}"
        display_name: "{{ realm_display_name }}"
        enabled: true
        ssl_required: "external"
        registration_allowed: "{{ keycloak_env == 'dev' }}"
        login_with_email_allowed: true
        duplicate_emails_allowed: false
        edit_username_allowed: false
        brute_force_protected: true
        max_failure_wait_seconds: 900
        failure_factor: 5
        password_policy: >-
          length(12) and upperCase(1) and lowerCase(1)
          and specialChars(1) and digits(1) and notUsername
        state: present
      register: realm_result

    - name: Display realm status
      ansible.builtin.debug:
        msg: "Realm '{{ realm_name }}' {{ 'created' if realm_result.changed else 'already configured' }}"
The community.general.keycloak_realm module is idempotent. If the realm already exists with the desired configuration, no changes are made.
Client Provisioning Playbook
Provision OIDC clients with role definitions:
# playbooks/configure-clients.yml

---

- name: Configure Keycloak Clients
  hosts: keycloak
  gather_facts: false

  vars:
    realm_name: "my-application"
    clients:
      - client_id: "frontend-app"
        name: "Frontend Application"
        public_client: true
        standard_flow_enabled: true
        direct_access_grants_enabled: false
        redirect_uris:
          - "https://app.example.com/*"
          - "http://localhost:3000/*"
        web_origins:
          - "https://app.example.com"
          - "http://localhost:3000"
        attributes:
          pkce.code.challenge.method: "S256"
        roles:
          - name: "admin"
            description: "Application administrator"
          - name: "editor"
            description: "Content editor"
          - name: "viewer"
            description: "Read-only user"

      - client_id: "backend-api"
        name: "Backend API Service"
        public_client: false
        service_accounts_enabled: true
        standard_flow_enabled: false
        direct_access_grants_enabled: false
        redirect_uris: []
        web_origins: []
        roles:
          - name: "service"
            description: "Service account role"

  tasks:
    - name: Obtain admin access token
      ansible.builtin.uri:
        url: "{{ keycloak_url }}/realms/master/protocol/openid-connect/token"
        method: POST
        body_format: form-urlencoded
        body:
          grant_type: "password"
          client_id: "admin-cli"
          username: "{{ keycloak_admin_user }}"
          password: "{{ keycloak_admin_password }}"
        status_code: 200
      register: token_response
      no_log: true

    - name: Set access token fact
      ansible.builtin.set_fact:
        keycloak_token: "{{ token_response.json.access_token }}"
      no_log: true

    - name: Create or update OIDC clients
      community.general.keycloak_client:
        auth_keycloak_url: "{{ keycloak_url }}"
        auth_realm: "master"
        token: "{{ keycloak_token }}"
        realm: "{{ realm_name }}"
        client_id: "{{ item.client_id }}"
        name: "{{ item.name }}"
        enabled: true
        public_client: "{{ item.public_client }}"
        standard_flow_enabled: "{{ item.standard_flow_enabled }}"
        direct_access_grants_enabled: "{{ item.direct_access_grants_enabled }}"
        service_accounts_enabled: "{{ item.service_accounts_enabled | default(false) }}"
        redirect_uris: "{{ item.redirect_uris }}"
        web_origins: "{{ item.web_origins }}"
        protocol: "openid-connect"
        attributes: "{{ item.attributes | default({}) }}"
        state: present
      loop: "{{ clients }}"
      loop_control:
        label: "{{ item.client_id }}"
      register: client_results

    - name: Create client roles
      community.general.keycloak_role:
        auth_keycloak_url: "{{ keycloak_url }}"
        auth_realm: "master"
        token: "{{ keycloak_token }}"
        realm: "{{ realm_name }}"
        client_id: "{{ item.0.client_id }}"
        name: "{{ item.1.name }}"
        description: "{{ item.1.description }}"
        state: present
      loop: "{{ clients | subelements('roles', skip_missing=True) }}"
      loop_control:
        label: "{{ item.0.client_id }}:{{ item.1.name }}"
This playbook demonstrates iterating over a list of clients and their nested roles using Ansible’s subelements filter, a pattern that would be more complex in HCL.
Identity Provider Configuration
Configure social login providers like Google and GitHub. For a detailed walkthrough of each provider’s setup, see our guide on social login configuration.
# playbooks/configure-identity-providers.yml

---

- name: Configure Identity Providers
  hosts: keycloak
  gather_facts: false

  vars:
    realm_name: "my-application"

  tasks:
    - name: Obtain admin access token
      ansible.builtin.uri:
        url: "{{ keycloak_url }}/realms/master/protocol/openid-connect/token"
        method: POST
        body_format: form-urlencoded
        body:
          grant_type: "password"
          client_id: "admin-cli"
          username: "{{ keycloak_admin_user }}"
          password: "{{ keycloak_admin_password }}"
        status_code: 200
      register: token_response
      no_log: true

    - name: Set access token fact
      ansible.builtin.set_fact:
        keycloak_token: "{{ token_response.json.access_token }}"
      no_log: true

    - name: Configure Google identity provider
      community.general.keycloak_identity_provider:
        auth_keycloak_url: "{{ keycloak_url }}"
        auth_realm: "master"
        token: "{{ keycloak_token }}"
        realm: "{{ realm_name }}"
        alias: "google"
        display_name: "Sign in with Google"
        provider_id: "google"
        enabled: true
        trust_email: true
        first_broker_login_flow_alias: "first broker login"
        config:
          clientId: "{{ google_client_id }}"
          clientSecret: "{{ google_client_secret }}"
          defaultScope: "openid email profile"
          syncMode: "INHERIT"
        state: present

    - name: Configure GitHub identity provider
      community.general.keycloak_identity_provider:
        auth_keycloak_url: "{{ keycloak_url }}"
        auth_realm: "master"
        token: "{{ keycloak_token }}"
        realm: "{{ realm_name }}"
        alias: "github"
        display_name: "Sign in with GitHub"
        provider_id: "github"
        enabled: true
        trust_email: true
        first_broker_login_flow_alias: "first broker login"
        config:
          clientId: "{{ github_client_id }}"
          clientSecret: "{{ github_client_secret }}"
          syncMode: "INHERIT"
        state: present
For more on managing identity providers in Keycloak, including SAML and enterprise IdPs, see our feature overview.
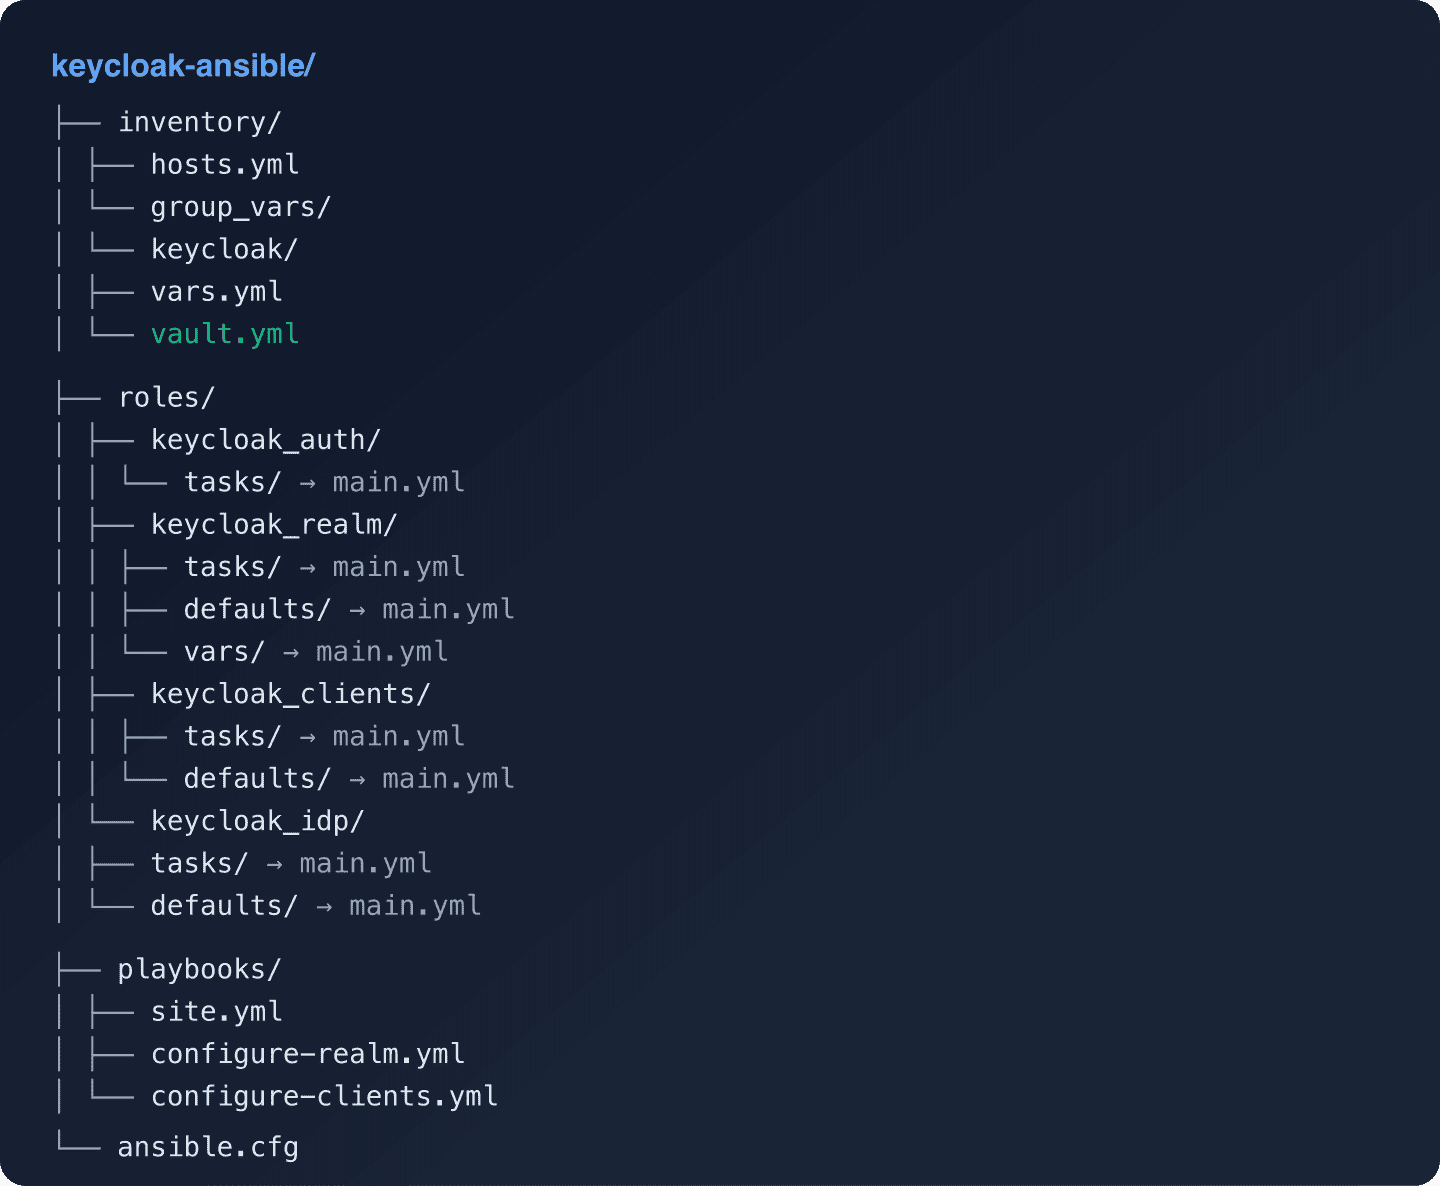
Role-Based Playbook Organization
For larger teams, organize playbooks into Ansible roles:
Authentication Role
Extract the token retrieval into a reusable role:
# roles/keycloak_auth/tasks/main.yml

---

- name: Obtain Keycloak admin access token
  ansible.builtin.uri:
    url: "{{ keycloak_url }}/realms/master/protocol/openid-connect/token"
    method: POST
    body_format: form-urlencoded
    body:
      grant_type: "password"
      client_id: "admin-cli"
      username: "{{ keycloak_admin_user }}"
      password: "{{ keycloak_admin_password }}"
    status_code: 200
  register: token_response
  no_log: true

- name: Set access token fact
  ansible.builtin.set_fact:
    keycloak_token: "{{ token_response.json.access_token }}"
  no_log: true
Master Playbook
Compose roles into a master playbook:
# playbooks/site.yml

---

- name: Configure Keycloak - Full Setup
  hosts: keycloak
  gather_facts: false

  roles:
    - role: keycloak_auth
    - role: keycloak_realm
    - role: keycloak_clients
    - role: keycloak_idp
      when: configure_idp | default(false)
Run the full suite:
ansible-playbook playbooks/site.yml -l keycloak_production --ask-vault-passOr run individual components:
ansible-playbook playbooks/configure-clients.yml -l keycloak_dev --ask-vault-passUser Provisioning
Ansible can also manage user accounts. This is particularly useful for provisioning initial admin users or service accounts:
# playbooks/provision-users.yml

---

- name: Provision Keycloak Users
  hosts: keycloak
  gather_facts: false

  vars:
    realm_name: "my-application"
    users:
      - username: "service-monitor"
        first_name: "Service"
        last_name: "Monitor"
        email: "[email protected]"
        enabled: true
        email_verified: true
        credentials:
          - type: "password"
            value: "{{ vault_monitor_password }}"
            temporary: false
        realm_roles:
          - "app-viewer"
        client_roles:
          - client_id: "backend-api"
            roles: ["service"]

  roles:
    - keycloak_auth

  tasks:
    - name: Create or update users
      community.general.keycloak_user:
        auth_keycloak_url: "{{ keycloak_url }}"
        auth_realm: "master"
        token: "{{ keycloak_token }}"
        realm: "{{ realm_name }}"
        username: "{{ item.username }}"
        first_name: "{{ item.first_name }}"
        last_name: "{{ item.last_name }}"
        email: "{{ item.email }}"
        enabled: "{{ item.enabled }}"
        email_verified: "{{ item.email_verified }}"
        credentials: "{{ item.credentials }}"
        state: present
      loop: "{{ users }}"
      loop_control:
        label: "{{ item.username }}"
      no_log: true
For large-scale user provisioning and synchronization, consider using Keycloak’s SCIM capabilities or user federation instead of Ansible-managed user records.
CI/CD Integration
Run Ansible playbooks in your CI/CD pipeline:
# .github/workflows/keycloak-ansible.yml
name: Keycloak Configuration
on:
  push:
    branches: [main]
    paths: ['keycloak-ansible/**']
  pull_request:
    paths: ['keycloak-ansible/**']

jobs:
  lint:
    runs-on: ubuntu-latest
    steps:
      - uses: actions/checkout@v4
      - name: Run ansible-lint
        uses: ansible/ansible-lint@v24
        with:
          working_directory: keycloak-ansible

  deploy:
    needs: lint
    if: github.ref == 'refs/heads/main'
    runs-on: ubuntu-latest
    strategy:
      matrix:
        environment: [dev, staging, production]
      max-parallel: 1
    steps:
      - uses: actions/checkout@v4
      - name: Install Ansible
        run: pip install ansible
      - name: Install community.general
        run: ansible-galaxy collection install community.general
      - name: Run playbook
        working-directory: keycloak-ansible
        env:
          ANSIBLE_VAULT_PASSWORD: ${{ secrets.ANSIBLE_VAULT_PASSWORD }}
        run: |
          echo "$ANSIBLE_VAULT_PASSWORD" > .vault_pass
          ansible-playbook playbooks/site.yml
            -l keycloak_${{ matrix.environment }}
            --vault-password-file=.vault_pass
          rm .vault_pass
Idempotency Considerations
The community.general.keycloak_* modules are idempotent for most operations, but there are caveats:
- Client secrets: Creating a confidential client generates a secret. Subsequent runs will not change the secret unless you explicitly set one.
- User credentials: Setting passwords is always treated as a change. Use
no_log: trueand consider whether you need to manage credentials through Ansible at all. - Authentication flows: The Keycloak Ansible modules have limited support for authentication flow management. For complex custom authentication flows, you may need to use the Keycloak Admin REST API directly.
- Token expiration: For long-running playbooks, the admin token may expire. Consider refreshing it between major task blocks.
Comparing Ansible, Terraform, and Pulumi for Keycloak
| Aspect | Ansible | Terraform | Pulumi |
|---|---|---|---|
| Approach | Procedural (tasks) | Declarative (state) | Declarative (code) |
| Language | YAML | HCL | TypeScript, Python, Go |
| State Management | Stateless | State file required | State file required |
| Idempotency | Module-level | Provider-level | Provider-level |
| Drift Detection | Run playbook to check | terraform plan |
pulumi preview |
| Secret Management | Ansible Vault | External (Vault, env vars) | Built-in encryption |
| Best For | Day-2 ops, cross-tool orchestration | Full IAM-as-code | Type-safe IAM-as-code |
None of these tools is universally better. Many teams use Terraform for initial provisioning and Ansible for ongoing operational tasks.
Conclusion
Ansible provides a practical, agentless approach to Keycloak automation that fits well into existing configuration management workflows. The community.general.keycloak_* modules cover realm, client, role, user, and identity provider management with idempotent operations. For a full list of configurable resources, see the Keycloak Server Administration Guide.
For teams looking to automate Keycloak without managing the underlying infrastructure, Skycloak’s managed hosting provides a production-ready Keycloak environment. You can point your Ansible playbooks at a Skycloak cluster and focus entirely on realm configuration. Visit the Skycloak documentation for API details and integration guides, or check out our pricing to get started.
