Last updated: March 2026
Keycloak’s authentication system is built around flows — configurable sequences of authentication steps that users must complete to log in. The built-in flows handle standard username/password login, OTP verification, and social login. But real-world requirements often demand custom logic: IP-based restrictions, device fingerprinting, progressive profiling, conditional MFA based on risk signals, or integration with external systems.
This guide walks through Keycloak’s authentication flow system, from using the admin console flow editor to building and deploying a custom authenticator SPI in Java.
Understanding Authentication Flows
An authentication flow in Keycloak is a directed graph of authentication steps called executions. Each execution has a requirement that determines how it participates in the flow:
| Requirement | Behavior |
|---|---|
| Required | Must succeed. If it fails, the entire flow fails. |
| Alternative | At least one alternative execution must succeed. If one passes, the others are skipped. |
| Conditional | Acts as a gate. If the condition is true, the sub-flow’s executions run. If false, they are skipped entirely. |
| Disabled | Ignored. Useful for temporarily removing a step without deleting it. |
Built-in Flows
Keycloak ships with several pre-configured flows:
- Browser Flow: The main login flow for web applications
- Direct Grant Flow: For Resource Owner Password Credentials (not recommended for production)
- Registration Flow: User self-registration
- Reset Credentials Flow: Password reset
- First Broker Login Flow: What happens when a user authenticates via an identity provider for the first time
You cannot modify built-in flows directly. Instead, copy them and modify the copy.
Using the Flow Editor
Copying and Modifying a Flow
- Navigate to Authentication in the admin console
- Select the Browser flow
- Click Duplicate and name it (e.g., “Custom Browser Flow”)
- Now you can add, remove, and reorder executions
Adding Conditional OTP
A common customization is requiring multi-factor authentication only for certain users or conditions. Here is how to set up conditional OTP:
-
In your custom browser flow, find the Browser – Conditional OTP sub-flow
-
By default, it contains:
- Condition – User Configured (Conditional): Checks if the user has OTP configured
- OTP Form (Required): Prompts for OTP if the condition is met
-
To make OTP required for all users (not just those who have configured it):
- Remove the conditional sub-flow
- Add OTP Form directly as a Required execution
-
To require OTP only for users with a specific role:
- Add a Condition – User Role execution before the OTP Form
- Configure it with the role name (e.g.,
admin) - Set the OTP Form as Required within the conditional sub-flow
Adding WebAuthn (Passkeys)
To add passkey support as an alternative to passwords:
- Add a sub-flow named “Passwordless” at the same level as the username/password form
- Set it as Alternative
- Inside the sub-flow, add WebAuthn Passwordless Authenticator as Required
- Set the existing username/password sub-flow to Alternative as well
Now users can choose between password-based login and passkey authentication. For more on passkey configuration, see our complete guide to Keycloak passkeys and WebAuthn, which covers both passwordless and 2FA modes.
Binding the Flow
After creating your custom flow, bind it to your realm:
- Go to Authentication > Bindings
- Set Browser Flow to your custom flow
- Click Save
All browser-based logins in the realm now use your custom flow.
Custom Authenticator SPI
When the built-in authenticators do not meet your requirements, you can write a custom one using Keycloak’s Service Provider Interface (SPI).
Project Setup
Create a Maven project:
<!-- pom.xml -->
<project xmlns="http://maven.apache.org/POM/4.0.0"
         xmlns:xsi="http://www.w3.org/2001/XMLSchema-instance"
         xsi:schemaLocation="http://maven.apache.org/POM/4.0.0 http://maven.apache.org/xsd/maven-4.0.0.xsd">
    <modelVersion>4.0.0</modelVersion>

    <groupId>com.example</groupId>
    <artifactId>keycloak-ip-authenticator</artifactId>
    <version>1.0.0</version>
    <packaging>jar</packaging>

    <properties>
        <maven.compiler.source>17</maven.compiler.source>
        <maven.compiler.target>17</maven.compiler.target>
        <keycloak.version>26.0.0</keycloak.version>
    </properties>

    <dependencies>
        <dependency>
            <groupId>org.keycloak</groupId>
            <artifactId>keycloak-core</artifactId>
            <version>${keycloak.version}</version>
            <scope>provided</scope>
        </dependency>
        <dependency>
            <groupId>org.keycloak</groupId>
            <artifactId>keycloak-server-spi</artifactId>
            <version>${keycloak.version}</version>
            <scope>provided</scope>
        </dependency>
        <dependency>
            <groupId>org.keycloak</groupId>
            <artifactId>keycloak-server-spi-private</artifactId>
            <version>${keycloak.version}</version>
            <scope>provided</scope>
        </dependency>
        <dependency>
            <groupId>org.keycloak</groupId>
            <artifactId>keycloak-services</artifactId>
            <version>${keycloak.version}</version>
            <scope>provided</scope>
        </dependency>
    </dependencies>
</project>
Example: IP Allowlist Authenticator
This custom authenticator checks the user’s IP address against an allowlist. If the IP is not allowed, authentication fails.
// src/main/java/com/example/IpAllowlistAuthenticator.java
package com.example;

import org.keycloak.authentication.AuthenticationFlowContext;
import org.keycloak.authentication.AuthenticationFlowError;
import org.keycloak.authentication.Authenticator;
import org.keycloak.models.AuthenticatorConfigModel;
import org.keycloak.models.KeycloakSession;
import org.keycloak.models.RealmModel;
import org.keycloak.models.UserModel;
import org.jboss.logging.Logger;

import java.util.Arrays;
import java.util.List;

public class IpAllowlistAuthenticator implements Authenticator {

    private static final Logger LOG = Logger.getLogger(IpAllowlistAuthenticator.class);

    @Override
    public void authenticate(AuthenticationFlowContext context) {
        String remoteAddress = context.getConnection().getRemoteAddr();

        // Also check X-Forwarded-For for proxied requests
        String forwardedFor = context.getHttpRequest()
                .getHttpHeaders()
                .getHeaderString("X-Forwarded-For");

        String clientIp = forwardedFor != null
                ? forwardedFor.split(",")[0].trim()
                : remoteAddress;

        LOG.infof("Checking IP allowlist for client IP: %s", clientIp);

        AuthenticatorConfigModel config = context.getAuthenticatorConfig();
        if (config == null || config.getConfig() == null) {
            LOG.warn("No authenticator config found, allowing access");
            context.success();
            return;
        }

        String allowlistStr = config.getConfig().get("ip-allowlist");
        if (allowlistStr == null || allowlistStr.trim().isEmpty()) {
            LOG.warn("Empty IP allowlist, allowing access");
            context.success();
            return;
        }

        List<String> allowedIps = Arrays.asList(allowlistStr.split(","));
        boolean allowed = allowedIps.stream()
                .map(String::trim)
                .anyMatch(ip -> matchIp(clientIp, ip));

        if (allowed) {
            LOG.infof("IP %s is in allowlist, granting access", clientIp);
            context.success();
        } else {
            LOG.warnf("IP %s is NOT in allowlist, denying access", clientIp);
            context.failure(AuthenticationFlowError.ACCESS_DENIED);
        }
    }

    private boolean matchIp(String clientIp, String pattern) {
        if (pattern.contains("/")) {
            return matchCidr(clientIp, pattern);
        }
        return clientIp.equals(pattern);
    }

    private boolean matchCidr(String ip, String cidr) {
        try {
            String[] parts = cidr.split("/");
            String cidrIp = parts[0];
            int prefixLength = Integer.parseInt(parts[1]);

            long ipLong = ipToLong(ip);
            long cidrIpLong = ipToLong(cidrIp);
            long mask = -(1L << (32 - prefixLength));

            return (ipLong & mask) == (cidrIpLong & mask);
        } catch (Exception e) {
            LOG.warnf("Invalid CIDR pattern: %s", cidr);
            return false;
        }
    }

    private long ipToLong(String ip) {
        String[] octets = ip.split("\.");
        return (Long.parseLong(octets[0]) << 24)
             + (Long.parseLong(octets[1]) << 16)
             + (Long.parseLong(octets[2]) << 8)
             + Long.parseLong(octets[3]);
    }

    @Override
    public void action(AuthenticationFlowContext context) {
        // No user interaction needed
    }

    @Override
    public boolean requiresUser() {
        return false;
    }

    @Override
    public boolean configuredFor(KeycloakSession session, RealmModel realm, UserModel user) {
        return true;
    }

    @Override
    public void setRequiredActions(KeycloakSession session, RealmModel realm, UserModel user) {
        // No required actions
    }

    @Override
    public void close() {
        // No resources to clean up
    }
}
Authenticator Factory
The factory tells Keycloak about your authenticator and its configurable properties:
// src/main/java/com/example/IpAllowlistAuthenticatorFactory.java
package com.example;

import org.keycloak.Config;
import org.keycloak.authentication.Authenticator;
import org.keycloak.authentication.AuthenticatorFactory;
import org.keycloak.models.AuthenticationExecutionModel;
import org.keycloak.models.KeycloakSession;
import org.keycloak.models.KeycloakSessionFactory;
import org.keycloak.provider.ProviderConfigProperty;

import java.util.List;

public class IpAllowlistAuthenticatorFactory implements AuthenticatorFactory {

    public static final String PROVIDER_ID = "ip-allowlist-authenticator";
    private static final IpAllowlistAuthenticator INSTANCE = new IpAllowlistAuthenticator();

    @Override
    public String getId() {
        return PROVIDER_ID;
    }

    @Override
    public String getDisplayType() {
        return "IP Allowlist";
    }

    @Override
    public String getHelpText() {
        return "Checks if the client IP is in the configured allowlist. "
             + "Supports individual IPs and CIDR notation.";
    }

    @Override
    public String getReferenceCategory() {
        return "Access Control";
    }

    @Override
    public boolean isConfigurable() {
        return true;
    }

    @Override
    public AuthenticationExecutionModel.Requirement[] getRequirementChoices() {
        return new AuthenticationExecutionModel.Requirement[]{
            AuthenticationExecutionModel.Requirement.REQUIRED,
            AuthenticationExecutionModel.Requirement.ALTERNATIVE,
            AuthenticationExecutionModel.Requirement.DISABLED,
        };
    }

    @Override
    public boolean isUserSetupAllowed() {
        return false;
    }

    @Override
    public List<ProviderConfigProperty> getConfigProperties() {
        ProviderConfigProperty allowlist = new ProviderConfigProperty();
        allowlist.setName("ip-allowlist");
        allowlist.setLabel("IP Allowlist");
        allowlist.setHelpText(
            "Comma-separated list of allowed IPs or CIDR ranges. "
            + "Example: 192.168.1.0/24, 10.0.0.1, 203.0.113.0/28"
        );
        allowlist.setType(ProviderConfigProperty.STRING_TYPE);
        allowlist.setDefaultValue("");

        return List.of(allowlist);
    }

    @Override
    public Authenticator create(KeycloakSession session) {
        return INSTANCE;
    }

    @Override
    public void init(Config.Scope scope) {
        // No initialization needed
    }

    @Override
    public void postInit(KeycloakSessionFactory factory) {
        // No post-initialization needed
    }

    @Override
    public void close() {
        // No resources to clean up
    }
}
SPI Service Registration
Create the service provider registration file:
src/main/resources/META-INF/services/org.keycloak.authentication.AuthenticatorFactoryWith the content:
com.example.IpAllowlistAuthenticatorFactoryBuilding and Deploying
Build the JAR:
mvn clean packageDeploy to Keycloak by copying the JAR to the providers directory:
# For standalone Keycloak
cp target/keycloak-ip-authenticator-1.0.0.jar /opt/keycloak/providers/

# Rebuild Keycloak's optimized runtime
/opt/keycloak/bin/kc.sh build

# Restart Keycloak
/opt/keycloak/bin/kc.sh start
For Kubernetes deployments, build a custom Keycloak image:
FROM quay.io/keycloak/keycloak:26.0 as builder

COPY target/keycloak-ip-authenticator-1.0.0.jar /opt/keycloak/providers/

RUN /opt/keycloak/bin/kc.sh build

FROM quay.io/keycloak/keycloak:26.0

COPY --from=builder /opt/keycloak/ /opt/keycloak/

ENTRYPOINT ["/opt/keycloak/bin/kc.sh"]
For deploying custom providers in Kubernetes, see our Kubernetes production deployment guide.
Using the Custom Authenticator
After deployment:
- Go to Authentication in the admin console
- Open your custom flow
- Click Add step
- Find “IP Allowlist” in the list
- Add it to your flow (usually as the first execution, before username/password)
- Click the gear icon to configure the allowed IPs
- Set the requirement to Required
Advanced Flow Patterns
Conditional MFA Based on User Role
Require OTP only for users with the admin role:
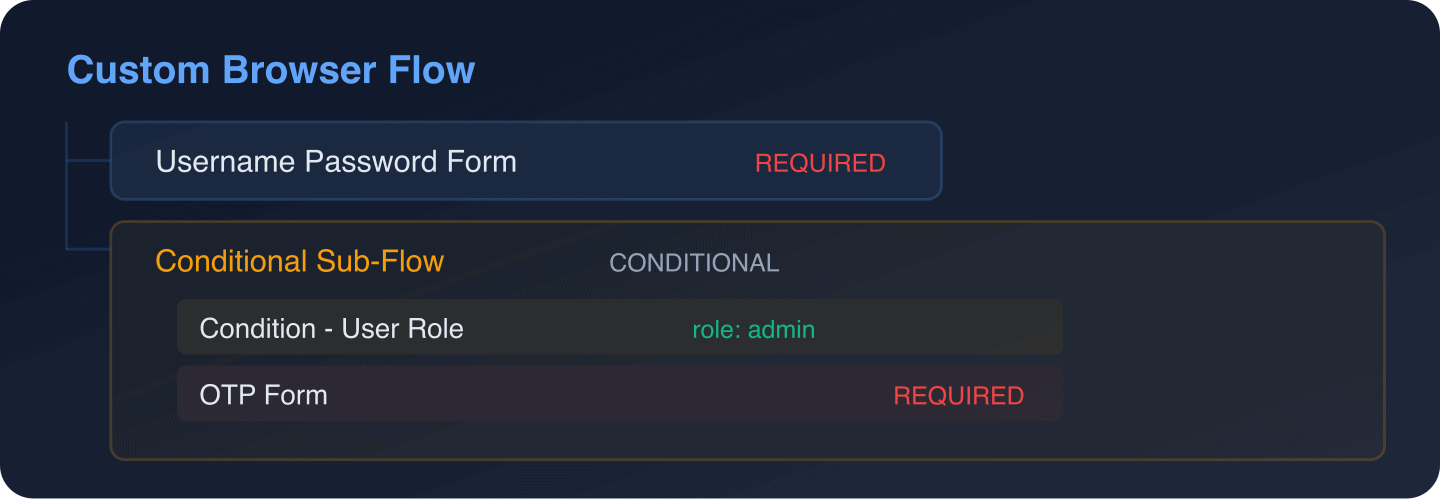
Configure the “Condition – User Role” execution with the role name. When the user does not have the admin role, the entire sub-flow is skipped.
Step-Up Authentication
Allow users to log in with a password for general access, but require additional authentication for sensitive operations:
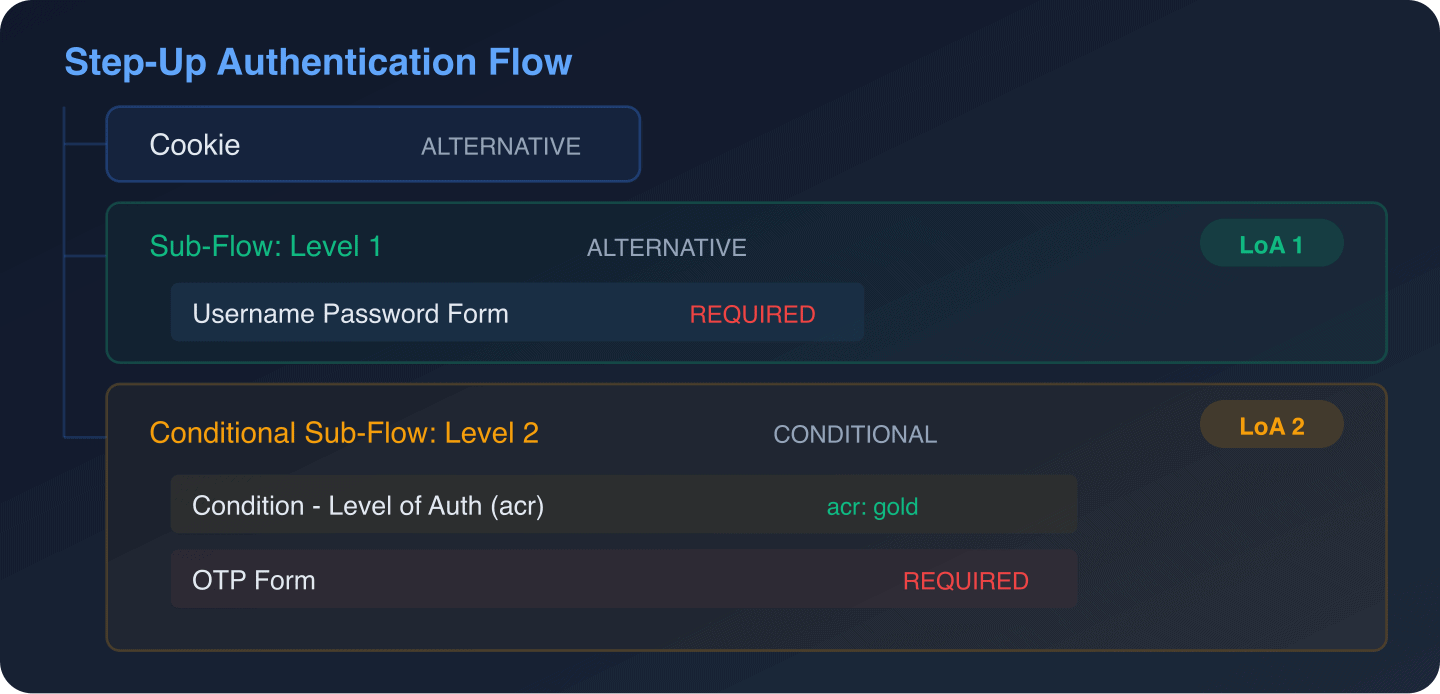
Applications request step-up authentication by including the acr_values parameter in the authorization request:
https://keycloak.example.com/realms/my-realm/protocol/openid-connect/auth
  ?client_id=my-app
  &response_type=code
  &scope=openid
  &acr_values=gold
  &redirect_uri=https://app.example.com/callback
The resulting token includes the ACR value, which the application can check before allowing access to sensitive features. Verify the ACR claim using the JWT Token Analyzer.
Progressive Profiling
Collect additional user information over time instead of requiring everything at registration:
- Create a custom Required Action that prompts users for missing profile fields
- Add the required action to users who need to complete their profile
- Keycloak shows the required action form after successful authentication
// Simplified Required Action Provider
public class ProfileCompletionAction implements RequiredActionProvider {

    @Override
    public void evaluateTriggers(RequiredActionContext context) {
        UserModel user = context.getUser();
        // Check if profile is incomplete
        if (user.getFirstAttribute("department") == null
                || user.getFirstAttribute("phone") == null) {
            user.addRequiredAction("COMPLETE_PROFILE");
        }
    }

    @Override
    public void requiredActionChallenge(RequiredActionContext context) {
        // Show the profile completion form
        Response challenge = context.form()
                .setAttribute("username", context.getUser().getUsername())
                .createForm("profile-completion.ftl");
        context.challenge(challenge);
    }

    @Override
    public void processAction(RequiredActionContext context) {
        MultivaluedMap<String, String> formData =
                context.getHttpRequest().getDecodedFormParameters();

        String department = formData.getFirst("department");
        String phone = formData.getFirst("phone");

        if (department != null && !department.isEmpty()) {
            context.getUser().setSingleAttribute("department", department);
        }
        if (phone != null && !phone.isEmpty()) {
            context.getUser().setSingleAttribute("phone", phone);
        }

        context.success();
    }

    // ... other interface methods
}
Deny Access for Disabled Accounts with Custom Message
Instead of a generic error, show a specific message when a disabled user tries to log in:
@Override
public void authenticate(AuthenticationFlowContext context) {
    UserModel user = context.getUser();
    if (user != null && !user.isEnabled()) {
        Response challenge = context.form()
                .setError("accountDisabledCustomMessage")
                .createErrorPage(Response.Status.FORBIDDEN);
        context.failure(AuthenticationFlowError.USER_DISABLED, challenge);
        return;
    }
    context.success();
}
Testing Custom Flows
Before deploying custom flows to production:
-
Test in a development environment: Use a local Keycloak instance or a Docker-based setup to test your flow.
-
Test all paths: Verify that every execution path works, including error cases:
- Successful login with all conditions met
- Failed login with wrong credentials
- Conditional flows where the condition is true and false
- Required actions triggering correctly
-
Test with your application: Verify that tokens issued after the custom flow contain the expected claims. Use the JWT Token Analyzer to inspect tokens.
-
Monitor authentication events: Enable event logging and check the audit logs for any unexpected authentication failures.
Flow Management with Infrastructure as Code
For version-controlled flow management, use the Keycloak Terraform provider or Keycloak’s realm export/import:
# Export realm configuration including flows
/opt/keycloak/bin/kc.sh export
  --dir /tmp/export
  --realm my-realm
  --users skip
For Terraform-based flow management, see our advanced Terraform patterns guide. For Ansible-based management, see the Ansible automation guide.
Security Considerations
Custom authentication flows directly impact your security posture:
- Never skip credential verification: A custom authenticator that grants access without proper credential checks creates a bypass vulnerability.
- Log authentication decisions: Use Keycloak’s event logging to track when custom authenticators grant or deny access.
- Handle errors gracefully: Do not expose internal details in error messages shown to users.
- Test for timing attacks: Ensure that your custom authenticator takes the same amount of time for success and failure paths.
- Review regularly: Custom authenticators do not receive Keycloak security updates automatically. Review your SPI code when upgrading Keycloak.
Conclusion
Keycloak’s authentication flow system provides flexibility that ranges from simple drag-and-drop configuration in the admin console to fully custom Java SPIs. Start with the built-in authenticators and conditional sub-flows — they cover a wide range of requirements without custom code. When you do need a custom authenticator, the Keycloak SPI documentation gives you full control over the authentication logic while integrating seamlessly with Keycloak’s session management, event logging, and user model.
For production deployments where you want custom authentication flows without managing Keycloak infrastructure, Skycloak’s managed hosting supports custom SPI deployment. See our pricing for plans that include custom provider support, or reach out through our contact page for enterprise requirements.


