
Last updated: March 2026
Introduction
Passkeys are the practical realization of passwordless authentication. Built on the WebAuthn standard and backed by the FIDO Alliance, passkeys use public-key cryptography stored in platform authenticators (Touch ID, Face ID, Windows Hello) or hardware security keys. Users authenticate with a biometric or PIN instead of typing a password.
Keycloak has supported WebAuthn since version 14, and the passkey experience has matured considerably. This guide shows you how to implement passkey registration and authentication in a React/Next.js application with Keycloak as the identity provider. We cover Keycloak WebAuthn policy configuration, the browser Credential Management API, conditional UI (passkey autofill), and cross-device passkeys.
For background on passkeys in Keycloak, see our complete guide to Keycloak passkeys and WebAuthn, which covers both passwordless and 2FA modes. This post builds on that by focusing on the frontend implementation in React.
How Passkeys Work with Keycloak
The passkey flow involves three parties:
- Relying Party (RP): Your application, backed by Keycloak.
- Authenticator: The user’s device (phone, laptop, security key).
- Browser: Mediates between the RP and authenticator via the WebAuthn API.
Registration flow:
- User clicks “Register passkey” in your React app.
- Your app redirects to Keycloak (or calls the Keycloak registration endpoint).
- Keycloak generates a challenge and registration options.
- The browser’s
navigator.credentials.create()prompts the user for biometric/PIN. - The authenticator creates a key pair and returns the public key to Keycloak.
- Keycloak stores the public key credential.
Authentication flow:
- User visits your login page.
- Your app redirects to Keycloak login.
- Keycloak generates an authentication challenge.
- The browser’s
navigator.credentials.get()prompts the user. - The authenticator signs the challenge with the private key.
- Keycloak verifies the signature and issues tokens.
Keycloak WebAuthn Configuration
Enable WebAuthn Authentication
- Log in to Keycloak admin console.
- Navigate to Authentication > Flows.
- Duplicate the Browser flow and name it
Browser with Passkeys. - Under the flow, add the WebAuthn Passwordless Authenticator execution.
- Configure the flow to offer passkeys as an alternative to password:
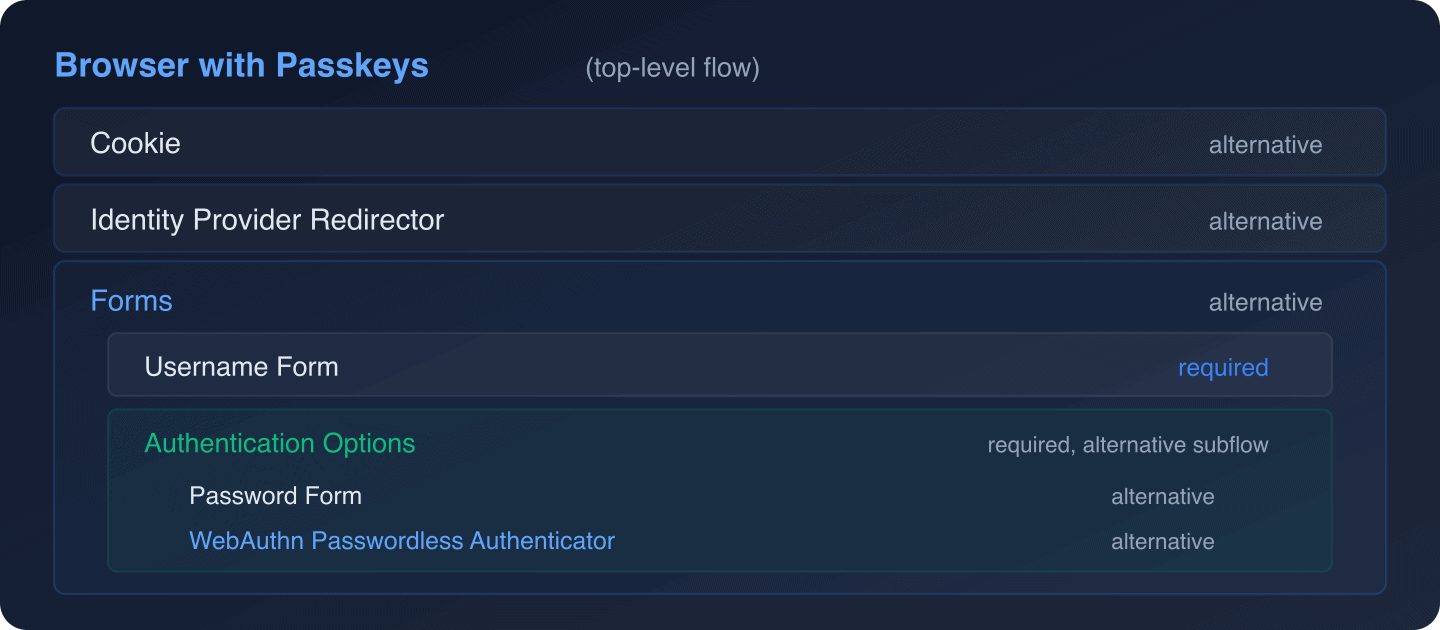
- Bind this flow as the Browser Flow under Authentication > Bindings.
Configure WebAuthn Policy
Go to Authentication > WebAuthn Passwordless Policy:
| Setting | Recommended Value | Notes |
|---|---|---|
| Relying Party Entity Name | Skycloak |
Display name shown to users |
| Signature Algorithms | ES256 |
Most widely supported |
| Relying Party ID | example.com |
Your domain (empty = auto-detect) |
| Attestation Conveyance Preference | none |
Simplifies registration |
| Authenticator Attachment | platform |
Built-in authenticators (Touch ID, etc.) |
| Require Resident Key | Yes |
Required for passkeys / discoverable credentials |
| User Verification Requirement | required |
Enforces biometric/PIN |
Setting Require Resident Key to Yes is what makes these true passkeys (discoverable credentials) rather than simple WebAuthn security keys.
Enable Passkey Registration
Users need a way to register passkeys. Configure the Required Actions:
- Go to Authentication > Required Actions.
- Enable WebAuthn Register Passwordless.
- Optionally, set it as a default action for new users.
Alternatively, users can register passkeys from the Keycloak Account Console at https://keycloak.example.com/realms/my-realm/account/#/security/signingin.
Next.js Application Setup
Project Initialization
npx create-next-app@latest passkey-demo --typescript --app
cd passkey-demo
npm install next-auth@5 keycloak-js
NextAuth.js Configuration
Configure NextAuth.js v5 with Keycloak as the provider:
// app/api/auth/[...nextauth]/route.ts
import NextAuth from "next-auth";
import KeycloakProvider from "next-auth/providers/keycloak";

const handler = NextAuth({
  providers: [
    KeycloakProvider({
      clientId: process.env.KEYCLOAK_CLIENT_ID!,
      clientSecret: process.env.KEYCLOAK_CLIENT_SECRET!,
      issuer: process.env.KEYCLOAK_ISSUER!,
    }),
  ],
  callbacks: {
    async jwt({ token, account }) {
      if (account) {
        token.accessToken = account.access_token;
        token.idToken = account.id_token;
      }
      return token;
    },
    async session({ session, token }) {
      session.accessToken = token.accessToken as string;
      return session;
    },
  },
});

export { handler as GET, handler as POST };
# .env.local
KEYCLOAK_CLIENT_ID=passkey-app
KEYCLOAK_CLIENT_SECRET=your-client-secret
KEYCLOAK_ISSUER=http://localhost:8080/realms/passkey-demo
NEXTAUTH_URL=http://localhost:3000
NEXTAUTH_SECRET=generate-a-random-secretLogin Page with Passkey Support
Create a login page that offers both traditional and passkey authentication:
// app/login/page.tsx
"use client";

import { signIn } from "next-auth/react";
import { useState } from "react";

export default function LoginPage() {
  const [isLoading, setIsLoading] = useState(false);
  const [passkeySupported, setPasskeySupported] = useState(false);

  // Check passkey support on mount
  useState(() => {
    async function checkSupport() {
      if (
        window.PublicKeyCredential &&
        typeof window.PublicKeyCredential
          .isUserVerifyingPlatformAuthenticatorAvailable
          === "function"
      ) {
        const available =
          await window.PublicKeyCredential
            .isUserVerifyingPlatformAuthenticatorAvailable();
        setPasskeySupported(available);
      }
    }
    checkSupport();
  });

  const handleLogin = async () => {
    setIsLoading(true);
    // Keycloak handles both password and passkey auth
    // based on the flow configuration
    await signIn("keycloak", { callbackUrl: "/" });
  };

  const handlePasskeyLogin = async () => {
    setIsLoading(true);
    // Direct to Keycloak with kc_action to trigger passkey
    await signIn("keycloak", {
      callbackUrl: "/",
    });
  };

  return (
    <div className="login-container">
      <h1>Sign In</h1>

      <button
        onClick={handleLogin}
        disabled={isLoading}
      >
        {isLoading ? "Signing in..." : "Sign in with Keycloak"}
      </button>

      {passkeySupported && (
        <button
          onClick={handlePasskeyLogin}
          disabled={isLoading}
          className="passkey-button"
        >
          Sign in with Passkey
        </button>
      )}

      {!passkeySupported && (
        <p className="passkey-notice">
          Passkeys are not supported on this device/browser.
        </p>
      )}
    </div>
  );
}
Conditional UI (Passkey Autofill)
Conditional UI allows passkey authentication to appear as an autofill suggestion in the username field. When a user focuses on the username input, the browser shows available passkeys alongside saved passwords.
How It Works
The browser’s navigator.credentials.get() API accepts a mediation: "conditional" option. When used with an <input autocomplete="username webauthn"> field, the browser integrates passkey selection into the autofill dropdown.
Custom Login Form with Conditional UI
If you are using a custom login theme in Keycloak (rather than redirecting to the default Keycloak login page), you can implement conditional UI:
// lib/webauthn.ts

export async function startConditionalAuthentication(
  keycloakUrl: string,
  realm: string,
): Promise<PublicKeyCredential | null> {
  // Check if conditional mediation is supported
  if (
    !window.PublicKeyCredential ||
    !window.PublicKeyCredential.isConditionalMediationAvailable
  ) {
    return null;
  }

  const isAvailable =
    await window.PublicKeyCredential
      .isConditionalMediationAvailable();
  if (!isAvailable) return null;

  try {
    // Fetch authentication options from your backend
    // which proxies to Keycloak's WebAuthn endpoints
    const optionsResponse = await fetch(
      "/api/auth/passkey/options",
    );
    const options = await optionsResponse.json();

    // Convert base64url strings to ArrayBuffers
    options.challenge = base64urlToBuffer(options.challenge);
    if (options.allowCredentials) {
      options.allowCredentials = options.allowCredentials.map(
        (cred: any) => ({
          ...cred,
          id: base64urlToBuffer(cred.id),
        }),
      );
    }

    // Start conditional authentication
    const credential = await navigator.credentials.get({
      publicKey: options,
      mediation: "conditional",
    }) as PublicKeyCredential;

    return credential;
  } catch (err) {
    console.error("Conditional auth failed:", err);
    return null;
  }
}

function base64urlToBuffer(base64url: string): ArrayBuffer {
  const base64 = base64url
    .replace(/-/g, "+")
    .replace(/_/g, "/");
  const binary = atob(base64);
  const buffer = new ArrayBuffer(binary.length);
  const view = new Uint8Array(buffer);
  for (let i = 0; i < binary.length; i++) {
    view[i] = binary.charCodeAt(i);
  }
  return buffer;
}
// components/ConditionalPasskeyInput.tsx
"use client";
import { useEffect, useRef } from "react";
import { startConditionalAuthentication } from "@/lib/webauthn";
export function ConditionalPasskeyInput({
keycloakUrl,
realm,
onAuthenticated,
}: {
keycloakUrl: string;
realm: string;
onAuthenticated: (credential: PublicKeyCredential) => void;
}) {
const inputRef = useRef<HTMLInputElement>(null);
useEffect(() => {
// Start conditional UI in the background
startConditionalAuthentication(keycloakUrl, realm)
.then((credential) => {
if (credential) {
onAuthenticated(credential);
}
});
}, [keycloakUrl, realm, onAuthenticated]);
return (
<input
ref={inputRef}
type="text"
name="username"
placeholder="Username or email"
autoComplete="username webauthn"
/>
);
}The autoComplete="username webauthn" attribute is the key. It tells the browser to show passkeys alongside saved usernames in the autofill dropdown.
Passkey Registration Component
After a user is authenticated (with a password, for example), they can register a passkey for future logins:
// components/PasskeyRegistration.tsx
"use client";

import { useState } from "react";
import { useSession } from "next-auth/react";

export function PasskeyRegistration() {
  const { data: session } = useSession();
  const [status, setStatus] = useState<
    "idle" | "registering" | "success" | "error"
  >("idle");
  const [error, setError] = useState<string | null>(null);

  const registerPasskey = async () => {
    setStatus("registering");
    setError(null);

    try {
      // 1. Get registration options from backend
      const optionsRes = await fetch("/api/auth/passkey/register", {
        method: "POST",
        headers: {
          Authorization: `Bearer ${session?.accessToken}`,
        },
      });
      const options = await optionsRes.json();

      // 2. Convert base64url fields to ArrayBuffers
      const publicKeyOptions: PublicKeyCredentialCreationOptions = {
        challenge: base64urlToBuffer(options.challenge),
        rp: {
          name: options.rp.name,
          id: options.rp.id,
        },
        user: {
          id: base64urlToBuffer(options.user.id),
          name: options.user.name,
          displayName: options.user.displayName,
        },
        pubKeyCredParams: options.pubKeyCredParams,
        authenticatorSelection: {
          authenticatorAttachment: "platform",
          residentKey: "required",
          requireResidentKey: true,
          userVerification: "required",
        },
        timeout: 60000,
        attestation: "none",
      };

      // 3. Create credential (triggers biometric prompt)
      const credential = await navigator.credentials.create({
        publicKey: publicKeyOptions,
      }) as PublicKeyCredential;

      // 4. Send credential to backend for storage
      const attestationResponse =
        credential.response as AuthenticatorAttestationResponse;

      await fetch("/api/auth/passkey/register/complete", {
        method: "POST",
        headers: {
          "Content-Type": "application/json",
          Authorization: `Bearer ${session?.accessToken}`,
        },
        body: JSON.stringify({
          id: credential.id,
          rawId: bufferToBase64url(credential.rawId),
          type: credential.type,
          response: {
            attestationObject: bufferToBase64url(
              attestationResponse.attestationObject,
            ),
            clientDataJSON: bufferToBase64url(
              attestationResponse.clientDataJSON,
            ),
          },
        }),
      });

      setStatus("success");
    } catch (err) {
      setStatus("error");
      setError(
        err instanceof Error ? err.message : "Registration failed",
      );
    }
  };

  if (!session) return null;

  return (
    <div className="passkey-registration">
      <h3>Passkey Registration</h3>
      <p>
        Register a passkey to sign in faster next time using your
        fingerprint, face, or device PIN.
      </p>

      {status === "idle" && (
        <button onClick={registerPasskey}>
          Register Passkey
        </button>
      )}

      {status === "registering" && (
        <p>Follow the prompt on your device...</p>
      )}

      {status === "success" && (
        <p className="success">
          Passkey registered. You can now sign in without a password.
        </p>
      )}

      {status === "error" && (
        <p className="error">
          {error || "Registration failed. Please try again."}
        </p>
      )}
    </div>
  );
}

function base64urlToBuffer(base64url: string): ArrayBuffer {
  const padding = "=".repeat((4 - (base64url.length % 4)) % 4);
  const base64 = (base64url + padding)
    .replace(/-/g, "+")
    .replace(/_/g, "/");
  const binary = atob(base64);
  const buffer = new ArrayBuffer(binary.length);
  const view = new Uint8Array(buffer);
  for (let i = 0; i < binary.length; i++) {
    view[i] = binary.charCodeAt(i);
  }
  return buffer;
}

function bufferToBase64url(buffer: ArrayBuffer): string {
  const bytes = new Uint8Array(buffer);
  let binary = "";
  for (const byte of bytes) {
    binary += String.fromCharCode(byte);
  }
  return btoa(binary)
    .replace(/+/g, "-")
    .replace(///g, "_")
    .replace(/=+$/, "");
}
Cross-Device Passkeys
Cross-device passkeys (also called “hybrid transport”) let a user authenticate on a laptop using a passkey stored on their phone. This is handled transparently by the platform:
- User selects “Use a phone or tablet” from the WebAuthn prompt.
- A QR code appears on the laptop.
- User scans the QR code with their phone.
- Phone prompts for biometric verification.
- Authentication completes on the laptop.
No special application code is needed. The browser and operating system handle the cross-device protocol. Keycloak receives the authentication response the same way it would from a local authenticator.
Requirements for Cross-Device Passkeys
- The user’s phone must have a passkey stored for the relying party.
- Both devices must have Bluetooth enabled (for the CTAP2 hybrid protocol).
- The relying party ID must match the domain where the passkey was registered.
Managing Passkeys
Users should be able to view and delete their registered passkeys. The Keycloak Account Console provides this at https://keycloak.example.com/realms/my-realm/account/#/security/signingin.
You can also build a custom management UI using the Keycloak Admin REST API:
// api/auth/passkey/list/route.ts
import { NextResponse } from "next/server";

export async function GET(request: Request) {
  const token = request.headers
    .get("authorization")?.split(" ")[1];

  // Get the user's credentials from Keycloak Admin API
  const response = await fetch(
    `${process.env.KEYCLOAK_ISSUER}/protocol/openid-connect/userinfo`,
    { headers: { Authorization: `Bearer ${token}` } },
  );
  const userInfo = await response.json();

  // Use admin API to list the user's WebAuthn credentials
  const adminToken = await getAdminToken();
  const credentials = await fetch(
    `${process.env.KEYCLOAK_URL}/admin/realms/${process.env.KEYCLOAK_REALM}`
    + `/users/${userInfo.sub}/credentials`,
    { headers: { Authorization: `Bearer ${adminToken}` } },
  );
  const allCreds = await credentials.json();

  // Filter to WebAuthn credentials only
  const passkeys = allCreds.filter(
    (c: any) => c.type === "webauthn-passwordless",
  );

  return NextResponse.json(passkeys.map((p: any) => ({
    id: p.id,
    label: p.userLabel || "Unnamed passkey",
    createdDate: p.createdDate,
  })));
}
Browser Compatibility
Passkey support is broadly available as of 2026:
| Browser | Platform Passkeys | Cross-Device | Conditional UI |
|---|---|---|---|
| Chrome 108+ | Yes | Yes | Yes |
| Safari 16+ | Yes | Yes | Yes |
| Firefox 122+ | Yes | Yes | Yes |
| Edge 108+ | Yes | Yes | Yes |
Always check for WebAuthn support before showing passkey options to users:
async function checkPasskeySupport(): Promise<{
  available: boolean;
  platform: boolean;
  conditional: boolean;
}> {
  if (!window.PublicKeyCredential) {
    return { available: false, platform: false, conditional: false };
  }

  const platform =
    await PublicKeyCredential
      .isUserVerifyingPlatformAuthenticatorAvailable();

  const conditional =
    typeof PublicKeyCredential.isConditionalMediationAvailable
      === "function"
    && await PublicKeyCredential.isConditionalMediationAvailable();

  return { available: true, platform, conditional };
}
Security Considerations
Passkeys resist phishing. The browser enforces origin validation. A credential registered for example.com cannot be used on evil-example.com.
No shared secrets. Unlike passwords, only the public key is stored on the server. A database breach does not expose authentication credentials.
User verification is local. Biometrics never leave the device. Keycloak only sees a signed challenge.
Backup and recovery. Platform passkeys (iCloud Keychain, Google Password Manager) sync across devices, providing resilience against device loss. For non-synced security keys, encourage users to register multiple credentials.
For broader passwordless strategy, see why everyone is talking about passwordless authentication.
Combining Passkeys with MFA
Passkeys can serve as a single authentication factor (something you have + something you are) or be combined with additional factors. In Keycloak, configure this via authentication flows:
- Passkey only: The passkey provides both possession and biometric verification.
- Passkey + OTP: For high-security scenarios, require an additional OTP. Configure this via multi-factor authentication in Keycloak flows.
Keycloak also supports step-up authentication, where certain operations require re-authentication with a passkey even within an active session.
Conclusion
Passkeys offer the best balance of security and user experience available today. Keycloak’s WebAuthn support handles the server-side complexity, while the browser’s Credential Management API handles the client-side prompts. The frontend work is primarily configuration and API bridging.
Key takeaways:
- Configure Keycloak’s WebAuthn Passwordless Policy with
residentKey: requiredfor true passkeys - Use conditional UI (
autoComplete="username webauthn") for seamless autofill integration - Cross-device passkeys work automatically via the platform’s hybrid transport
- Always provide fallback authentication methods during the transition period
- Register multiple passkeys per user for recovery
For the WebAuthn specification, see W3C Web Authentication. For Keycloak specifics, consult the Keycloak WebAuthn documentation.
Ready to offer passkey authentication to your users? Try Skycloak free for a managed Keycloak instance with WebAuthn pre-configured and custom branding support.
