Last updated: March 2026
Moving Keycloak configurations between environments — from development to staging to production — is one of the most common operational challenges teams face. Realm exports capture clients, roles, authentication flows, identity providers, and (optionally) users, but the process has significant gotchas around secrets, environment-specific settings, and import ordering.
This guide covers every approach to realm export and import: the Admin Console UI, the Admin REST API, the CLI tool, Docker-based auto-import, and the keycloak-config-cli tool for GitOps-style configuration management. By the end, you will have a repeatable strategy for promoting Keycloak configurations across environments.
Understanding What Gets Exported
A Keycloak realm export includes:
| Included | Not Included (by Default) |
|---|---|
| Realm settings | User passwords (hashed) |
| Clients and client scopes | Client secrets |
| Roles (realm and client) | User sessions |
| Authentication flows | Offline tokens |
| Identity provider configs | Event logs |
| User federation configs | Audit data |
| Protocol mappers | |
| Groups | |
| Default roles |
The biggest caveat: client secrets and user password hashes are excluded from partial exports via the Admin Console. Full exports from the CLI include them, but you need to handle those secrets carefully.
For a broader look at Keycloak configuration best practices, see 8 default configurations to adjust on your Keycloak cluster.
Method 1: Admin Console Export
The simplest approach, but with limitations.
- Go to Realm Settings > Partial Export
- Toggle Export groups and roles and Export clients
- Click Export
This produces a JSON file you can download. The limitations:
- No user data — partial export never includes users
- No client secrets — secrets are stripped from the export
- No bulk export — you export one realm at a time
- Size limits — large realms may time out
This method works for quickly copying client configurations during development but is not suitable for production migrations.
Method 2: Admin REST API Export
The REST API gives you more control over what you export. You can export specific resources individually or use the partial export endpoint.
Full Realm Representation
# Get an admin access token
TOKEN=$(curl -s -X POST
  "http://localhost:8080/realms/master/protocol/openid-connect/token"
  -H "Content-Type: application/x-www-form-urlencoded"
  -d "grant_type=password"
  -d "client_id=admin-cli"
  -d "username=admin"
  -d "password=admin"
  | jq -r '.access_token')

# Export the full realm representation
curl -s -X GET
  "http://localhost:8080/admin/realms/myrealm"
  -H "Authorization: Bearer $TOKEN"
  | jq '.' > realm-export.json
Partial Export via REST API
# Partial export endpoint (includes clients and roles)
curl -s -X POST
  "http://localhost:8080/admin/realms/myrealm/partial-export?exportClients=true&exportGroupsAndRoles=true"
  -H "Authorization: Bearer $TOKEN"
  | jq '.' > realm-partial-export.json
Export Individual Resources
For more targeted exports, pull specific resource types:
# Export all clients
curl -s "http://localhost:8080/admin/realms/myrealm/clients"
  -H "Authorization: Bearer $TOKEN"
  | jq '.' > clients.json

# Export all roles
curl -s "http://localhost:8080/admin/realms/myrealm/roles"
  -H "Authorization: Bearer $TOKEN"
  | jq '.' > roles.json

# Export identity providers
curl -s "http://localhost:8080/admin/realms/myrealm/identity-provider/instances"
  -H "Authorization: Bearer $TOKEN"
  | jq '.' > identity-providers.json

# Export authentication flows
curl -s "http://localhost:8080/admin/realms/myrealm/authentication/flows"
  -H "Authorization: Bearer $TOKEN"
  | jq '.' > auth-flows.json

# Export users (paginated)
curl -s "http://localhost:8080/admin/realms/myrealm/users?first=0&max=100"
  -H "Authorization: Bearer $TOKEN"
  | jq '.' > users.json
You can inspect exported tokens with our JWT Token Analyzer to verify the admin token contains the correct realm-management roles.
Method 3: Keycloak CLI Export (kc.sh)
The built-in kc.sh export command performs a full export including users and credentials. This is the most complete export method.
# Export to a single file
/opt/keycloak/bin/kc.sh export
  --dir /tmp/export
  --realm myrealm
  --users realm_file

# Export with users in a separate file
/opt/keycloak/bin/kc.sh export
  --dir /tmp/export
  --realm myrealm
  --users different_files
The --users flag controls how user data is exported:
| Value | Behavior |
|---|---|
skip |
No users exported |
realm_file |
Users included in the realm file |
same_file |
Users in a separate file per realm |
different_files |
Users split across multiple files (for large realms) |
Important: The kc.sh export command requires the server to be stopped first (or run in a separate process). In Docker, run it as a one-off command:
docker exec -it keycloak /opt/keycloak/bin/kc.sh export
  --dir /tmp/export
  --realm myrealm
  --users realm_file

docker cp keycloak:/tmp/export ./keycloak-export
Method 4: Docker Auto-Import at Startup
For local development and testing, you can configure Keycloak’s Docker image to automatically import a realm on startup:
# docker-compose.yml
services:
  keycloak:
    image: quay.io/keycloak/keycloak:26.0
    command:
      - start-dev
      - --import-realm
    volumes:
      - ./realm-export.json:/opt/keycloak/data/import/realm-export.json:ro
    environment:
      KC_BOOTSTRAP_ADMIN_USERNAME: admin
      KC_BOOTSTRAP_ADMIN_PASSWORD: admin
      KC_DB: postgres
      KC_DB_URL: jdbc:postgresql://postgres:5432/keycloak
      KC_DB_USERNAME: keycloak
      KC_DB_PASSWORD: keycloak
    ports:
      - "8080:8080"
    depends_on:
      - postgres
Use our Docker Compose Generator to create a complete docker-compose.yml with database, volume mounts, and other options pre-configured. You can also generate full Keycloak configurations with our Keycloak Config Generator.
The --import-realm flag tells Keycloak to scan /opt/keycloak/data/import/ at startup and import any JSON files found there. If a realm with the same name already exists, the import is skipped unless you use the --override flag (available in Keycloak 24+).
Conditional Import Script
For more control, use an entrypoint script:
#!/bin/bash
# docker-entrypoint.sh

IMPORT_DIR="/opt/keycloak/data/import"

# Only import if the realm does not already exist
if [ -f "$IMPORT_DIR/realm-export.json" ]; then
  REALM_NAME=$(jq -r '.realm' "$IMPORT_DIR/realm-export.json")

  echo "Checking if realm '$REALM_NAME' exists..."

  /opt/keycloak/bin/kc.sh start-dev --import-realm &
  KC_PID=$!

  # Wait for Keycloak to be ready
  until curl -sf http://localhost:8080/health/ready > /dev/null 2>&1; do
    sleep 2
  done

  echo "Keycloak started with realm import"
  wait $KC_PID
else
  echo "No import file found, starting normally"
  /opt/keycloak/bin/kc.sh start-dev
fi
Method 5: keycloak-config-cli (GitOps)
For teams that want to manage Keycloak configuration as code, keycloak-config-cli is the best tool available. It takes a desired-state JSON or YAML configuration and applies it to a running Keycloak instance, creating, updating, or deleting resources as needed.
Installation
# Docker
docker pull adorsys/keycloak-config-cli:latest

# Or download the JAR
curl -L -o keycloak-config-cli.jar
  "https://github.com/adorsys/keycloak-config-cli/releases/download/v6.2.1/keycloak-config-cli-6.2.1.jar"
Configuration File Format
{
  "realm": "myrealm",
  "enabled": true,
  "sslRequired": "external",
  "registrationAllowed": false,
  "loginWithEmailAllowed": true,
  "duplicateEmailsAllowed": false,
  "resetPasswordAllowed": true,
  "editUsernameAllowed": false,
  "bruteForceProtected": true,
  "accessTokenLifespan": 300,
  "ssoSessionIdleTimeout": 1800,
  "clients": [
    {
      "clientId": "my-web-app",
      "name": "My Web Application",
      "enabled": true,
      "clientAuthenticatorType": "client-secret",
      "secret": "$(env:MY_WEB_APP_SECRET)",
      "redirectUris": [
        "$(env:APP_BASE_URL)/*"
      ],
      "webOrigins": [
        "$(env:APP_BASE_URL)"
      ],
      "publicClient": false,
      "protocol": "openid-connect",
      "defaultClientScopes": [
        "openid",
        "profile",
        "email"
      ]
    }
  ],
  "roles": {
    "realm": [
      { "name": "app-admin", "description": "Application administrator" },
      { "name": "app-user", "description": "Regular application user" }
    ],
    "client": {
      "my-web-app": [
        { "name": "manage-users", "description": "Can manage users" },
        { "name": "view-reports", "description": "Can view reports" }
      ]
    }
  },
  "identityProviders": [
    {
      "alias": "google",
      "providerId": "google",
      "enabled": true,
      "config": {
        "clientId": "$(env:GOOGLE_CLIENT_ID)",
        "clientSecret": "$(env:GOOGLE_CLIENT_SECRET)",
        "defaultScope": "openid profile email"
      }
    }
  ]
}
Notice the $(env:VARIABLE_NAME) syntax — keycloak-config-cli supports environment variable substitution. This is how you handle secrets and environment-specific values without committing them to version control.
Running keycloak-config-cli
# Using Docker
docker run --rm
  -v $(pwd)/keycloak-config:/config
  -e KEYCLOAK_URL=http://keycloak:8080
  -e KEYCLOAK_AVAILABILITYCHECK_ENABLED=true
  -e KEYCLOAK_USER=admin
  -e KEYCLOAK_PASSWORD=admin
  -e IMPORT_FILES_LOCATIONS='/config/*'
  -e MY_WEB_APP_SECRET=supersecret
  -e APP_BASE_URL=https://myapp.example.com
  -e GOOGLE_CLIENT_ID=xxx
  -e GOOGLE_CLIENT_SECRET=xxx
  --network keycloak-network
  adorsys/keycloak-config-cli:latest

# Using the JAR
java -jar keycloak-config-cli.jar
  --keycloak.url=http://localhost:8080
  --keycloak.user=admin
  --keycloak.password=admin
  --import.files.locations=./keycloak-config/
Directory Structure for GitOps
Organize your configuration files by concern:
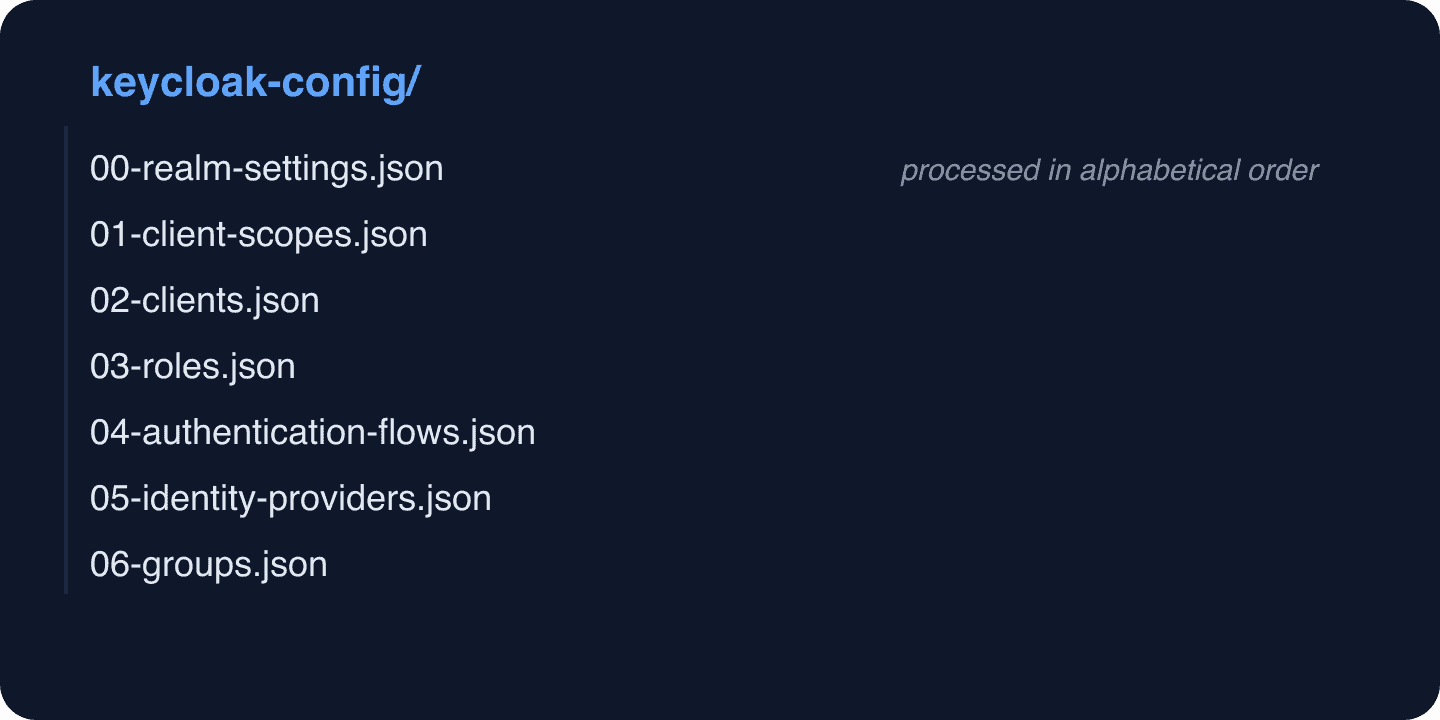
Files are processed in alphabetical order, so prefix with numbers to control import sequence. This matters when resources have dependencies (e.g., clients reference client scopes).
CI/CD Integration
GitHub Actions Pipeline
# .github/workflows/keycloak-config.yml
name: Deploy Keycloak Configuration

on:
  push:
    paths:
      - 'keycloak-config/**'
    branches:
      - main

jobs:
  deploy-dev:
    runs-on: ubuntu-latest
    environment: development
    steps:
      - uses: actions/checkout@v4

      - name: Deploy to Dev Keycloak
        uses: docker://adorsys/keycloak-config-cli:latest
        env:
          KEYCLOAK_URL: ${{ secrets.KEYCLOAK_DEV_URL }}
          KEYCLOAK_USER: ${{ secrets.KEYCLOAK_ADMIN_USER }}
          KEYCLOAK_PASSWORD: ${{ secrets.KEYCLOAK_ADMIN_PASSWORD }}
          KEYCLOAK_AVAILABILITYCHECK_ENABLED: "true"
          IMPORT_FILES_LOCATIONS: "/github/workspace/keycloak-config/"
          APP_BASE_URL: ${{ vars.APP_BASE_URL }}
          MY_WEB_APP_SECRET: ${{ secrets.WEB_APP_CLIENT_SECRET }}

  deploy-staging:
    runs-on: ubuntu-latest
    needs: deploy-dev
    environment: staging
    steps:
      - uses: actions/checkout@v4

      - name: Deploy to Staging Keycloak
        uses: docker://adorsys/keycloak-config-cli:latest
        env:
          KEYCLOAK_URL: ${{ secrets.KEYCLOAK_STAGING_URL }}
          KEYCLOAK_USER: ${{ secrets.KEYCLOAK_ADMIN_USER }}
          KEYCLOAK_PASSWORD: ${{ secrets.KEYCLOAK_ADMIN_PASSWORD }}
          KEYCLOAK_AVAILABILITYCHECK_ENABLED: "true"
          IMPORT_FILES_LOCATIONS: "/github/workspace/keycloak-config/"
          APP_BASE_URL: ${{ vars.APP_BASE_URL }}
          MY_WEB_APP_SECRET: ${{ secrets.WEB_APP_CLIENT_SECRET }}
For teams using Terraform, see our guide on using Terraform to set up and configure Keycloak for an alternative infrastructure-as-code approach. For Kubernetes deployments, deploying Keycloak with ArgoCD covers GitOps with Helm.
Handling Secrets and Credentials
Secrets are the hardest part of Keycloak configuration management. Here are the recommended patterns:
Pattern 1: Environment Variable Substitution
Use keycloak-config-cli’s $(env:VAR) syntax:
{
  "clients": [{
    "clientId": "my-app",
    "secret": "$(env:MY_APP_SECRET)"
  }]
}
Secrets live in your CI/CD platform (GitHub Secrets, Vault, AWS Secrets Manager) and are injected at deploy time.
Pattern 2: Placeholder Replacement
For the REST API approach, use jq or envsubst to replace placeholders before import:
# realm-template.json uses ${VARIABLE} placeholders
envsubst < realm-template.json > realm-import.json

curl -X POST
  "http://localhost:8080/admin/realms"
  -H "Authorization: Bearer $TOKEN"
  -H "Content-Type: application/json"
  -d @realm-import.json
Pattern 3: Post-Import Secret Update
Export without secrets, import the structure, then update secrets via the REST API:
# Import the realm (without secrets)
curl -X POST
  "http://localhost:8080/admin/realms"
  -H "Authorization: Bearer $TOKEN"
  -H "Content-Type: application/json"
  -d @realm-no-secrets.json

# Get the client's internal ID
CLIENT_UUID=$(curl -s
  "http://localhost:8080/admin/realms/myrealm/clients?clientId=my-app"
  -H "Authorization: Bearer $TOKEN"
  | jq -r '.[0].id')

# Update the client secret
curl -X POST
  "http://localhost:8080/admin/realms/myrealm/clients/$CLIENT_UUID/client-secret"
  -H "Authorization: Bearer $TOKEN"
Migrating Users
User migration is often the trickiest part. Keycloak hashes passwords, and you cannot export those hashes via the REST API.
Option 1: CLI Full Export
The kc.sh export command includes password hashes. Import them on the target:
# Export with users
kc.sh export --dir /tmp/export --realm myrealm --users realm_file

# Import on target
kc.sh import --file /tmp/export/myrealm-realm.json
Option 2: Force Password Reset
Export users without passwords, import them, and force a password reset:
# Export users via API
curl -s "http://localhost:8080/admin/realms/myrealm/users?max=1000"
  -H "Authorization: Bearer $TOKEN"
  | jq '.' > users.json

# Import each user and set required action
for user in $(jq -c '.[]' users.json); do
  USER_ID=$(echo $user | jq -r '.id')
  echo $user | jq '. + {"requiredActions": ["UPDATE_PASSWORD"]}' |
  curl -X POST
    "http://localhost:8080/admin/realms/target-realm/users"
    -H "Authorization: Bearer $TOKEN"
    -H "Content-Type: application/json"
    -d @-
done
Option 3: User Federation Bridge
For zero-downtime migration, configure the old Keycloak as an identity provider in the new instance. Users authenticate through the old system and are gradually migrated. This approach is covered in depth in our Auth0 to Keycloak migration guide.
Environment-Specific Configuration
Some settings should differ between environments. Here is how to structure your configuration for multi-environment deployments:
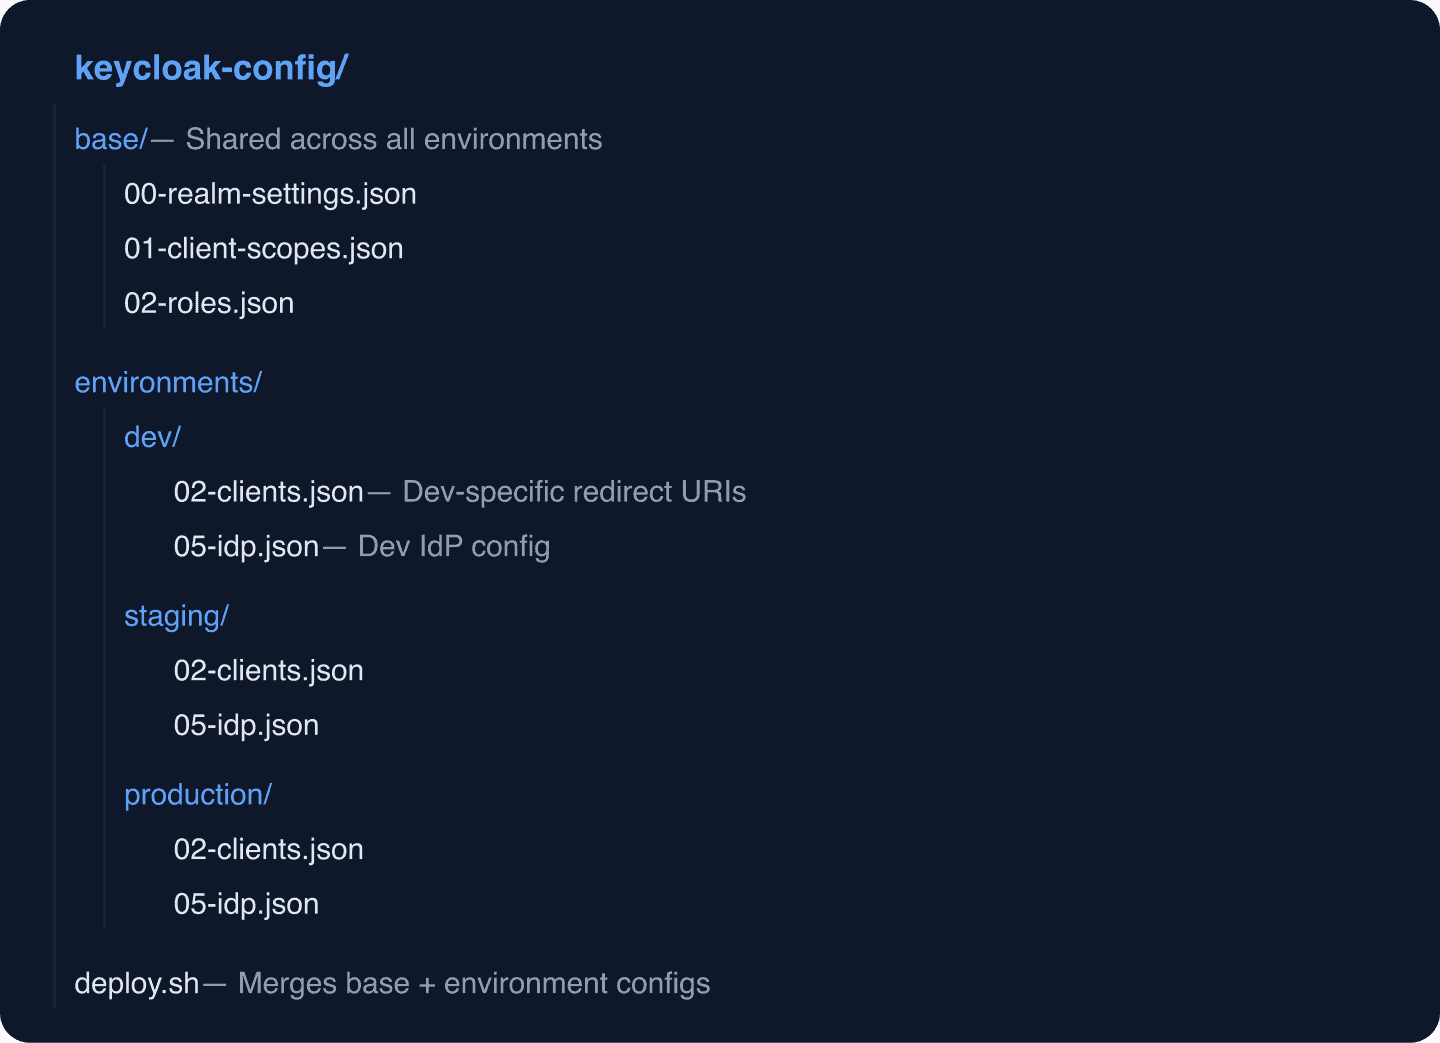
The deploy script:
#!/bin/bash
# deploy.sh
ENVIRONMENT=${1:-dev}
CONFIG_DIR="keycloak-config"
MERGED_DIR="/tmp/keycloak-merged"

rm -rf "$MERGED_DIR"
mkdir -p "$MERGED_DIR"

# Copy base config
cp "$CONFIG_DIR/base/"*.json "$MERGED_DIR/"

# Overlay environment-specific config (overrides base files with same name)
if [ -d "$CONFIG_DIR/environments/$ENVIRONMENT" ]; then
  cp "$CONFIG_DIR/environments/$ENVIRONMENT/"*.json "$MERGED_DIR/"
fi

echo "Deploying $ENVIRONMENT configuration..."
docker run --rm
  -v "$MERGED_DIR:/config"
  -e KEYCLOAK_URL="$KEYCLOAK_URL"
  -e KEYCLOAK_USER="$KEYCLOAK_ADMIN"
  -e KEYCLOAK_PASSWORD="$KEYCLOAK_ADMIN_PASSWORD"
  -e IMPORT_FILES_LOCATIONS='/config/*'
  adorsys/keycloak-config-cli:latest
Monitoring and Audit
After importing a realm configuration, verify it by checking audit logs for any import-related events. Keycloak logs realm imports as admin events, which gives you traceability for every configuration change.
For ongoing monitoring of your Keycloak instances, Skycloak’s Insights dashboard provides real-time metrics without needing to configure separate monitoring infrastructure.
Common Pitfalls
- Import ordering — authentication flows must be imported before clients that reference them. Use numbered file prefixes.
- Internal IDs — do not rely on Keycloak’s internal UUIDs. They differ between instances. Use
clientId,alias, andnameas identifiers. - Default client scopes — if you reference custom client scopes in a client configuration, the scopes must exist first.
- Realm creation vs update — POST to
/admin/realmscreates a new realm; PUT to/admin/realms/{realm}updates an existing one. keycloak-config-cli handles this automatically. - Large exports — realms with thousands of users may cause memory issues during export. Use
--users different_filesto split the export.
Further Reading
- Keycloak Server Administration Guide — Export and Import
- keycloak-config-cli GitHub Repository
- Upgrading Keycloak — migration strategies
- Multitenancy using Keycloak organizations
- SCIM provisioning with Keycloak — for automated user synchronization between systems
Wrapping Up
Realm export and import is foundational to any Keycloak operations workflow. For development and testing, Docker auto-import gets you started quickly. For production, keycloak-config-cli with environment variable substitution gives you a GitOps-compatible, auditable configuration pipeline.
If managing Keycloak infrastructure is not where you want to spend your engineering time, Skycloak handles the operational burden — deployment, upgrades, backups, and configuration management — so you can focus on your application. Check our pricing or review our security practices and SLA guarantees.
