Team Management
Learn how to effectively manage your team within Skycloak workspaces, including inviting members, assigning roles, and controlling access to your Keycloak clusters.
Understanding Workspaces
What is a Workspace?
A workspace in Skycloak is your organization’s dedicated environment that contains:
- All your Keycloak clusters - Development, staging, and production instances
- Team members - Colleagues who collaborate on identity management
- Shared resources - Applications, configurations, and settings
- Billing and subscription - Centralized billing for all clusters
- Event logs - Activity tracking across your organization
Think of a workspace as your company’s account in Skycloak where all team members can collaborate on managing authentication and authorization.
Workspace Hierarchy
Workspace (Your Organization)
├── Team Members
│   ├── Owners
│   ├── Admins
│   ├── Developers
│   └── Read-only Users
├── Keycloak Clusters
│   ├── Development Cluster
│   ├── Staging Cluster
│   └── Production Cluster
├── Applications
├── Billing & Subscription
└── Settings & Security
Team Roles and Permissions
Skycloak uses a role-based access control (RBAC) system with five predefined roles:
Role Comparison
| Feature | Workspace Owner | Workspace Admin | Workspace Billing | Cluster Admin | Cluster Viewer |
|---|---|---|---|---|---|
| Workspace Management | |||||
| View workspace | ✅ | ✅ | ✅ | ✅ | ✅ |
| Update workspace settings | ✅ | ✅ | ❌ | ❌ | ❌ |
| Delete workspace | ✅ | ❌ | ❌ | ❌ | ❌ |
| Invite team members | ✅ | ✅ | ❌ | ❌ | ❌ |
| Billing & Subscription | |||||
| View billing information | ✅ | ❌ | ✅ | ❌ | ❌ |
| Manage subscription | ✅ | ❌ | ✅ | ❌ | ❌ |
| Update payment methods | ✅ | ❌ | ✅ | ❌ | ❌ |
| Cluster Operations | |||||
| Create clusters | ✅ | ✅ | ❌ | ✅ | ❌ |
| View clusters | ✅ | ✅ | ✅ | ✅ | ✅ |
| Update clusters | ✅ | ✅ | ❌ | ✅ | ❌ |
| Delete clusters | ✅ | ✅ | ❌ | ✅ | ❌ |
| Keycloak Management | |||||
| Access Keycloak admin | ✅ | ✅ | ❌ | ✅ | ❌ |
| Manage realms | ✅ | ✅ | ❌ | ✅ | ❌ |
| Configure applications | ✅ | ✅ | ❌ | ✅ | ❌ |
| Manage users | ✅ | ✅ | ❌ | ✅ | ❌ |
| Monitoring | |||||
| View logs | ✅ | ✅ | ✅ | ✅ | ✅ |
| View metrics | ✅ | ✅ | ✅ | ✅ | ✅ |
| Export data | ✅ | ✅ | ❌ | ✅ | ❌ |
Role Descriptions
🔑 Workspace Owner (workspace:owner)
- Full control over the entire workspace
- Can manage billing, subscriptions, and payment methods
- Can invite and manage all team members
- Has all cluster management permissions
- Can delete the workspace
- Typically the person who created the workspace
🛡️ Workspace Admin (workspace:admin)
- Full technical control over the workspace
- Cannot access billing information
- Can invite and manage team members
- Full cluster creation and management rights
- Cannot delete the workspace
💳 Workspace Billing (workspace:billing)
- Focused on financial aspects of the workspace
- Can view and manage billing information
- Can update payment methods and subscriptions
- Cannot manage clusters or team members
- Ideal for finance team members
🔧 Cluster Admin (cluster:admin)
- Full control over cluster operations
- Can create, update, and delete clusters
- Has full Keycloak administration access
- Cannot manage workspace settings or billing
- Perfect for DevOps and technical team members
👁️ Cluster Viewer (cluster:viewer)
- Read-only access to cluster information
- Can view logs, metrics, and configurations
- Cannot make any changes
- Ideal for stakeholders, auditors, or support staff
Managing Team Members
The team management interface provides a comprehensive view of your workspace members and their roles:
The interface shows:
- Team Members Tab: Current active members
- Pending Invitations: Outstanding invites waiting for acceptance
- Member Details: Name, email, status, and assigned role
- Role Management: Easy role assignment and modification
- Understanding Roles: Visual guide to permission levels
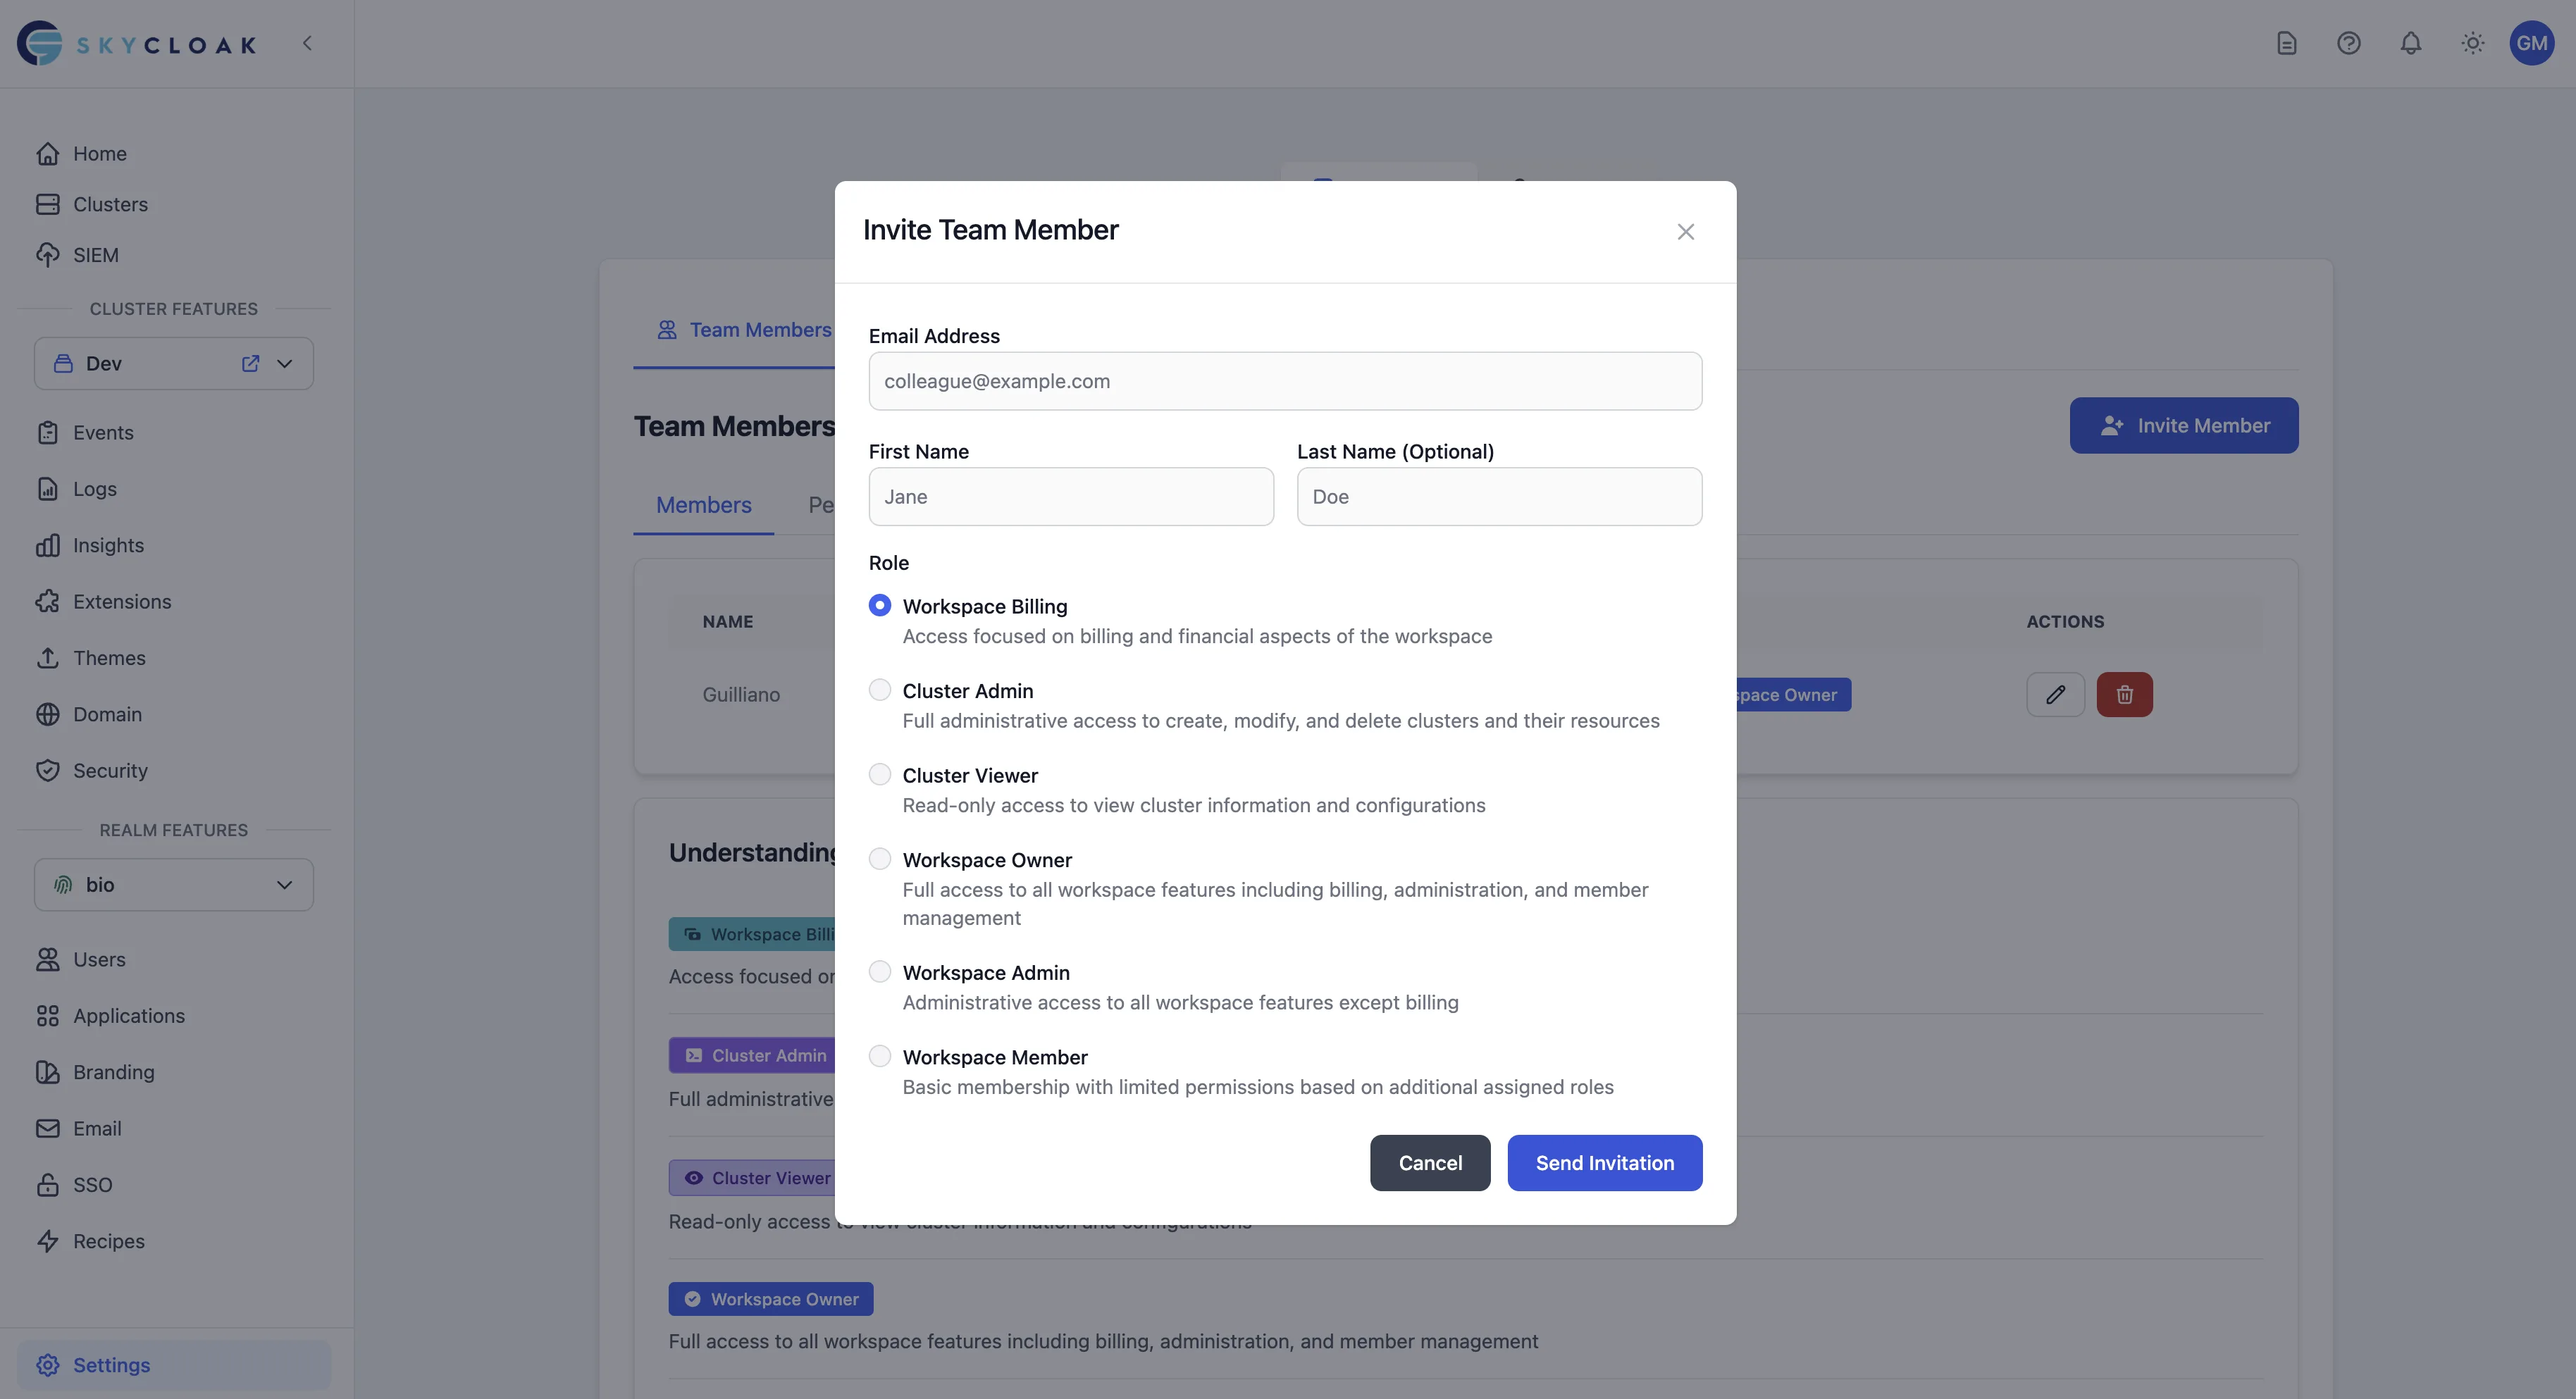
Inviting New Members
- Navigate to Settings → Team Members
- Click “Invite Member”
- Enter team member details:
- Email address (required)
- First name (optional)
- Last name (optional)
- Role - Select appropriate role
- Click “Send Invitation”
Invitation Process
When you invite a team member:
- Email sent - Invitation email with secure link
- 24-hour validity - Link expires after 24 hours
- Manual acceptance - User must click the invitation link to accept
- Account creation - New users create Skycloak account if needed
- Role assignment - User receives the role specified in invitation upon acceptance
- Session update - User’s session is updated with new roles immediately after accepting
Important Notes
- No auto-acceptance - All invitations must be manually accepted via the invitation link
- SSO users - Even with SSO enabled, users must still click the invitation link to accept
- Role activation - The invited role only becomes active after manual acceptance
Managing Existing Members
Change Member Role
- Find the member in the team list
- Click the role dropdown
- Select new role
- Confirm the change
Note: You cannot change your own role or demote the last owner.
Remove Team Member
- Click the "…" menu next to member
- Select “Remove from workspace”
- Confirm removal
Warning: Removed members lose all access immediately.
Best Practices
1. Principle of Least Privilege
Grant the minimum necessary permissions:
- Start with Read-only for new members
- Upgrade to Developer for active contributors
- Reserve Admin for senior team members
- Limit Owner role to 2-3 people
2. Regular Access Reviews
- Monthly: Review active team members
- Quarterly: Audit role assignments
- When employees leave: Remove access immediately
- Project completion: Downgrade temporary elevated roles
3. Role Assignment Guidelines
Developer Role for:
- Software engineers working on integrations
- DevOps team members managing configurations
- QA engineers testing authentication flows
Admin Role for:
- Team leads and architects
- Senior engineers responsible for infrastructure
- DevOps/SRE team members
Read-only Role for:
- Product managers monitoring usage
- Support team viewing logs
- Compliance officers reviewing configurations
- External consultants
4. Security Recommendations
- Enable MFA for all team members
- Configure SSO - Use workspace SSO for centralized authentication (Business/Enterprise)
- Use strong passwords - Minimum 12 characters for non-SSO accounts
- Regular rotation - Review access quarterly
- Event logs - Monitor team member activities
MFA Enforcement (Business+)
Workspace owners and admins on Business and Enterprise plans can enforce Multi-Factor Authentication (MFA) for all workspace members.
What is MFA Enforcement?
When MFA enforcement is enabled:
- All workspace members are required to set up MFA on their next login
- Members cannot access the workspace until they configure MFA
- New members invited to the workspace must set up MFA immediately
- Email notifications are sent to all members when enforcement is enabled/disabled
Enabling MFA Enforcement
- Navigate to Settings → Workspace → Security
- Find the MFA Enforcement toggle
- Click to enable MFA enforcement
- Confirm the action in the modal
- All workspace members will receive an email notification
Member Experience
When MFA enforcement is enabled:
- Members are prompted to set up MFA on their next login
- Supported MFA methods include authenticator apps (TOTP)
- Members can manage their MFA settings in Account Settings
- MFA must remain enabled while enforcement is active
Disabling MFA Enforcement
- Navigate to Settings → Workspace → Security
- Click the MFA Enforcement toggle to disable
- Confirm the action
- Members will be notified via email
- Members can choose to keep or remove their MFA setup
Best Practices
- Notify your team before enabling MFA enforcement
- Provide setup instructions for authenticator apps
- Set up backup recovery codes for all members
- Test the flow with a small group first
- Keep emergency admin access in case of lockout issues
Team Collaboration Features
Shared Resources
All team members share access to:
- Clusters - Based on their role permissions
- Applications - Configured clients and settings
- Branding - Custom themes and emails
- Extensions - Installed Keycloak extensions
Activity Tracking
Monitor team activities through:
- Event logs - Who did what and when
- Change history - Configuration modifications
- Login history - Team member access patterns
Communication
Improve team coordination:
- Change notifications - Email alerts for critical changes
- Comments - Add notes to configurations (coming soon)
- Approval workflows - For production changes (Enterprise)
Common Scenarios
Onboarding New Developer
- Send invitation as Developer role
- Ensure acceptance - Remind them to click the invitation link
- Schedule walkthrough of workspace structure
- Share documentation and integration guides
- Grant additional permissions as needed
With SSO Enabled: New team members with your domain email can access the workspace after authenticating with your corporate IdP. However, if you’ve sent them an invitation with a specific role, they must still manually accept it via the invitation link to receive that role.
Contractor Access
- Create limited account with Read-only role
- Set expiration reminder for access review
- Upgrade to Developer only for specific tasks
- Remove immediately upon contract completion
DevOps Team Setup
- Assign Admin role to DevOps lead
- Developer role for team members
- Enable cluster management permissions
- Configure monitoring access
Troubleshooting
Invitation Issues
Problem: Team member didn’t receive invitation
- Check spam/junk folders
- Verify email address
- Resend invitation
- Remind them that even with SSO, they must accept the invitation
- Contact support if persists
Problem: Invitation link expired
- Delete pending invitation
- Send new invitation
- Ask member to accept within 24 hours
- Note: There is no auto-acceptance, even for SSO users
Problem: User’s role not updated after accepting invitation
- This issue has been resolved - roles are now immediately updated
- If problem persists, check event logs for role assignment
- User may need to refresh their browser for UI to reflect new permissions
Permission Issues
Problem: Member cannot perform expected action
- Verify their current role
- Check specific permission requirements
- Upgrade role if necessary
- Review event logs for details
Problem: Cannot change member role
- Ensure you have Owner or Admin role
- Cannot change your own role
- Cannot demote last Owner
Access Problems
Problem: Member removed but still has access
- Sessions may take up to 5 minutes to expire
- Force logout from all sessions
- Clear browser cache
- Contact support if access persists
Workspace Settings
Security Settings
Configure workspace-wide security:
- MFA requirement - Enforce for all members
- IP restrictions - Limit access by IP range
- Session timeout - Configure inactivity timeout
Notification Preferences
Manage team notifications:
- Email alerts - Critical changes and errors
- Weekly summaries - Usage and activity reports
- Billing notifications - Subscription updates
Compliance Features
For regulated industries:
- Audit retention - Extended log storage
- Access reports - Regular compliance reports
- Data residency - Choose data location
- SSO integration - Use corporate identity provider