Application Management
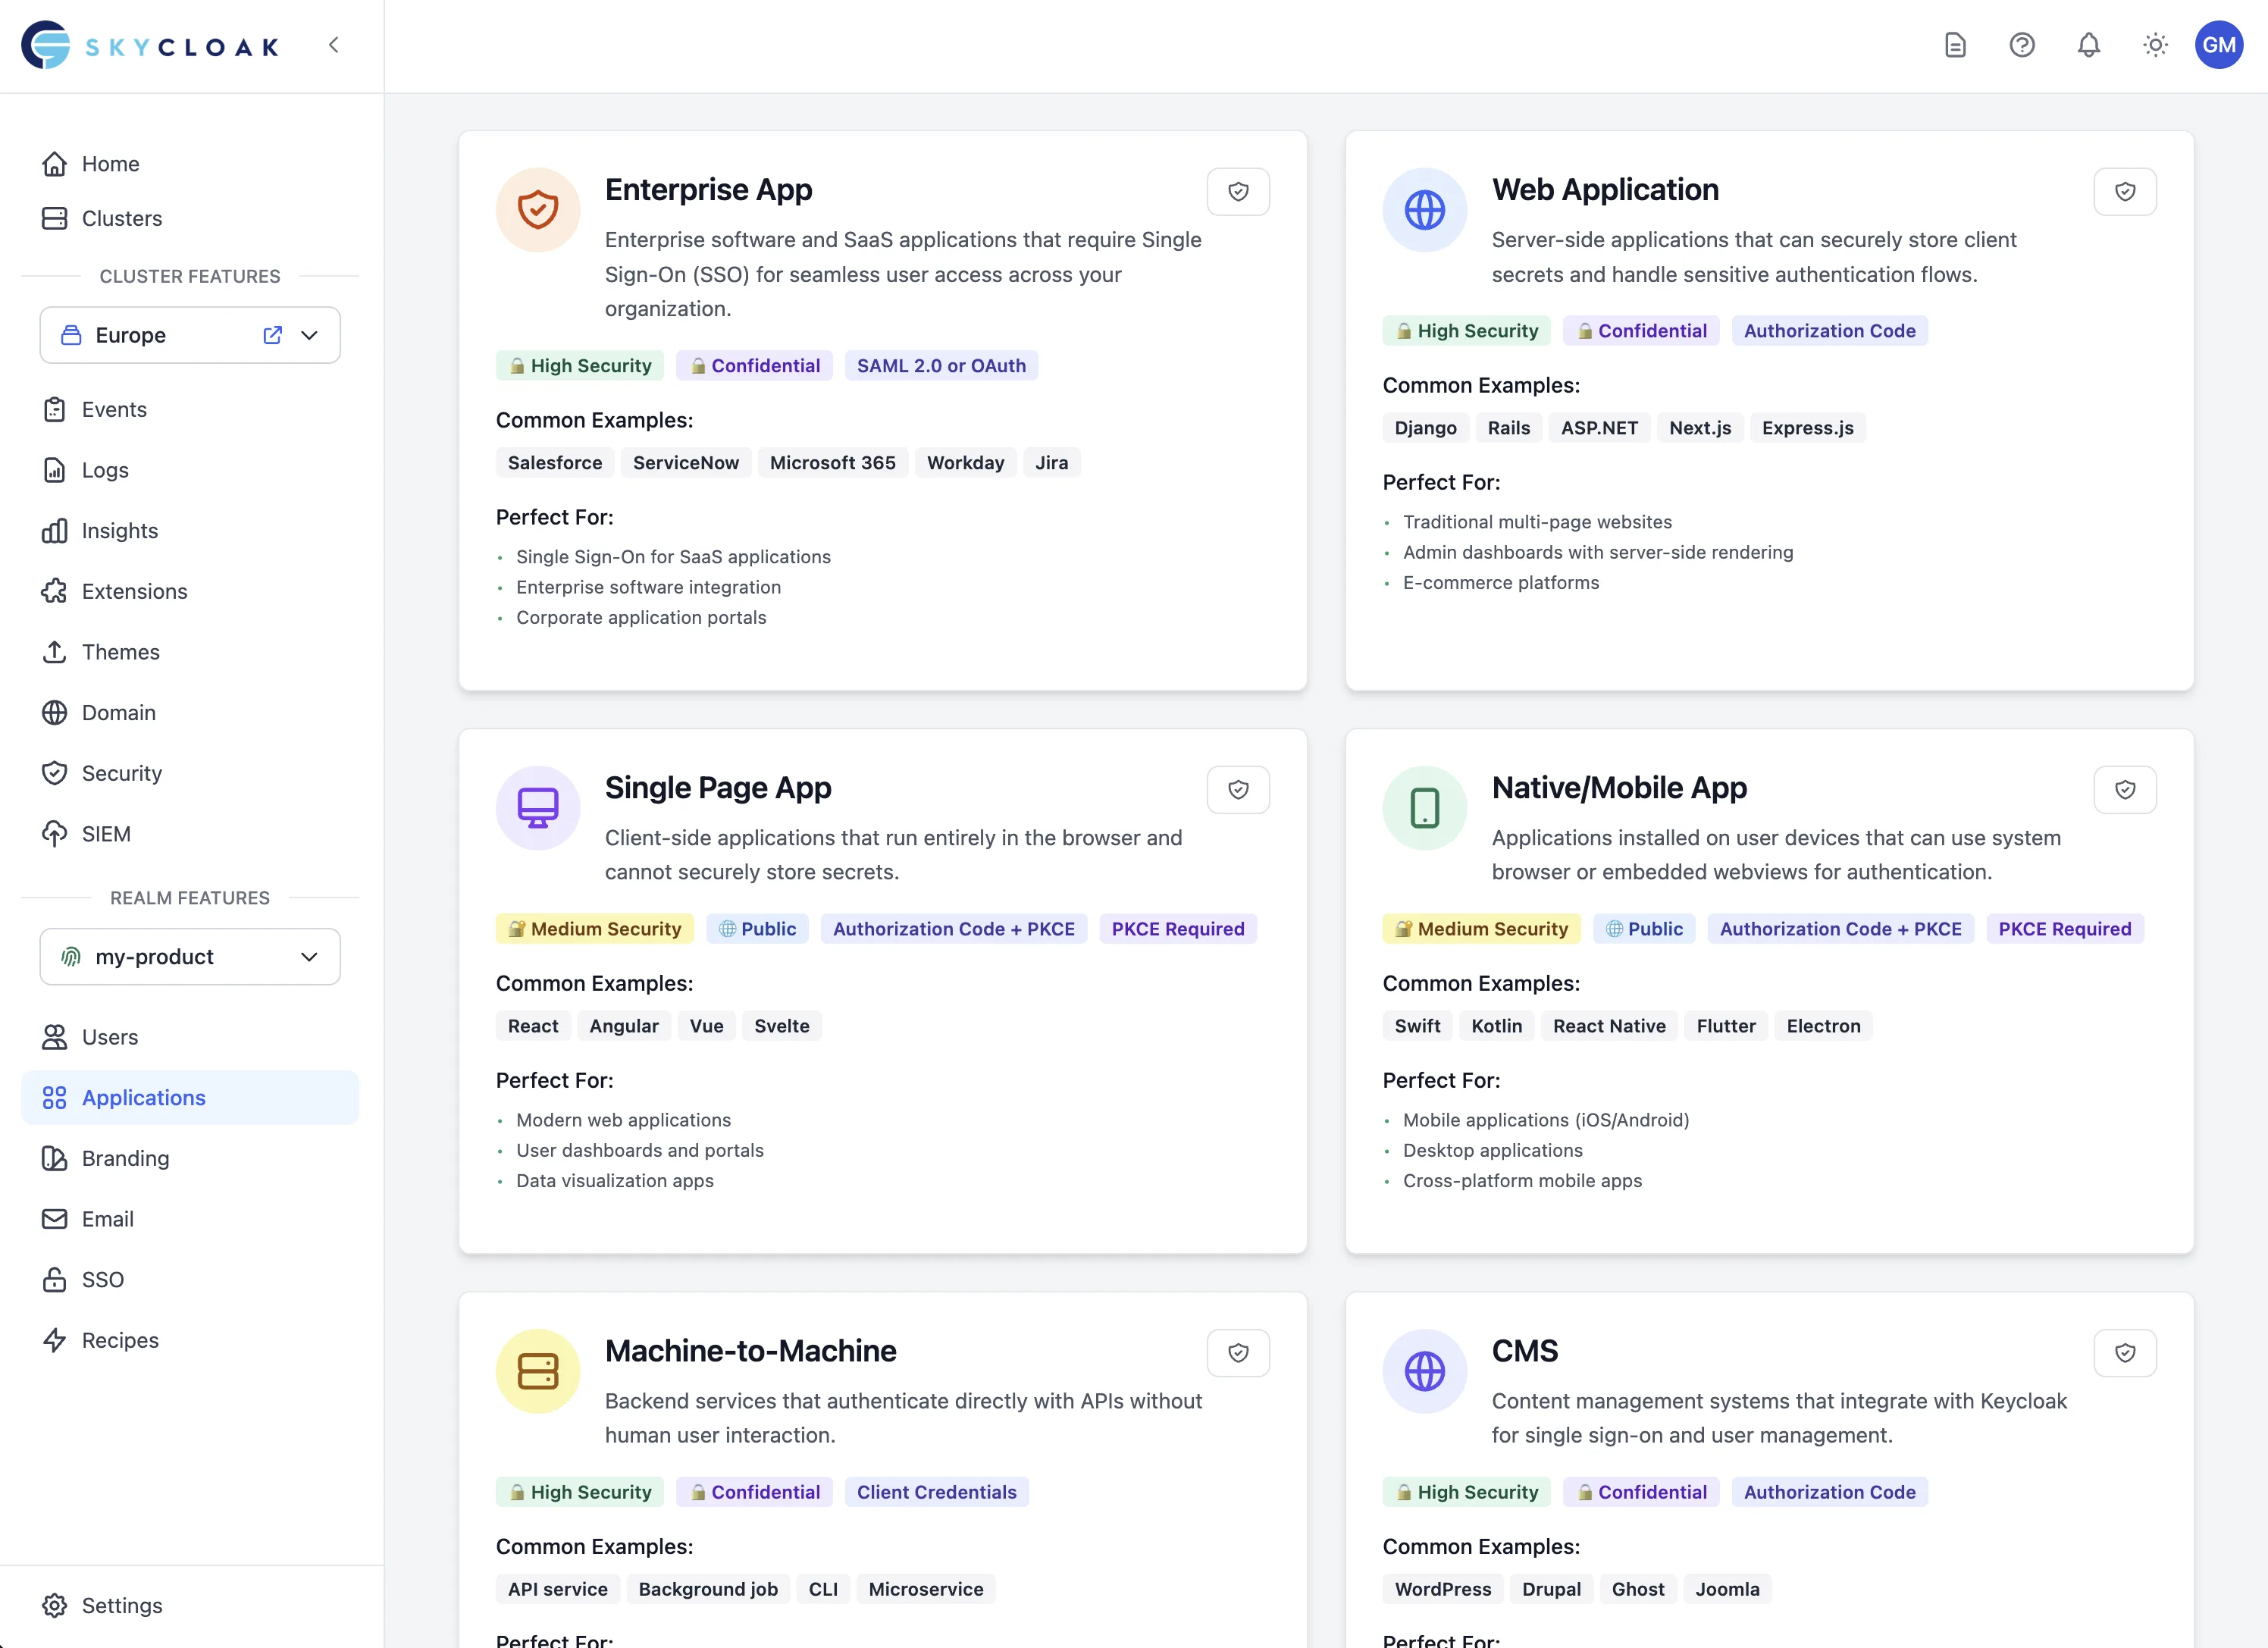
Skycloak’s Application Management system provides intelligent guidance and streamlined workflows for integrating your applications with Keycloak authentication. From initial setup to production deployment, get step-by-step guidance tailored to your technology stack.
Overview
The Application Management feature helps you:
- Guided Integration: Step-by-step setup for popular frameworks
- Technology Detection: Automatic configuration based on your stack
- Code Generation: Ready-to-use integration code and examples
- Testing Tools: Built-in testing and validation capabilities
- Documentation: Framework-specific guides and best practices
Application Wizard
Getting Started
The Application Wizard guides you through the entire integration process:
-
Application Type Selection
- Single Page Applications (SPA)
- Traditional Web Applications
- Mobile Applications
- API/Backend Services
- Machine-to-Machine Applications
-
Technology Selection
- Frontend frameworks (React, Vue, Angular, etc.)
- Backend technologies (Node.js, Python, Java, etc.)
- Mobile platforms (iOS, Android, React Native, etc.)
- API frameworks (Express, FastAPI, Spring Boot, etc.)
-
Configuration Generation
- Automatic client configuration
- Environment-specific settings
- Security best practices applied
- Integration code samples
Supported Technologies
Frontend Frameworks:
- React: Complete integration with popular libraries
- Vue.js: Vue 2 and Vue 3 support with composition API
- Angular: Full Angular integration with guards and interceptors
- Vanilla JavaScript: Pure JavaScript implementation
- Next.js: Server-side rendering and static site generation
- Nuxt.js: Vue-based universal applications
Backend Technologies:
- Node.js: Express, Koa, and Fastify integrations
- Python: Django, Flask, and FastAPI implementations
- Java: Spring Boot and JAX-RS integrations
- PHP: Laravel, Symfony, and vanilla PHP
- Go: Gin, Echo, and native implementations
- .NET: ASP.NET Core and Web API
Mobile Platforms:
- React Native: Cross-platform mobile applications
- iOS: Native Swift and Objective-C
- Android: Native Java and Kotlin
- Flutter: Cross-platform mobile development
- Xamarin: Microsoft mobile development platform
Enterprise SSO (Salesforce, Slack, Zendesk, Workday, Confluence Cloud, ServiceNow, Microsoft 365, Google Workspace)
Enterprise SSO connects a SaaS application to your realm, so your people sign into it with their Skycloak identity instead of a separate password. Your realm acts as the identity provider and the SaaS application trusts it over SAML.
Choose Enterprise SSO in the application wizard, then pick the application from the gallery. Applications tagged “Ready” have a guided setup; anything tagged “Roadmap” can still be configured through Configure a custom SAML app, which works with any SAML 2.0 application.
Setting up Salesforce SSO
You will move between two browser tabs: Skycloak and your Salesforce Setup screen. Have Salesforce open before you start.
1. Tell Skycloak about your Salesforce org
Skycloak asks for two values, both from Salesforce:
| Field | Where to find it in Salesforce |
|---|---|
| Salesforce My Domain | Setup > Company Settings > My Domain. Enter the host only, for example acme.my.salesforce.com. Leave off https:// and any path. |
| Salesforce Organization ID | Setup > Company Settings > Company Information > Salesforce.com Organization ID. |
Skycloak builds Salesforce’s entity ID and login URL from these, and creates the SAML client in your realm. Nothing is written to Salesforce.
2. Give Salesforce Skycloak’s details
In Salesforce, go to Setup > Identity > Single Sign-On Settings and select SAML Enabled.
The quickest route is to import Skycloak’s SAML metadata, which carries the issuer, the login
URL and the signing certificate in one file. Copy the SAML metadata URL from Skycloak
(the Open button shows it), then in Salesforce choose New from Metadata URL and paste
it. If your Salesforce org cannot reach the URL, open it, save the page as a .xml file, and
use New from Metadata File instead.
To fill the form by hand instead, choose New and map the values Skycloak shows:
| Skycloak value | Salesforce field |
|---|---|
| Identity Provider Login URL | Identity Provider Login URL |
| Identity Provider Entity ID | Issuer |
For Identity Provider Certificate, Salesforce wants a certificate file, not the metadata
document. Open the metadata, copy the text inside the <ds:X509Certificate> tag, and save it
to a file between -----BEGIN CERTIFICATE----- and -----END CERTIFICATE----- lines. This is
the step the metadata import saves you, which is why it is worth trying first.
Set SAML Identity Type to match how your users sign in. Skycloak sends the user’s email address, so either their Salesforce username must be that email address, or set the identity type to Federation ID and set each user’s Federation ID to their email address.
3. Test the connection
Back in Skycloak, choose Start test login. A sign-in opens in a new tab; complete it.
Skycloak confirms its own half of the exchange, that it signed you in and sent the assertion to Salesforce, and marks the application Verified. Check the tab that opened: if Salesforce signed you in, the connection works end to end. If Salesforce shows an error instead, the assertion reached it but was rejected, which usually means the certificate or the identity type does not match. Fix that in Salesforce and test again.
An application stays Not tested until a test login passes. Skycloak never marks a connection working just because the setup form succeeded.
Setting up Confluence Cloud SSO
Confluence Cloud SSO is configured for managed Atlassian accounts at the organization level. The same authentication policy can apply to Confluence and other Atlassian Cloud apps used by people from your linked domains.
Before starting, you need:
- an Atlassian organization admin account
- Atlassian Guard Standard
- a verified domain linked to an identity provider directory
- a test user in a limited authentication policy, so you can test without locking out admins
1. Get Atlassian’s service provider values
In Atlassian Administration, select your organization, then go to Security > User security > Identity providers. Open the directory linked to your verified domain and select Set up SAML single sign-on.
Copy these values into the Confluence Cloud setup in Skycloak:
| Atlassian value | Skycloak field |
|---|---|
| Service provider entity URL | Atlassian service provider entity URL |
| Service provider assertion consumer service URL | Atlassian assertion consumer service URL |
Select Add application. Skycloak creates a SAML client in your realm with the entity URL, ACS URL, signed HTTP POST responses, email NameID, and Atlassian’s documented user attributes.
2. Give Atlassian Skycloak’s identity provider values
Return to Atlassian’s SAML setup screen and map the values shown by Skycloak:
| Skycloak value | Atlassian field |
|---|---|
| Identity Provider Entity ID | Identity provider Entity ID |
| Identity Provider Login URL | Identity provider SSO URL |
| Certificate in the SAML metadata | Public x509 Certificate |
For the certificate, open the SAML metadata link, copy the text inside the
<ds:X509Certificate> element, and place it between -----BEGIN CERTIFICATE----- and
-----END CERTIFICATE----- lines. Paste the complete certificate into Atlassian.
Save the SAML configuration. In your test authentication policy, enable and enforce SAML SSO only for the test user first.
3. Test before wider enforcement
Back in Skycloak, select Start test login and finish signing in in the new tab. A Keycloak
LOGIN event marks the Enterprise App Verified, which proves Skycloak authenticated the user
and sent the assertion. Confirm that the other tab reached Confluence Cloud to prove Atlassian
accepted it.
If Atlassian rejects the assertion, check that the user’s Atlassian account email matches the email in the SAML NameID, and check that the certificate was copied without missing characters. Correct the values and run the test again.
4. Roll back a misconfiguration
Select Remove setup in Skycloak. This deletes the SAML client from your realm and removes the Skycloak record, so it needs the applications delete permission (workspace owner, workspace admin, or cluster admin). In Atlassian Administration, delete the SAML configuration or stop enforcing it for the test policy before trying again. Keep a non-SSO organization admin account available until the test succeeds.
Setting up Zendesk SSO
Zendesk SAML SSO requires an eligible Zendesk plan and administrator access. Keep Zendesk Admin Center open in a second tab while you complete the Skycloak wizard.
1. Tell Skycloak your Zendesk subdomain
Choose Zendesk in the Enterprise SSO gallery. Enter the part of your account address before
.zendesk.com. For https://acme-support.zendesk.com, enter acme-support.
Skycloak creates a SAML client with Zendesk’s required values:
- Entity ID:
https://acme-support.zendesk.com - Assertion Consumer Service URL:
https://acme-support.zendesk.com/access/saml - NameID: the user’s email address
- Binding: HTTP POST
- Signed SAML assertions
2. Give Zendesk your Skycloak details
In Zendesk Admin Center, go to Account > Security > Single sign-on. Select Create SSO configuration, then SAML.
Copy Identity Provider Login URL from Skycloak into Zendesk’s SAML SSO URL field. Do not use the Identity Provider Entity ID in that field.
Copy SHA-256 Certificate Fingerprint from Skycloak into Zendesk’s certificate fingerprint field, then save the configuration. Skycloak calculates this value from the signing certificate in your realm’s SAML metadata. The metadata link remains available for review.
Assign the saved SSO configuration to team members, end users, or both in Zendesk’s authentication settings. Keep native Zendesk authentication available until the test below succeeds, so a configuration mistake does not lock administrators out.
3. Test before relying on SSO
Back in Skycloak, select Start test login and finish signing in in the new tab. Skycloak marks the application Verified only after the realm records a successful login event.
Check the Zendesk tab too. A Skycloak Verified status proves that the realm signed and sent the assertion. The Zendesk tab confirms whether Zendesk accepted it. If Zendesk rejects it, check the SAML SSO URL, certificate fingerprint, account subdomain, and user email.
To discard a misconfigured setup, choose Remove setup. Skycloak deletes the SAML client from your realm before returning you to the setup form. Your Zendesk configuration is not changed.
Setting up Workday SSO
You need access to Edit Tenant Setup - Security in Workday. Keep that page and Skycloak open in separate tabs.
1. Copy your Workday service provider values
Open the SAML Identity Providers section in Edit Tenant Setup - Security. Copy these tenant-specific values into Skycloak:
| Skycloak field | Workday value |
|---|---|
| Workday Assertion Consumer Service URL | The HTTPS Assertion Consumer Service URL from your Workday SAML metadata. The host must end in workday.com. |
| Workday Service Provider ID | The Service Provider ID for the SAML Identity Provider row. Copy it exactly. |
Skycloak uses the Workday Service Provider ID as the SAML audience and client ID. It uses
the Assertion Consumer Service URL for HTTP POST responses. The generated client sends an
unspecified-format NameID from each user’s Keycloak workdayUsername attribute, signs both
the SAML response and assertion with SHA-256, and includes email, first name, and last name
attributes. Before assigning Workday SSO, set workdayUsername on each Keycloak user to the
account name that user signs into Workday with.
Assertion encryption is off because the standard Workday setup does not provide Skycloak with a tenant-specific encryption certificate. If your tenant requires encrypted assertions, contact support before enabling SSO.
2. Give Workday your Skycloak identity provider values
After Skycloak creates the client, copy the displayed Identity Provider Login URL and Identity Provider Entity ID into the Workday SAML Identity Provider row. Open the SAML metadata link and copy its signing certificate into Workday. Apply the SAML provider to the authentication policy that should use it.
3. Test the connection
Choose Start test login and finish signing in through the new tab. Skycloak marks the application Verified only after the realm records the login and sends a SAML assertion. Confirm that the new tab lands in Workday, since only Workday can confirm that it accepted the assertion.
Setting up Slack SSO
You need Workspace Owner access in Slack Business+, or Org Owner access in Enterprise Grid. Keep Slack and Skycloak open in separate browser tabs.
1. Tell Skycloak which Slack workspace to use
In Skycloak, choose Enterprise SSO, select Slack, and enter the full Slack host without
https:// or a path:
- Business+:
acme.slack.com - Enterprise Grid:
acme.enterprise.slack.com
Skycloak validates that host and creates a SAML client in your Realm with Slack’s required settings. The Enterprise App remains Not tested.
2. Configure custom SAML in Slack
For Slack Business+, open Admin > Workspace settings > Security > SSO & authentication, then configure An identity provider or custom SAML.
For Enterprise Grid, open Organization settings > Security > SSO Settings, then add an SSO configuration.
Copy these values from the Skycloak wizard:
| Skycloak value | Slack field |
|---|---|
| Identity Provider Login URL | SAML 2.0 Endpoint URL |
| Identity Provider Entity ID | Identity Provider Issuer URL |
https://slack.com |
Service Provider Issuer URL |
Slack also requires the Realm’s X.509 signing certificate. Select Open beside the SAML
metadata URL in Skycloak, then copy the certificate value from ds:X509Certificate. Paste it
into Slack as a PEM certificate with BEGIN CERTIFICATE and END CERTIFICATE lines.
Skycloak configures persistent NameID, signs the SAML response, uses HTTP POST, and sends the
required User.Email attribute. It also sends username, first name, and last name when those
properties exist on the Realm user.
3. Validate before requiring SSO
In Slack, choose Test Configuration. Do not turn on required SSO until Slack accepts the configuration.
Back in Skycloak, choose Start test login and finish the login in the new tab. Skycloak
marks the Enterprise App Verified only after a matching Keycloak LOGIN event proves that
the Realm authenticated the user and sent the assertion. Confirm that the new tab also landed
in Slack, because Skycloak cannot see whether Slack accepted the assertion.
If the test fails or setup is incomplete, choose Remove setup. Skycloak removes both the Enterprise App record and its Keycloak SAML client so you can start again cleanly.
Slack’s current vendor instructions are available in Set up SAML single sign-on for Slack and Custom SAML single sign-on.
Setting up ServiceNow SSO
Have your ServiceNow instance open before you start. You need access to Multi-Provider SSO > Identity Providers in ServiceNow.
1. Tell Skycloak about your ServiceNow instance
Choose ServiceNow from the Enterprise SSO gallery. Enter the instance host only, for
example acme.service-now.com. Leave off https:// and any path.
Skycloak creates a SAML client in your realm with these ServiceNow values:
| Setting | Value |
|---|---|
| Entity ID and audience | https://acme.service-now.com |
| Assertion Consumer Service URL | https://acme.service-now.com/navpage.do |
| NameID format | Email address |
2. Give ServiceNow Skycloak’s details
In ServiceNow, go to All > Multi-Provider SSO > Identity Providers and choose New > SAML. Import the SAML metadata URL shown in Skycloak. The metadata supplies Skycloak’s issuer, login endpoint, and signing certificate.
Confirm these values in the ServiceNow identity provider:
| ServiceNow field | Value |
|---|---|
| ServiceNow Homepage | Your instance URL ending in /navpage.do
|
| Entity ID/Issuer | Your base instance URL |
| Audience URI | Your base instance URL |
| NameID Policy | Email address |
Skycloak sends the user’s email address as the NameID. Make sure it matches the unique user field chosen in ServiceNow. Save the identity provider, run ServiceNow’s Test Connection, and activate it only after that test succeeds.
3. Test from Skycloak
Back in Skycloak, choose Start test login and complete the login in the new tab. A
successful Keycloak LOGIN event marks the application Verified. This proves Skycloak
signed the user in and sent the SAML assertion. Confirm that the ServiceNow tab also opened
successfully to prove ServiceNow accepted it.
If setup is incomplete, choose Remove setup. Skycloak removes both its enterprise application record and the SAML client from your realm, so you can start again without leaving a broken client behind.
If something goes wrong
- “is not your managed realm”: the guided gallery currently sets up applications on the realm Skycloak manages for your workspace. For a realm on your own dedicated cluster, use the Keycloak admin console, or contact support.
- The test login never confirms: your realm may have login events turned off, so Skycloak cannot see the result. The login itself still works; check the tab that opened.
- You want to start over: choose Remove setup. Skycloak removes the managed SAML client and its protocol mappers from your realm and returns you to the setup form, so you can add the application again.
Application Configuration
Basic Configuration
Application Details:
- Name: Human-readable application name
- Description: Purpose and functionality description
- Type: Application architecture type
- Environment: Development, staging, or production
Client Settings:
- Client ID: Unique application identifier
- Client Secret: Secure authentication credential (when applicable)
- Redirect URIs: Allowed callback URLs after authentication
- Logout URIs: Post-logout redirect destinations
Advanced Configuration
Authentication Flow:
- Authorization Code Flow: Standard for web applications
- PKCE: Enhanced security for public clients
- Implicit Flow: Legacy flow for simple applications
- Client Credentials: Machine-to-machine authentication
- Device Flow: For devices with limited input capabilities
Token Configuration:
- Access Token Lifespan: Token validity duration
- Refresh Token Settings: Refresh token behavior
- ID Token Claims: Custom claims and mappings
- Token Encryption: Advanced security options
Scope and Permissions:
- Default Scopes: Automatically granted permissions
- Optional Scopes: User-consent required permissions
- Audience Restrictions: Token audience limitations
- Role Mappings: Application-specific role assignments
Token Mappers
A mapper decides what an application puts in the tokens it issues. Open an application and choose the Mappers tab to see what it adds today and to add more.
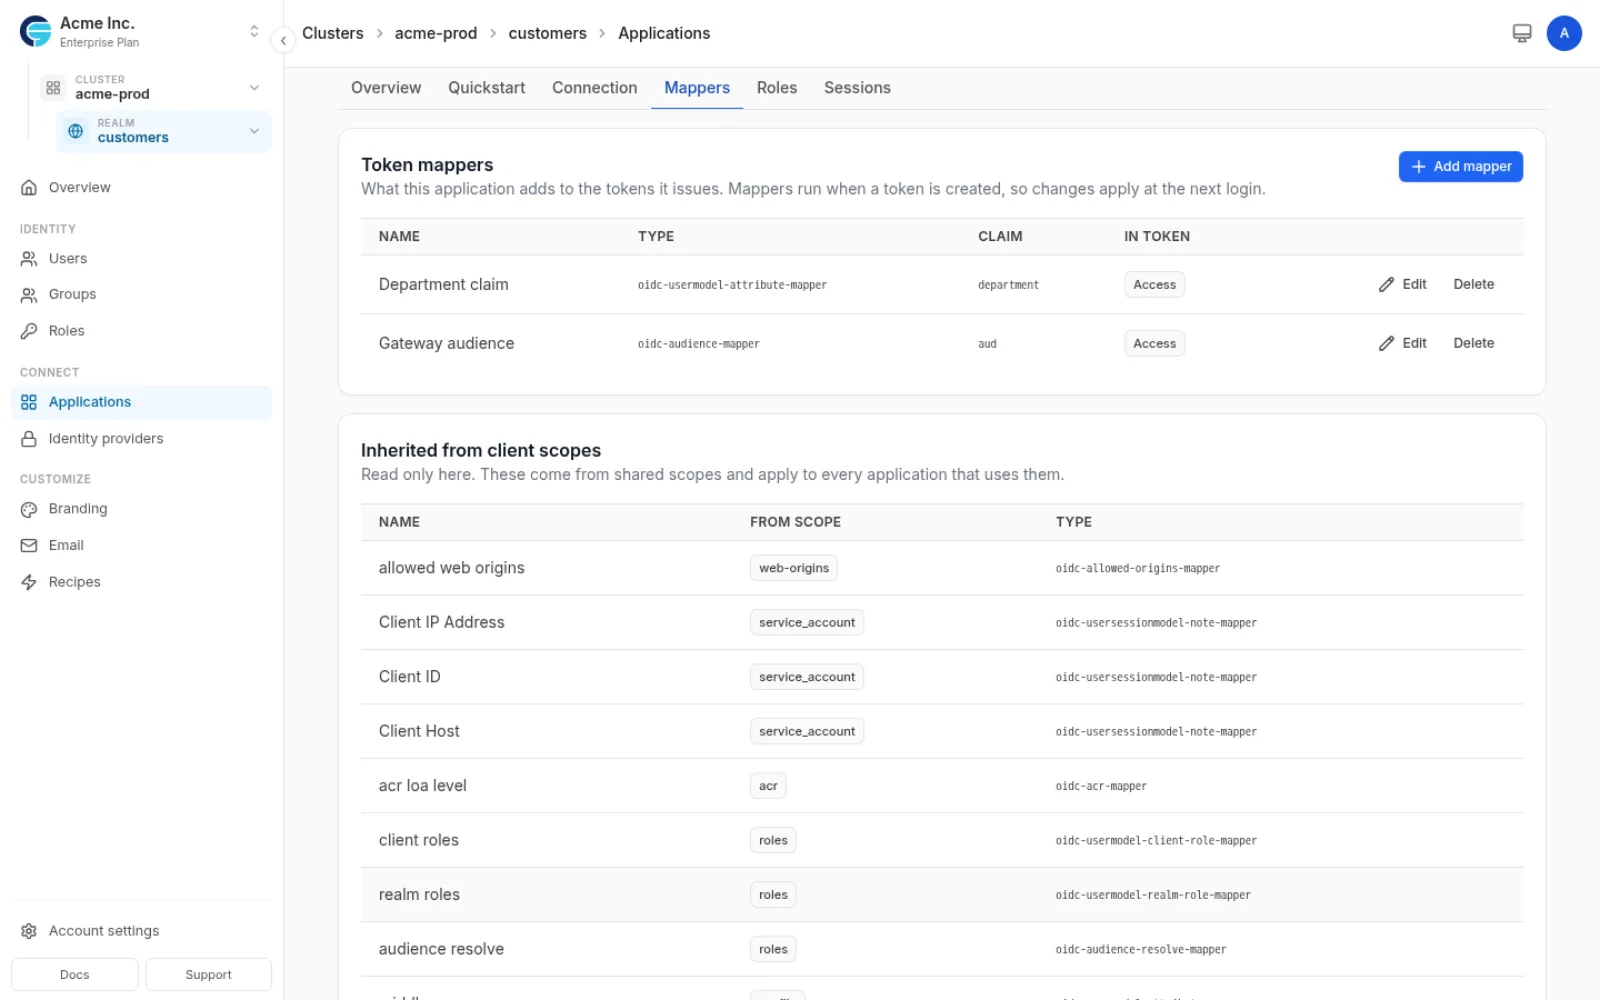
Mappers run at the moment a token is created, so a change takes effect at the user’s next login, not for tokens already issued.
Adding a mapper
Add mapper offers the handful of things most applications need, plus an escape hatch for everything else.
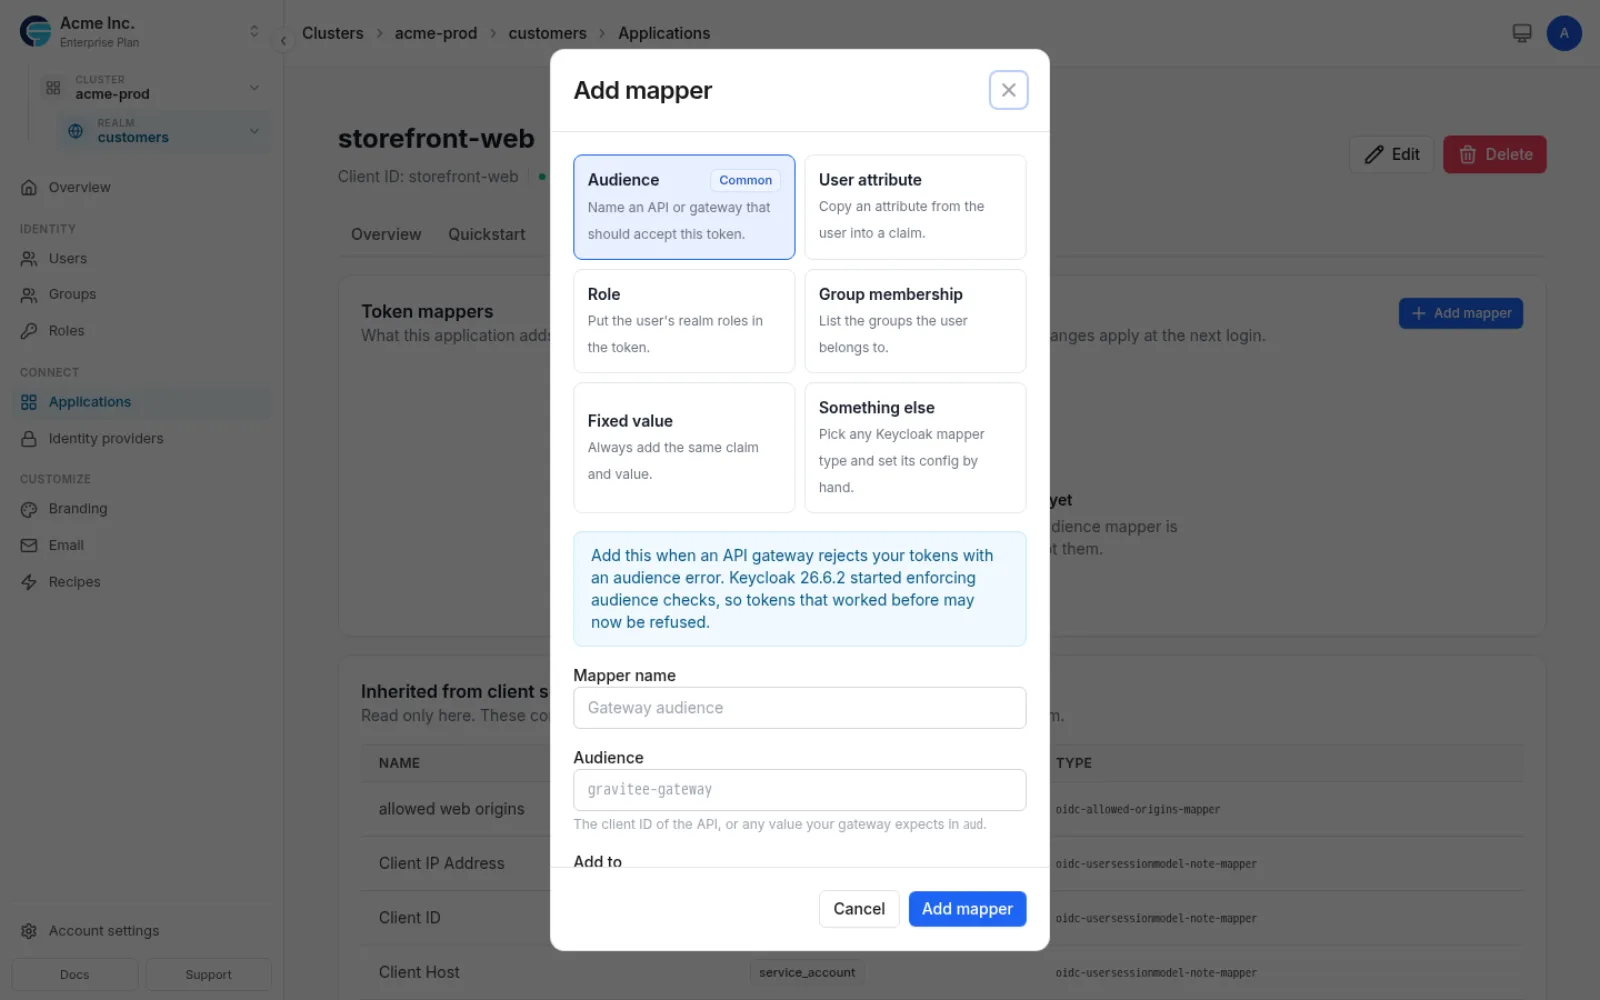
| Type | What it does |
|---|---|
| Audience | Names an API or gateway that should accept the token |
| User attribute | Copies an attribute from the user into a claim |
| Role | Puts the user’s realm roles in the token |
| Group membership | Lists the groups the user belongs to |
| Fixed value | Always adds the same claim and value |
| Something else | Any Keycloak mapper type, with its config set by hand |
Each one asks only for what it needs, and you choose whether the claim goes in the access token, the ID token, or both.
When a gateway rejects your tokens
If an API gateway refuses tokens with an audience error, an Audience mapper is the fix. Set the audience to the client ID of the API, or to whatever value the gateway expects in aud.
This bites on upgrade more than on first setup. Keycloak 26.6.2 began enforcing audience checks, so a token that a gateway accepted before can start being refused with no change on your side.
Passing a user attribute to an application
A User attribute mapper is how an attribute you keep on a user reaches the application. Name the attribute, and optionally a different claim name if the application expects one. Attributes are covered in User Management.
Mappers you cannot edit here
Below your own mappers is everything inherited from client scopes. These are shared: they come from a scope the application uses and apply to every application using that scope, so they are read-only on this page. Change them on the scope itself when you need to.
Integration Guidance
Step-by-Step Integration
1. Initial Setup
# Example for React application
npx create-react-app my-app
cd my-app
npm install @skycloak/react-auth
2. Configuration
// src/auth-config.js
export const authConfig = {
  realm: 'your-realm',
  clientId: 'your-client-id',
  serverUrl: 'https://your-cluster.skycloak.io'
};
3. Integration Implementation
// src/App.js
import { AuthProvider, useAuth } from '@skycloak/react-auth';
import { authConfig } from './auth-config';

function App() {
  return (
    <AuthProvider config={authConfig}>
      <Dashboard />
    </AuthProvider>
  );
}
4. Protected Routes
// src/Dashboard.js
import { ProtectedRoute } from '@skycloak/react-auth';

function Dashboard() {
  return (
    <ProtectedRoute>
      <h1>Protected Content</h1>
    </ProtectedRoute>
  );
}
Framework-Specific Guides
React Integration:
- Hooks-based authentication state management
- Context providers for global auth state
- Protected route components
- Automatic token refresh handling
Vue.js Integration:
- Composition API authentication composables
- Vue Router integration and guards
- Reactive authentication state
- Plugin-based configuration
Angular Integration:
- Service-based authentication management
- Route guards for protected routes
- HTTP interceptors for token management
- Dependency injection patterns
Testing and Validation
Built-in Testing Tools
Authentication Testing:
- Login Flow Validation: Test complete authentication flows
- Token Verification: Validate token format and claims
- Logout Testing: Verify proper session cleanup
- Refresh Token Testing: Test token renewal processes
Integration Testing:
- API Endpoint Testing: Test protected API endpoints
- CORS Configuration: Validate cross-origin settings
- Redirect URI Testing: Test callback URL configurations
- Error Handling: Test error scenarios and recovery
Development Tools
Debug Dashboard:
- Real-time authentication events
- Token inspection and decoding
- Network request monitoring
- Error diagnosis and troubleshooting
Test Users:
- Pre-configured test accounts
- Different role and permission sets
- Automated test scenario execution
- Performance testing capabilities
Security Best Practices
Implementation Security
Token Management:
- Secure token storage (httpOnly cookies recommended)
- Automatic token refresh implementation
- Proper token expiration handling
- Cross-site scripting (XSS) protection
Network Security:
- HTTPS enforcement for all communications
- Proper CORS configuration
- Content Security Policy (CSP) implementation
- Secure redirect URI validation
Client Configuration:
- Public vs confidential client types
- PKCE implementation for public clients
- Client secret protection and rotation
- Minimum required scope principle
Vulnerability Prevention
Common Security Issues:
- Token leakage through logs or error messages
- Insecure redirect URI configurations
- Cross-site request forgery (CSRF) attacks
- Session fixation vulnerabilities
Prevention Strategies:
- Regular security audits and reviews
- Automated vulnerability scanning
- Security-focused code reviews
- Penetration testing recommendations
Production Deployment
Deployment Checklist
Pre-Deployment:
- Security review completed
- Performance testing passed
- Error handling implemented
- Monitoring and logging configured
- Backup and recovery plan ready
Configuration Review:
- Production redirect URIs configured
- Client secrets properly secured
- Token lifespans appropriately set
- Scope and permissions reviewed
- Rate limiting configured
Post-Deployment:
- Authentication flows tested
- Monitoring dashboards configured
- Error alerts set up
- Performance metrics baseline established
- Documentation updated
Monitoring and Maintenance
Performance Monitoring:
- Authentication success rates
- Token refresh frequency
- API response times
- Error rates and patterns
Security Monitoring:
- Failed authentication attempts
- Suspicious user behavior
- Token abuse patterns
- Compliance audit trails
Troubleshooting
Common Integration Issues
Authentication Failures:
- Invalid client configuration
- Incorrect redirect URI setup
- Token expiration issues
- Network connectivity problems
Configuration Problems:
- Missing or incorrect scopes
- Wrong authentication flow selection
- CORS configuration errors
- SSL/TLS certificate issues
Performance Issues:
- Slow authentication responses
- Token refresh failures
- Network latency problems
- Resource exhaustion
Debugging Tools
Built-in Diagnostics:
- Real-time error logging
- Authentication flow visualization
- Token introspection tools
- Network request analysis
External Tools:
- Browser developer tools integration
- Postman collection for API testing
- Curl command examples
- SDK debugging features
Advanced Features
Multi-Environment Support
Environment Management:
- Development, staging, and production configurations
- Environment-specific client settings
- Automated deployment pipelines
- Configuration synchronization
Environment Variables:
- Secure credential management
- Environment-specific URLs and settings
- Configuration templating
- Secret rotation automation
Enterprise Features
Advanced Analytics:
- Application usage analytics
- User behavior tracking
- Performance metrics
- Security event monitoring
Compliance Support:
- Audit trail logging
- Compliance reporting
- Data retention policies
- Regulatory requirement tracking
Custom Integrations:
- Webhook-based notifications
- Custom authentication flows
- API gateway integration
- Legacy system connectors
Integration Documentation
Once you’ve created your application, follow our comprehensive integration guides:
🚀 Quick Links by Technology
Frontend Frameworks:
- React Integration Guide - Hooks, context, and protected routes
- Angular Integration Guide - Guards, interceptors, and services
- Vue.js Integration Guide - Composition API and plugins
- Next.js Integration Guide - Server components and NextAuth
- Plain JavaScript Guide - Vanilla JS implementation
Backend Technologies:
- Node.js Integration Guide - Express, Fastify, and more
- Spring Boot Integration Guide - Spring Security setup
- Django Integration Guide - Python authentication
- .NET Core Integration Guide - ASP.NET middleware
- Laravel Integration Guide - PHP authentication
- Go Integration Guide - Middleware and JWT validation
Mobile Platforms:
- React Native Guide - Cross-platform mobile
- Flutter Guide - Dart implementation
- iOS Guide - Swift with AppAuth
- Android Guide - Kotlin with AppAuth
📚 Complete Integration Resources
- 5-Minute Quickstart - Get running fast
- Integration Overview - Understanding OAuth flows