Getting Started with Skycloak
Welcome to Skycloak! This guide walks you through your first login, the onboarding process, and helps you understand how to make the most of your managed Keycloak platform. In just a few minutes, you’ll have your workspace ready for secure identity management.
Your First Login
Creating Your Account
When you first sign up for Skycloak:
- Visit skycloak.io and click “Start Free Trial”
-
Choose your sign-up method:
- Email and password
- Google OAuth
- GitHub OAuth
- Verify your email (if using email sign-up)
- Pick your onboarding path on the welcome screen
The Onboarding Experience
After signing up, you land on a welcome screen that offers a choice of paths. Pick the one that matches how you want to start — both land on the same dashboard.
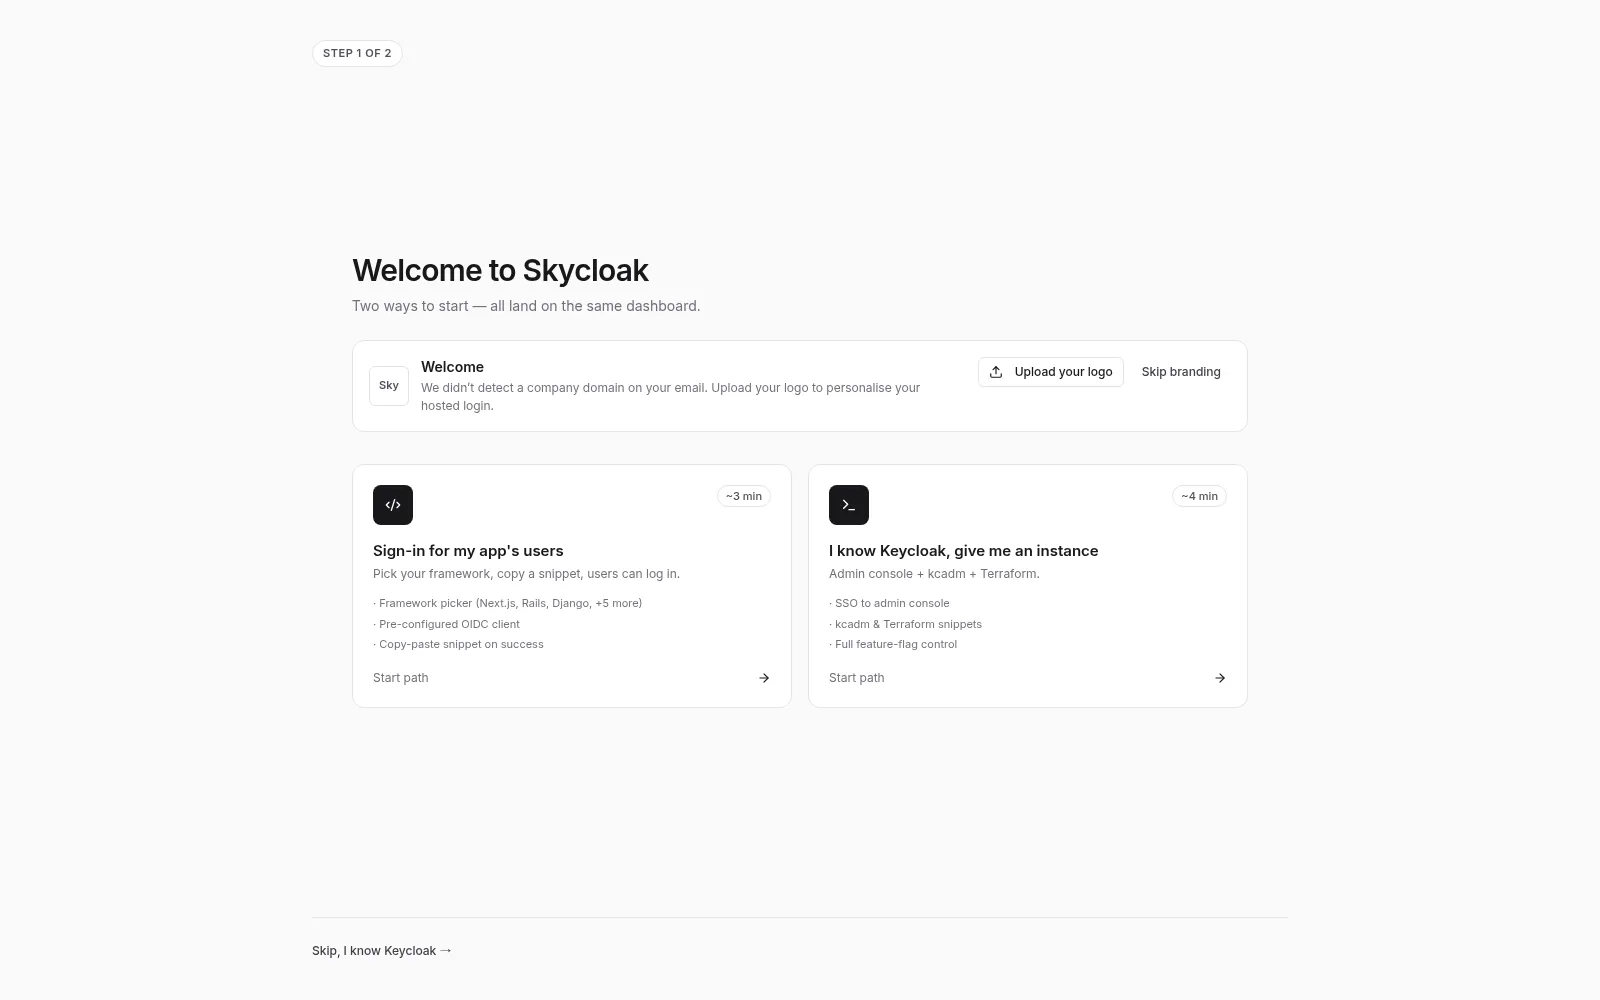
The available paths adapt to your account, and you can bail out at any point with the “Skip, set it up myself” link at the bottom of the screen.
Branding your hosted login
At the top of the welcome screen, Skycloak offers to personalize your hosted login page. If your email is on a company domain, we detect it; either way you can upload your logo right there or click Skip branding and do it later from the Branding page.
Path 1: Sign-in for my app’s users (~3 minutes)
The fastest way to add login to an application you’re building:
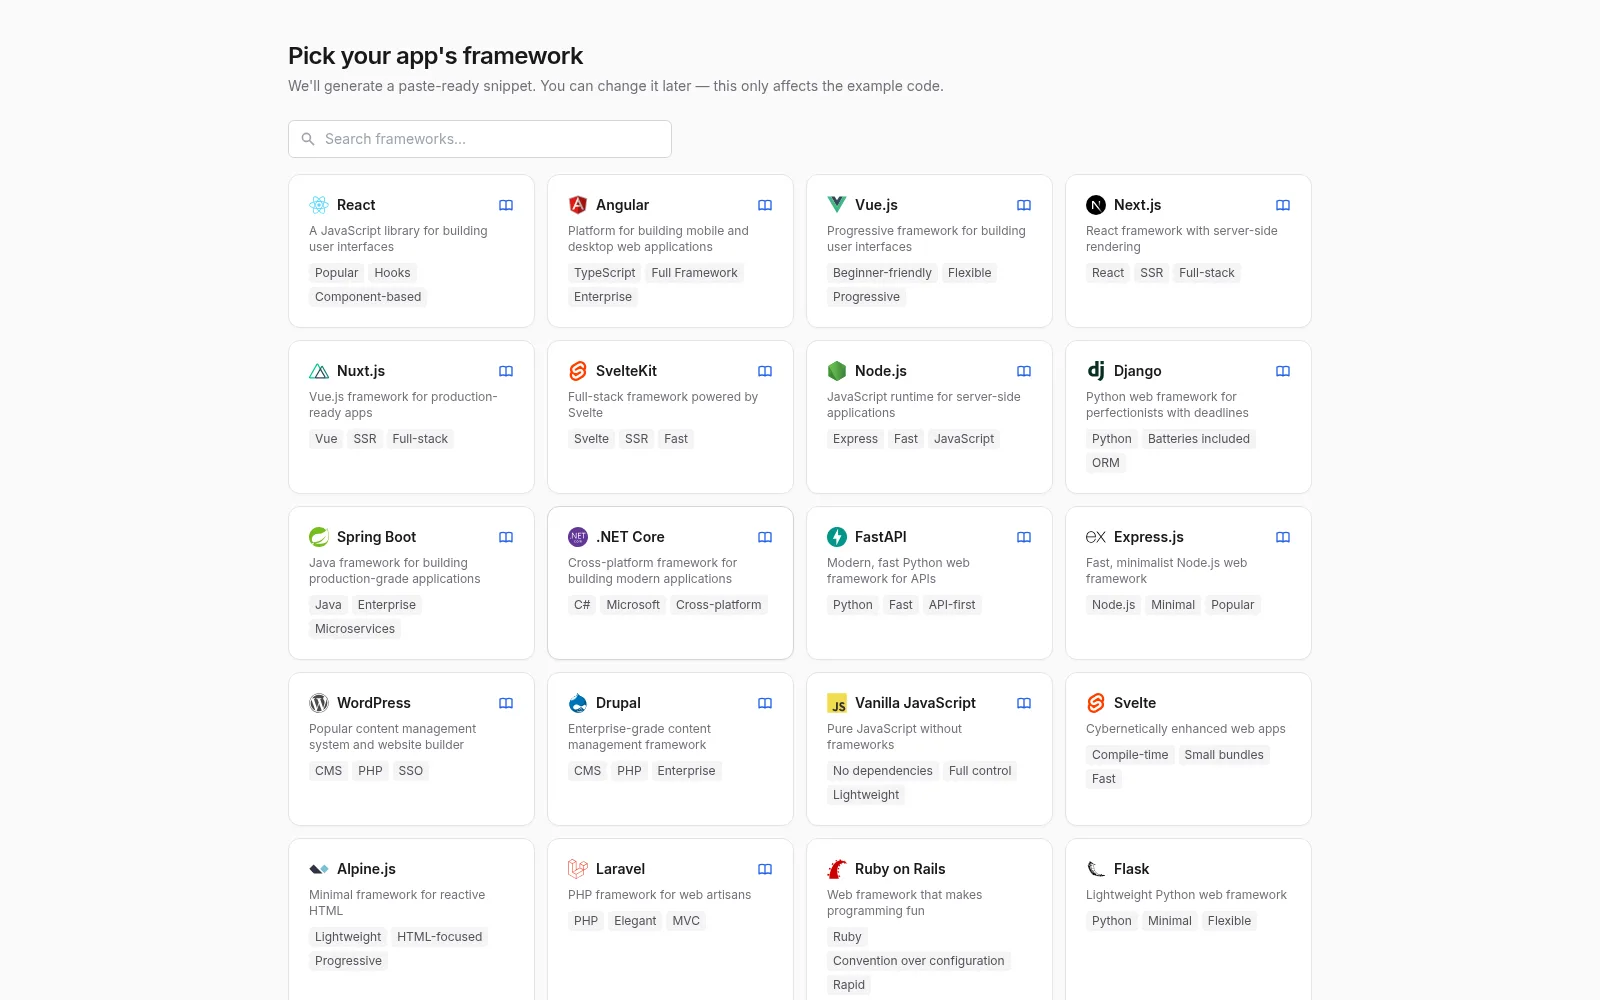
- Pick your framework from a searchable grid — React, Angular, Vue, Next.js, Nuxt, SvelteKit, Node.js, Django, Spring Boot, .NET Core, FastAPI, Express, Laravel, Rails, Flask, WordPress, Drupal, and more. Each card links to its full integration guide.
- Using something else? Choose the Other / Not listed card — Skycloak creates a client and hands you generic OIDC credentials that work with any OIDC-compatible stack.
- Copy the snippet — you get a pre-configured OIDC client and a paste-ready code snippet for your framework. Users can log in as soon as it’s deployed.
Path 2: I know Keycloak, give me an instance (~4 minutes)
For teams who already run Keycloak and want the full console:
- SSO to the admin console — sign in to Keycloak’s admin console with your Skycloak account; there are no separate admin credentials to manage
- kcadm & Terraform snippets — ready-to-use automation examples for scripting your setup
- Full feature-flag control — toggle Keycloak server features per cluster
Looking for employee SSO?
Workspace-level SSO for your own team (SAML/OIDC against your IdP) is configured after onboarding from the dashboard — see Workspace SSO.
Workspace Creation
Automatic Setup
Alongside onboarding, Skycloak automatically:
- Creates your workspace with a unique identifier
- Sets you up as the workspace owner
- Initiates your free trial — 21 days on the app path (a fully managed realm on the Shared Cluster), or 7 days on the Expert path (your own dedicated cluster). No credit card required, and both paths can be extended. If an Expert-path trial ends without an upgrade, the dedicated cluster is paused and then deleted 7 days later — we warn you by email first, and upgrading at any point during that week restores everything.
After Onboarding: Your Clusters Page
After onboarding, you land on your Clusters page — your workspace home. Depending on your path, your managed realm or your dedicated cluster is ready to open.
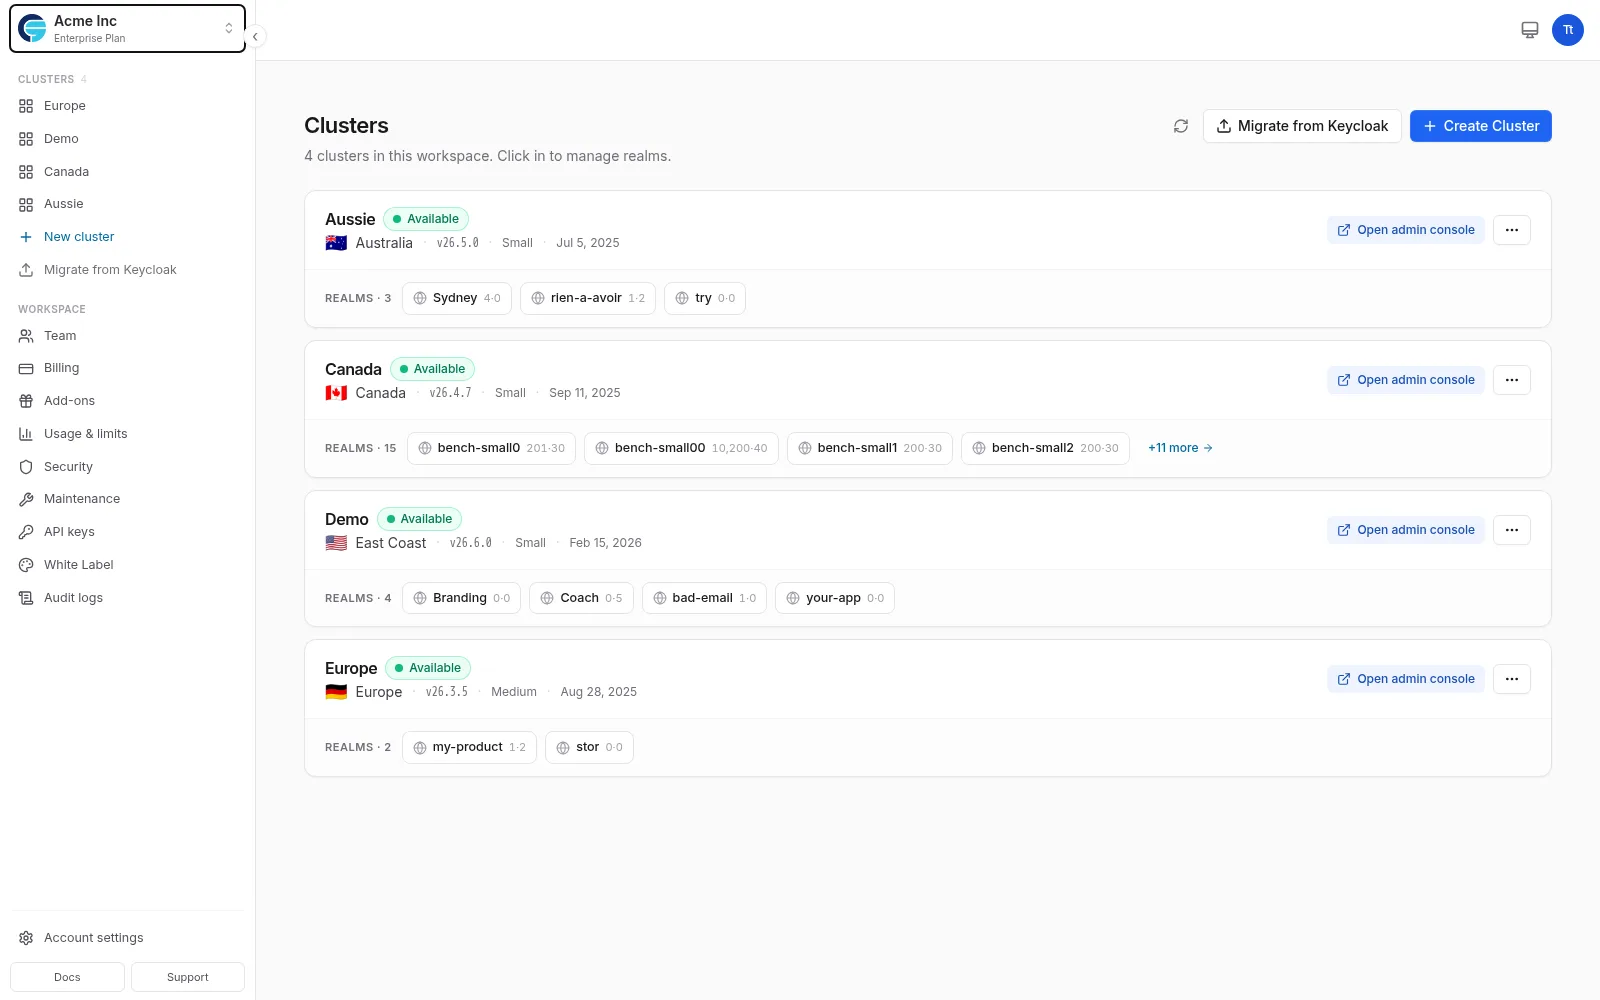
From here, the essential next steps are:
- Verify Your Email - Confirm your account email address (required to subscribe and for Admin Console SSO)
- Open Your Realm or Cluster - Click into it to see health, live metrics, and configuration
- Create Your First Application - Configure authentication for your app
- Configure Email Settings - Set up SMTP for user notifications
- Invite Team Members - Add colleagues from the Team page
Depending on your plan, you can also:
- Add Custom Domain - Use your own domain (e.g., auth.yourcompany.com)
- Add Custom Branding - Customize login pages with your brand
- Extend Keycloak Capabilities - Install extensions for additional features
- Brand Your Email Templates - Customize email notifications
Skipping Onboarding
If you’re joining an existing workspace via invitation:
- The onboarding flow is automatically skipped
- You’ll go directly to the workspace’s Clusters page
- Your role and permissions are assigned based on the invitation
For experienced users signing up fresh:
- Use “Skip onboarding for now” or “Skip, set it up myself” on any onboarding step except the final success page
- Your workspace will still be created automatically
- You can always access features directly from the sidebar
Post-Onboarding Tips
Take Your Time
- Each step in the Getting Started checklist has helpful guides
- Progress is automatically tracked
- You can complete tasks in any order (though some depend on others)
Use Help Resources
- Documentation links throughout the dashboard
- Email support at support [at] skycloak.io
- In-app tooltips for common questions
Common Patterns
For B2C Apps:
- Start with social login (Google, GitHub, etc.)
- Add email/password as fallback
- Enable user registration
For B2B Apps:
- Configure enterprise SSO from the dashboard after onboarding (Workspace SSO)
- Configure role-based access
- Enable MFA requirements
For Internal Tools:
- Connect to Active Directory/LDAP
- Set up employee groups
- Configure access policies
Troubleshooting Onboarding
Common Issues
-
Email Not Received
- Check spam/junk folders
- Verify email address
- Request resend from account settings
-
Workspace Not Created
- Refresh the page
- Check your network connection
- Contact support if issue persists
-
Onboarding Stuck
- Clear browser cache
- Try a different browser
- Contact support [at] skycloak.io
-
“Use a different email address” After Signing Up
- Skycloak doesn’t accept disposable (temporary inbox) email services for new accounts
- Sign up again with your work or personal email address
- If your address was blocked by mistake, contact support [at] skycloak.io and we’ll re-enable it
Getting Help
During onboarding:
- 📧 Email: support [at] skycloak.io
- 📚 Documentation links in each step
Next Steps After Onboarding
-
Create Your Cluster:
- Create Your First Cluster
- Choose your region and cluster size
-
Configure Your Application:
- Set up authentication
- Test the login flow
-
Customize Your Experience:
-
Invite Your Team:
- Team Management
- Assign roles and permissions
-
Monitor and Optimize: