Extensions
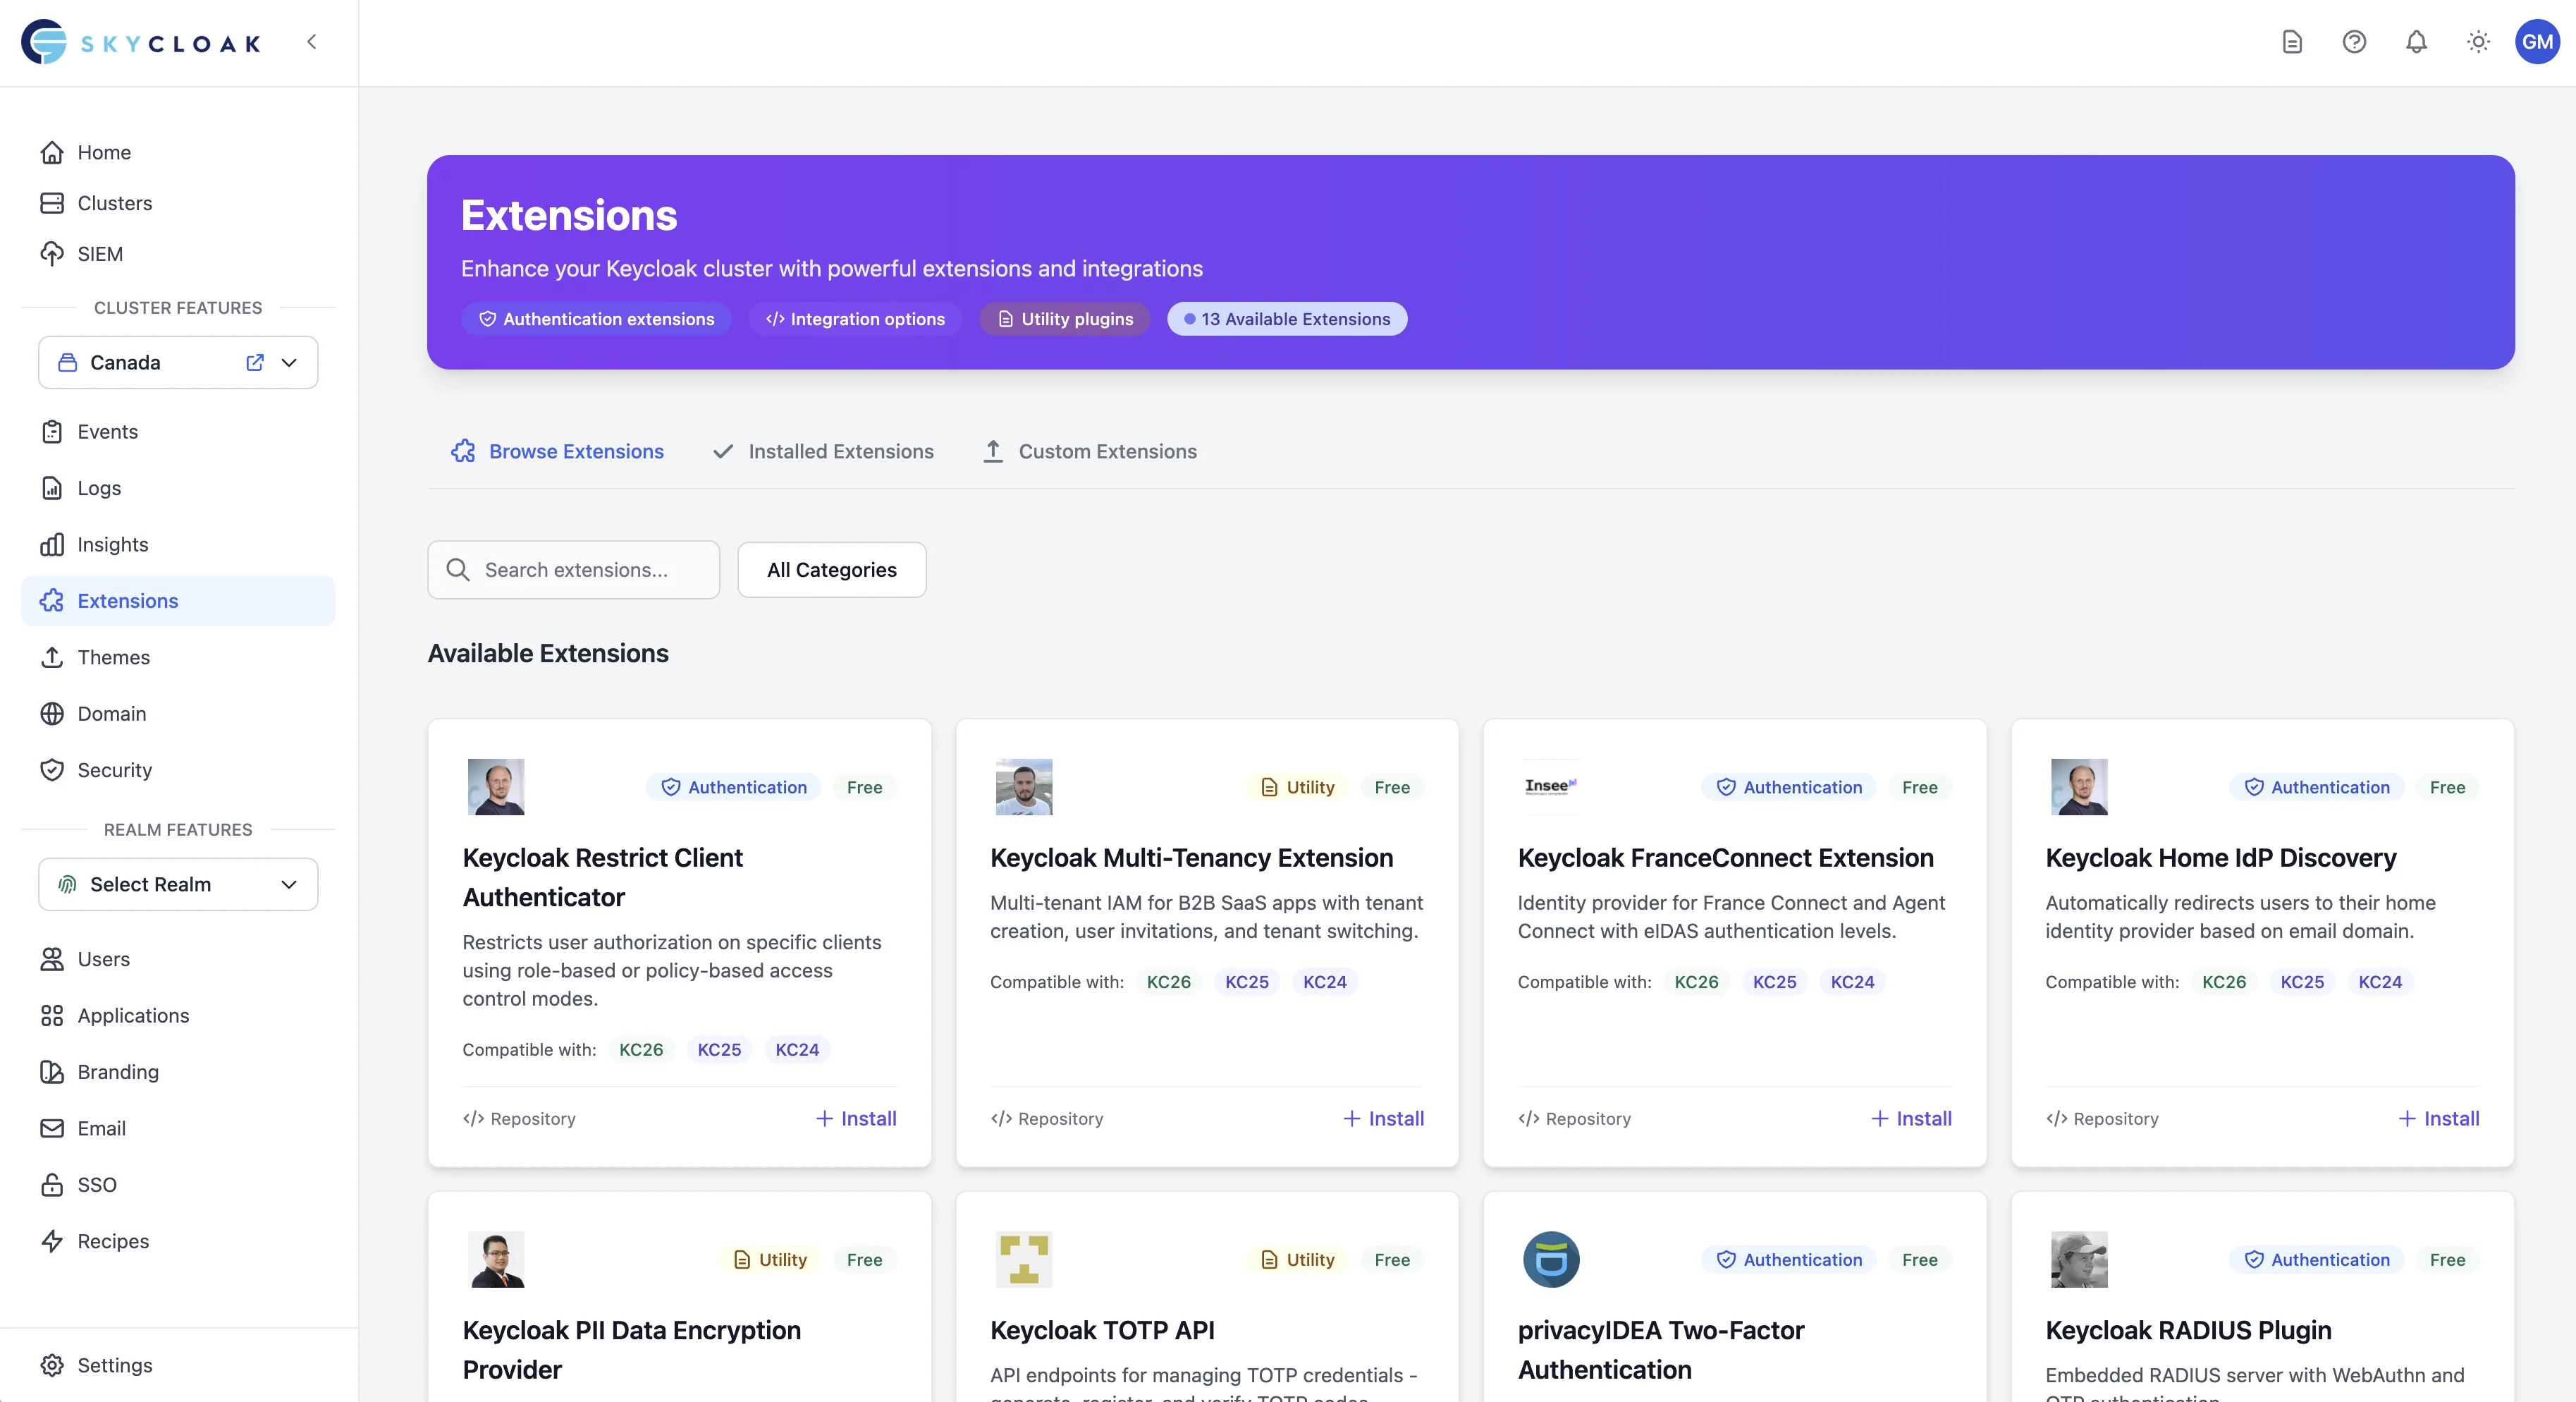
Skycloak’s extension system allows you to enhance your Keycloak clusters with additional functionality through a curated marketplace of extensions. Extensions can add new authentication providers, integrations, monitoring capabilities, and custom features to your Keycloak instance.
Overview
Extensions in Skycloak are JAR files that extend Keycloak’s functionality. They are organized by categories and can be easily installed, managed, and uninstalled through the Skycloak dashboard.
Extension Categories
Authentication Extensions
- Custom identity providers
- Enhanced authentication flows
- Multi-factor authentication providers
- Social login integrations
Integration Extensions
- Third-party system connectors
- API integrations
- Webhook providers
- Data synchronization tools
Monitoring Extensions
- Health check providers
- Custom metrics collectors
- Performance monitoring tools
- Audit log enhancers
Utility Extensions
- User management tools
- Configuration helpers
- Development utilities
- Administrative enhancements
Managing Extensions
Installing Extensions
- Navigate to your cluster in the Skycloak dashboard
- Click on “Extensions” in the cluster sidebar
- Browse available extensions or use the search function
- Click on an extension card to view details
- Click “Install” to open the installation modal
- Configure any required parameters
- Click “Install Extension” to begin installation
Installation Process:
- Extensions are installed in the background
- Cluster status shows “Updating” during installation
- You’ll receive a notification when installation completes
- Failed installations will show error details
Viewing Installed Extensions
Switch to the “Installed Extensions” tab to see:
- Currently active extensions
- The installed version of each extension and, when a different build is published for your Keycloak version, the available version
- Installation dates
- Extension status (Active, Installing, Failed, Uninstalling)
- Links to extension repositories
- Uninstall options
Uninstalling Extensions
- Go to the “Installed Extensions” tab
- Find the extension you want to remove
- Click the “Uninstall” button
- Confirm the uninstall action
- The extension will be marked as “Uninstalling”
- Once complete, it will be removed from the list
Extension Compatibility
Keycloak Version Compatibility
Extensions are built for specific Keycloak versions. The Skycloak extension marketplace automatically shows only compatible extensions for your cluster’s Keycloak version.
Compatibility Indicators:
- Green badge: Compatible with your cluster version
- Yellow badge: Compatibility issues detected
- Disabled: Not compatible with your cluster version
Version Support
Each extension may support multiple Keycloak versions. Skycloak uses a granular version matching system:
-
Major.minor match (e.g.,
26.5): Used when an extension has a specific build for a Keycloak minor version range -
Major match (e.g.,
26): Used as a fallback for general compatibility within a major version - Fallback: If no exact match exists, the highest compatible version is selected
This means some extensions may serve different JARs depending on your exact Keycloak version. For example, the Home IdP Discovery extension uses one version for Keycloak 26.0-26.4 and a different version for 26.5+, ensuring API compatibility across all minor releases.
Important: When upgrading your Keycloak version, your installed extensions continue to use their current JARs. If you need to update an extension after a Keycloak upgrade, uninstall and reinstall it to pick up the version matched to your new Keycloak version.
Extension Configuration
Parameter Types
Extensions can request various configuration parameters during installation:
Input Types:
- Text fields: API keys, client IDs, realm names
- Dropdowns: Environment selection, predefined options
- Checkboxes: Feature toggles, enable/disable options
- Number fields: Ports, timeouts, limits
- Password fields: Secrets, tokens, sensitive data
Helper Features:
- Contextual help text for each parameter
- Placeholder examples showing expected format
- Required field validation
- Default values where applicable
- Review step before installation
Post-Installation Resources
After installing an extension, access comprehensive documentation:
Usage Instructions:
- Step-by-step quick start guides
- Configuration tips by category (realm, client, auth flow, API)
- Code examples and integration patterns
- Video tutorials (when available)
API Documentation:
- New endpoints added by the extension
- Request/response formats
- Authentication requirements
- Usage examples
Extension Development
Finding Extensions
Marketplace Browse:
- Filter by category (Authentication, Integration, Monitoring, Utility)
- Search by name or description
- View extension details and documentation
- Check compatibility before installation
- See tier requirements (Free, Paid, Custom)
Extension Details Include:
- Description and features
- Supported Keycloak versions with version badges
- Configuration parameters with types and validation
- Repository links for open-source extensions
- Installation requirements and dependencies
- Real-time compatibility checking
Custom Extension Development
For Enterprise customers developing custom extensions:
- Development: Build your extension as a Keycloak JAR
- Testing: Test with your target Keycloak version
- Upload: Use the Custom Extensions tab to upload
- Security: Wait for the malware scan. Every uploaded JAR is scanned with ClamAV before it can be used.
- Installation: Install once the security scan passes
Development Guidelines:
- Target specific Keycloak versions for compatibility
- Include clear metadata in your JAR
- Document all configuration parameters
- Test thoroughly before uploading
- Keep JAR size under 50MB
Best Practices
Installation Planning
Before Installing:
- Review extension documentation and compatibility
- Understand configuration requirements and parameter types
- Check your plan’s extension tier access
- Plan for cluster restart during installation
- Have a rollback plan if needed
During Installation:
- Only one extension operation at a time (system enforced)
- Monitor real-time progress through status indicators
- Wait for “Active” status before using the extension
- Review installation logs if issues occur
Extension Management
Regular Maintenance:
- Keep extensions updated when new versions are available
- Remove unused extensions to reduce complexity
- Monitor extension performance impact
- Review extension logs for issues
Security Considerations:
- Only install extensions from trusted sources
- Review extension permissions and access requirements
- Monitor extension behavior after installation
- Keep track of installed extensions for security audits
Updating Extensions
Extension Versions
Every extension shows the version you are running. For marketplace extensions this is the release name published by the extension’s maintainers, for example v1.5.0. Some projects use names that are not plain numbers, such as v1.4.1-SNAPSHOT, and these are shown exactly as published. If Skycloak cannot tell which build an instance is running, the version shows as unknown.
The Extensions tab shows the version available for your cluster’s Keycloak version. Different Keycloak versions can receive different builds of the same extension, so two clusters may show different available versions.
Upgrading a Marketplace Extension
When a different build of a marketplace extension is published for your Keycloak version, the Installed Extensions tab shows both versions (for example installed v1.3.5 and available v1.5.0) and an Upgrade button. Click it to install the build for your Keycloak version. See What Happens During an Upgrade.
The Upgrade button only appears when upgrading would actually change what your cluster runs. Routine catalog maintenance that leaves your build unchanged never offers an upgrade. If Skycloak support has pinned an extension on your cluster to a specific build, the Upgrade button is not shown for it. Contact support if you want to move a pinned extension to a newer build.
Updating a Custom Extension
Upload the new JAR: Go to the Custom Extensions tab, find your extension, and click “Update JAR”. Upload the new JAR file and specify the new version number.
Wait for security scan: The new JAR is scanned for malware with ClamAV. Once the scan passes, you’ll see a list of clusters that have this extension installed. Scans usually finish in under a minute; a large JAR full of nested archives can take a few minutes.
Select clusters to upgrade: Choose which clusters should receive the new version. You can upgrade all at once or select specific clusters — for example, upgrade staging first, then production after verifying.
Monitor upgrade progress: The modal shows real-time progress as each cluster is upgraded sequentially.
If you close the modal during scanning, you can return later by clicking the “Upgrade Clusters” button on the extension card in the Custom Extensions tab.
What Happens During an Upgrade
When you click Upgrade on a cluster:
- The cluster image is rebuilt with the new extension JAR
- The cluster performs a rolling restart to apply the change
- Medium and large clusters have no downtime during the rolling restart
- Small clusters may experience brief downtime
- Your existing extension configuration (parameters) is preserved
The cluster status will show “Updating” during the process and return to “Available” once complete.
Best Practices for Upgrades
- Test on staging first — upgrade a non-production cluster and verify the new version works correctly before upgrading production
- Upgrade one cluster at a time — avoid upgrading all clusters simultaneously so you can catch issues early
- Check cluster status — ensure the cluster is in Available state before starting an upgrade
- Review release notes — understand what changed in the new version before deploying
Troubleshooting
Common Issues
Installation Failures:
- Check Keycloak version compatibility
- Verify cluster has sufficient resources
- Review error messages in the dashboard
- Contact support if issues persist
Extension Not Working:
- Verify extension is in “Active” status
- Check extension configuration parameters
- Review cluster logs for error messages
- Restart cluster if recommended by extension documentation
Performance Impact:
- Monitor cluster performance after installation
- Check resource usage in insights dashboard
- Consider removing or replacing problematic extensions
- Optimize extension configuration if available
Getting Help
Support Channels:
- Extension repository documentation
- Skycloak support (for paid plans)
- Extension-specific support channels
Information to Provide:
- Extension name and version
- Keycloak cluster version
- Error messages or symptoms
- Configuration details (without sensitive data)
Extension Tiers and Pricing
Extension Access by Plan
Extensions are categorized into three tiers based on your subscription:
Free Extensions (All plans: Trial, Developer, Launch, Business, Enterprise)
- Open-source community extensions
- GitHub-hosted extensions
- Basic authentication providers
Paid Extensions (Business+)
- Premium third-party integrations
- Advanced monitoring tools
- Enterprise authentication providers
Custom Extensions (Enterprise only)
- Upload your own JAR files
- Every JAR scanned for malware with ClamAV before it can be installed
- Private extension hosting
- Full control over extension lifecycle
Custom Extensions Upload
Enterprise customers can upload custom extensions:
- Navigate to the “Custom Extensions” tab
- Click “Upload Extension”
- Select your JAR file (max 50MB)
- Provide extension details:
- Name and description
- Keycloak version compatibility
- Configuration parameters
- Wait for the malware scan to complete
- Install once marked as “Clean”
Security Scanning Status:
- 🟢 Clean: Scanned and safe to install
- 🟡 Pending/Scanning: The scan is running. The extension cannot be installed yet.
- 🔴 Malware detected: ClamAV matched a known signature. The JAR file is deleted from our storage immediately and cannot be installed, upgraded or reconfigured. The extension stays in your list showing the signature name so you can see what was found. To recover, check the JAR against your own copy and upload a clean one.
- ⚠️ Scan incomplete: The scan could not run to completion, for example because the scanner was unavailable, or because the JAR unpacks to more content than we can inspect. The JAR was never cleared, so it cannot be installed. Nothing is deleted. Use Update JAR to upload the file again and retry.
How scanning works
Every custom extension JAR you upload is streamed to a ClamAV instance we run ourselves, inside our own infrastructure. The JAR is never sent to a third party scanning service.
Two things follow from that:
- Scanning is fail-closed. If we cannot complete a scan, the extension is marked Scan incomplete and stays uninstallable. We never mark a JAR clean that we did not actually inspect.
- A detection deletes the file. When ClamAV matches a signature, the JAR is removed from our storage right away and cannot be restored, so keep your own copy of anything you upload. The extension record itself stays visible with the signature name, and an extension already running on a cluster is never pulled out from under it automatically.
Extension Marketplace
Quality Standards
All marketplace extensions are reviewed for:
- Security: No malicious code or vulnerabilities
- Compatibility: Works with supported Keycloak versions
- Documentation: Clear installation and usage instructions
- Maintenance: Active development and support
Available Extensions
Our marketplace currently includes the following extensions:
Authentication & Access Control
Keycloak Restrict Client Authenticator
- Restrict client access based on roles and policies
- Configure which clients users can authenticate to
- Ideal for multi-tenant environments
- Parameters: None required
Keycloak Home IdP Discovery
- Automatically redirect users to their identity provider based on email domain
- Streamline login for organizations with multiple IdPs
- Configuration: set the
home.idp.discovery.domainsattribute on each identity provider via Keycloak’s Identity Providers REST API orkcadm(it has no admin console UI field); separate multiple domains with##. The domain list lives on each identity provider, not on the authenticator
Apple Identity Provider
- Enable “Sign in with Apple” functionality
- Support for Apple’s privacy-focused authentication
- Parameters: Service ID, Team ID, Client Secret Key
privacyIDEA Two-Factor Authentication
- Integrate with privacyIDEA for advanced MFA
- Support for hardware tokens, SMS, and mobile apps
- Parameters: Server URL, verify SSL, realm mapping
Email OTP Authenticator
- Send one-time passwords via email
- Passwordless authentication option
- Customizable email templates
- Parameters: Email subject, template customization
Adaptive Risk
- Risk-based authentication: scores each browser login from 0 to 100 against the user’s own login history (new device, new network, new country, rapid country change, recent failed attempts, unusual hour)
- A Condition - risk level step lets your flow ask for OTP or WebAuthn, or deny access, only for medium or high risk logins
- Every login event carries
risk_score,risk_levelandrisk_reasons, so you can see why a login was flagged - Free, open source, Keycloak 26 only. See Risk-Based MFA for the recommended flow
- Parameters (both optional, pre-filled in the install dialog):
-
Client IP Header (
SKYCLOAK_ADAPTIVE_RISK_CLIENT_IP_HEADER, defaultCF-Connecting-IP): header holding the client IP. Clear it to use Keycloak’s own resolved address -
Country Header (
SKYCLOAK_ADAPTIVE_RISK_COUNTRY_HEADER, defaultCF-IPCountry): header holding the client’s country code. Clear it to turn the country reasons off
-
Client IP Header (
Multi-Tenancy & B2B
Keycloak Multi-Tenancy Extension
- Create isolated tenant realms
- Tenant-specific branding and configuration
- Ideal for B2B SaaS applications
- Parameters: Tenant identifier configuration
Regional & Compliance
Keycloak FranceConnect Extension
- Integration with French government identity provider
- Compliant with French digital identity standards
- Parameters: Environment (production/sandbox), client credentials
Keycloak PII Data Encryption Provider
- Encrypt sensitive user attributes at rest
- GDPR compliance support
- Field-level encryption
- Parameters: Encryption key, fields to encrypt
API & Integration
Keycloak TOTP API
- REST API for TOTP management
- Programmatic MFA setup
- QR code generation endpoints
- Parameters: None required
SCIM 2.0 Server for Keycloak
- SCIM provisioning API support
- User and group synchronization
- Compatible with enterprise provisioning tools
- Parameters: Authentication mode, JWT settings (configured via realm attributes)
Keycloak RADIUS Plugin
- Embedded RADIUS server
- Network device authentication
- VPN and WiFi integration
- Parameters: Shared secret, NAS configuration
Communication
Keycloak Phone Provider (⚠️ Limited compatibility)
- SMS-based authentication
- Phone number verification
- Note: Only supports Keycloak versions 20-21
- Parameters: SMS gateway configuration
Managing Extensions Through the Dashboard
All extension management is handled through the Skycloak dashboard interface:
Viewing Available Extensions:
- Navigate to your cluster’s Extensions section
- Browse or search the marketplace
- Filter by category and compatibility
Installing Extensions:
- Click on an extension to view details
- Configure any required parameters in the modal
- Click “Install Extension” to begin installation
- Monitor progress through the cluster status indicator
Managing Installed Extensions:
- Switch to the “Installed Extensions” tab
- View status and configuration details
- Uninstall extensions when no longer needed