User Management
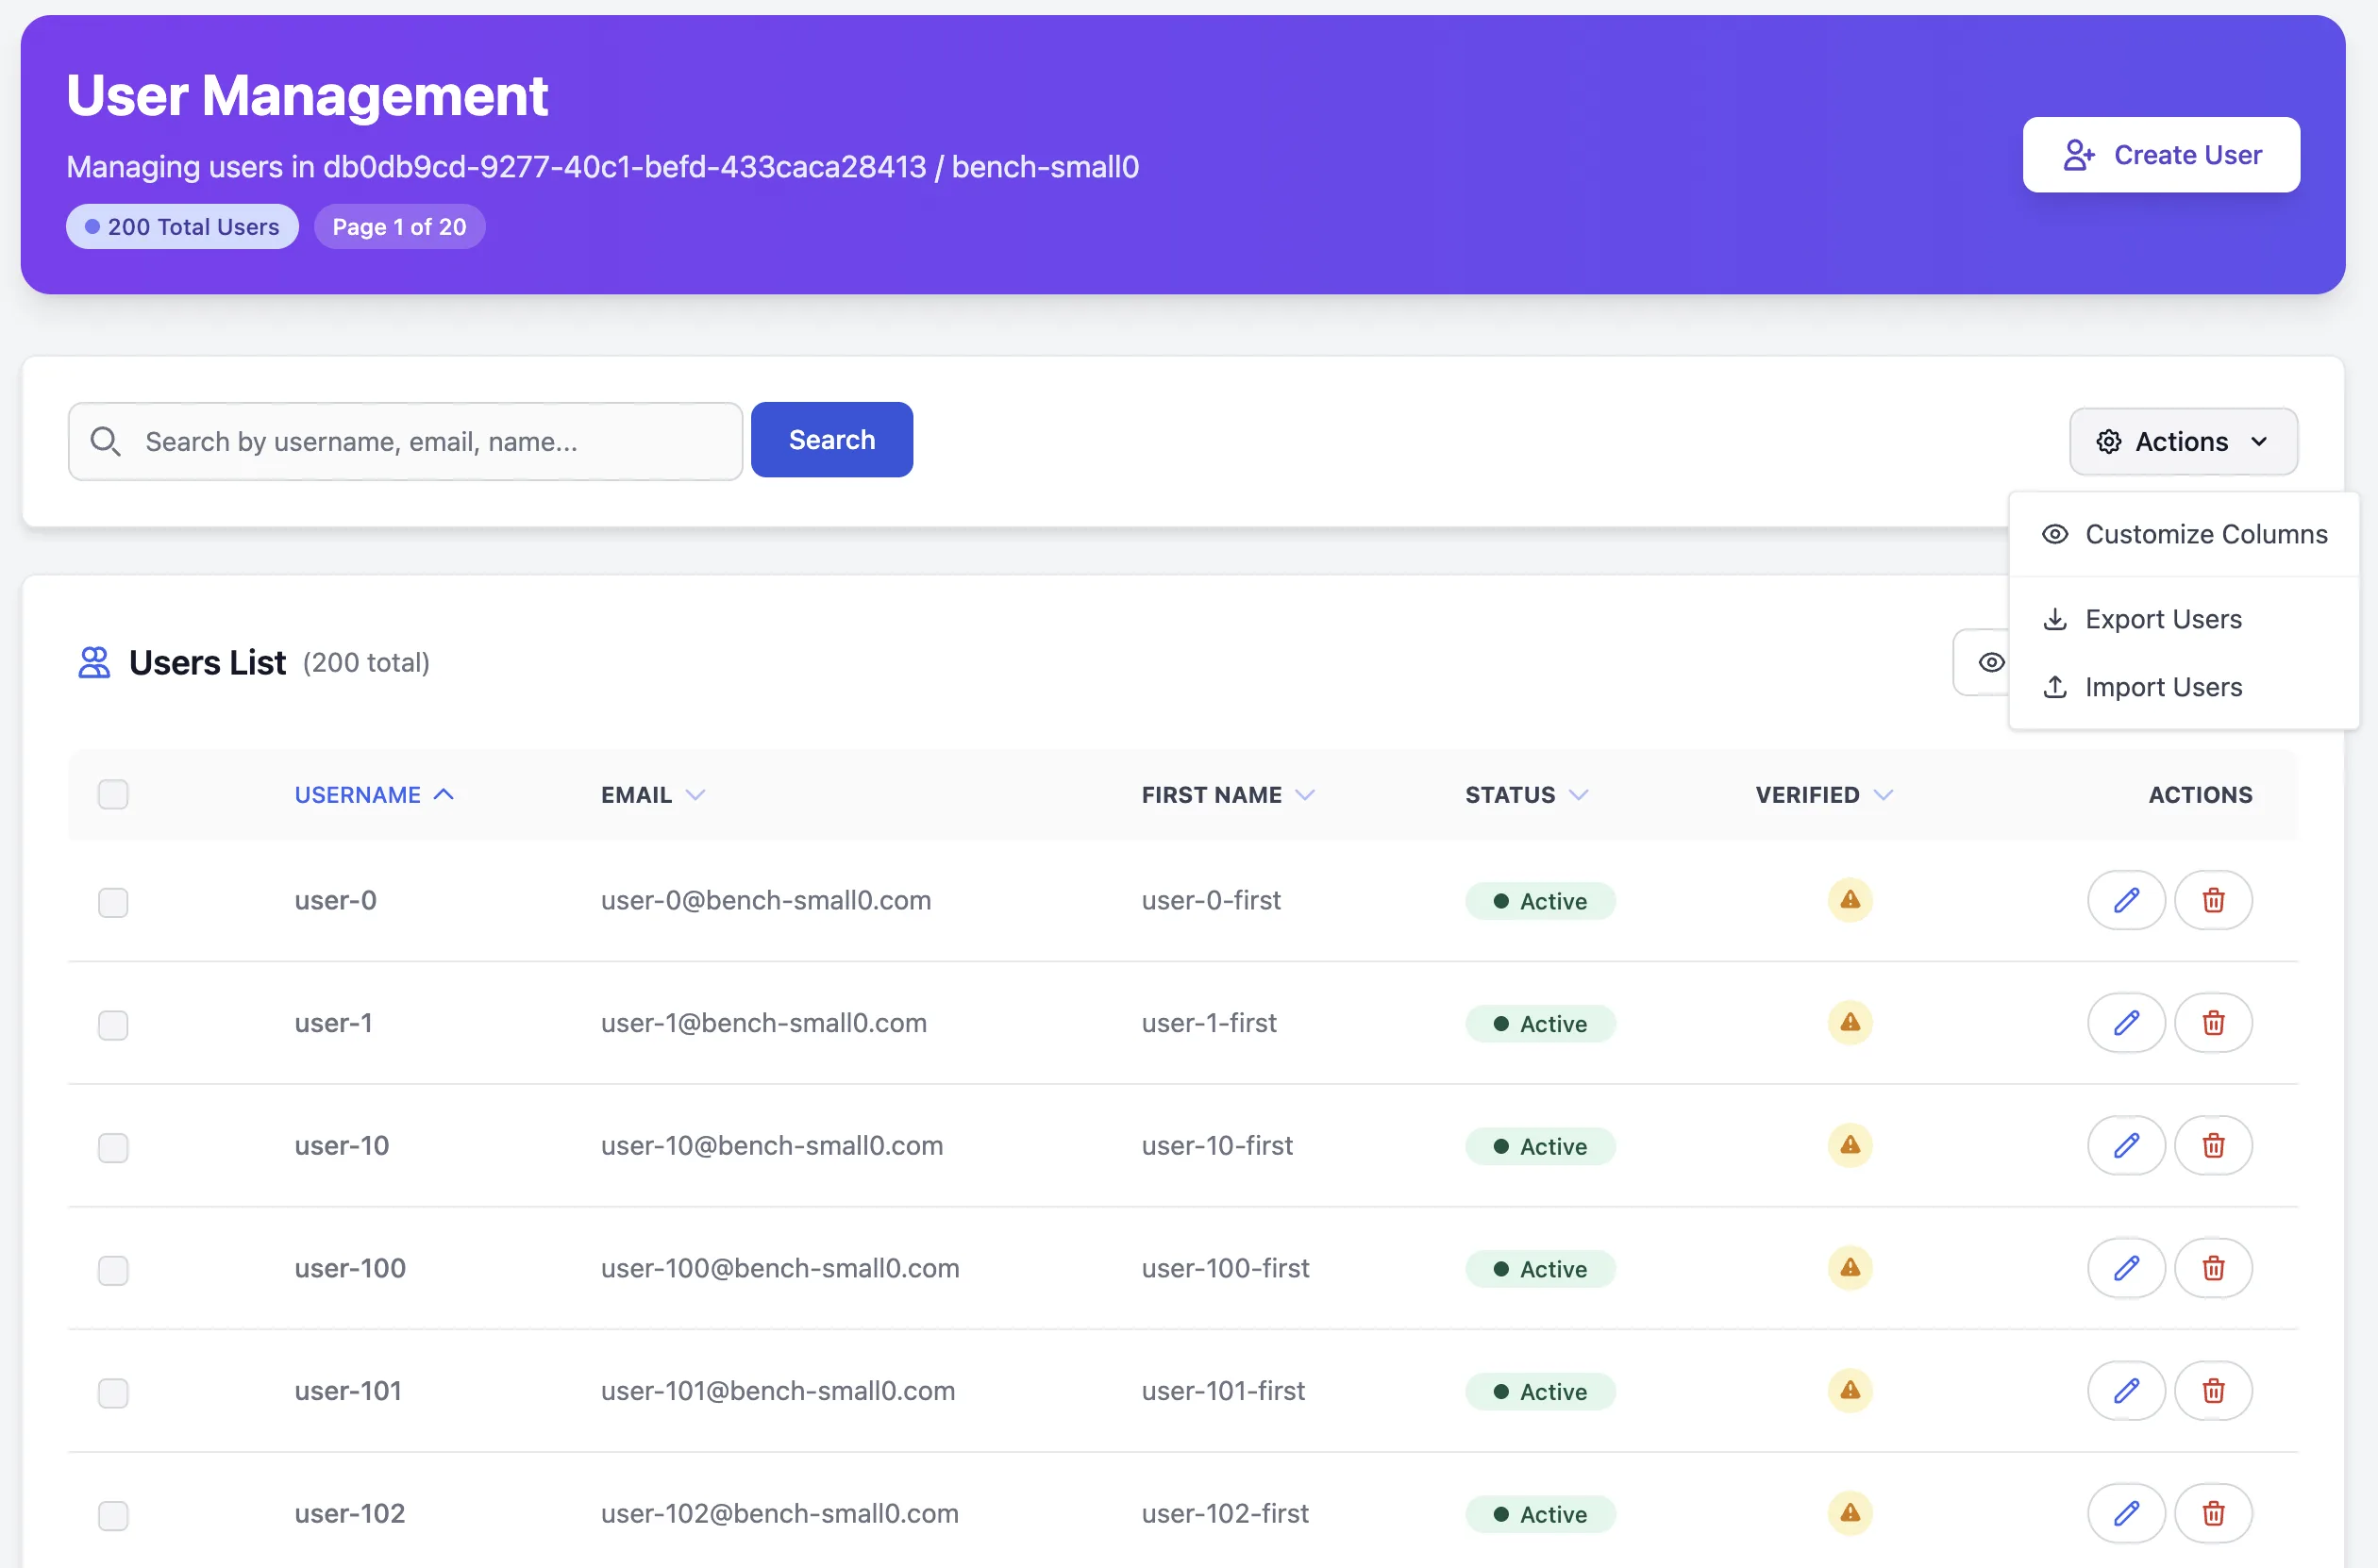
Manage your application users efficiently with Skycloak’s comprehensive user management system. Create users, assign roles, manage groups, and control access - all from a unified interface that simplifies identity management across your applications.
Overview
User Management in Skycloak provides everything you need to:
- Create and manage users across all your applications
- Assign roles and permissions with fine-grained control
- Organize users into groups for easier management
- Import users in bulk from existing systems
- Set password policies and manage credentials
- Track user sessions and login activity
- Configure self-registration and user profiles
Prerequisites
- An active Skycloak cluster
- A configured realm (default or custom)
- Admin or user management permissions in your workspace
- Basic understanding of Keycloak concepts (users, roles, groups)
Getting Started
Accessing User Management
- Select your cluster and realm in the sidebar’s context stack
- Click Users under the realm’s Identity section
- View your user list with search and filter capabilities
The user table shows username, email, name, status, and verification state, with search, customizable columns, bulk actions, and pagination. Columns are not limited to the built-in fields: see showing attributes as columns.
Creating Users
Manual User Creation
Click “Create User” button
-
Fill in user details:
- Username (required, unique identifier)
- Email address (for notifications and password resets)
- First and Last name
- Initial password or temporary password
- Email verified status
- User enabled status
-
Set initial configuration:
- Temporary password (forces reset on first login)
- Email verification requirement
- Account activation status
Bulk User Import
For migrating existing users or creating multiple accounts:
Click “Import Users” in the Actions menu
-
Upload a CSV or JSON file (5 MB maximum). CSV files use these column headers:
username,email,firstName,lastName,enabled,roles,temporaryPasswordOnly
usernameandemailare required. WhentemporaryPasswordis left empty, a random temporary password is generated. Choose what happens to users that already exist: skip them, or update them with the values in the file
Review and confirm the import
Assigning roles during import
Put role names in the roles column, separated by a pipe (|), for example
support-agent|billing. A few rules apply:
- Every role must already exist in the realm. Create the roles first, then import.
- Role names are matched exactly, and Keycloak role names are case-sensitive:
Support-Agentis notsupport-agent. - Only realm roles can be assigned this way. Client roles are assigned from the user’s Role Mappings tab after the import.
If any name does not match a role in the realm, nothing is imported and the error lists every unmatched name, so you can correct the file in one pass.
Managing User Details
User Profile Information
Click on any user to access their detailed profile:
Basic Information Tab:
- Personal details (name, email, username)
- Account status and verification
- User attributes and custom fields
- Profile completeness indicators
The profile is organized into tabs — Profile, Credentials, Role Mappings, Groups, and Sessions — with actions to edit, reset the password, or delete the user.
Password and Credentials
Manage user authentication methods:
- Reset passwords with temporary or permanent options
- Configure MFA (TOTP, WebAuthn, etc.)
- View credential history and last change dates
- Set required actions for next login
Role Management
Realm roles vs client roles
A role is a named permission you hand out to users and groups. Keycloak has two kinds, and picking the right one is the difference between a permission that your whole realm can see and one that belongs to a single application.
| Realm role | Client role | |
|---|---|---|
| Where it lives | The realm | One application (client) |
| Who can ask for it | Every application in the realm | Only that application |
| Use it for | Cross-cutting things: admin, staff, beta-tester
|
Permissions that only mean something inside one app: invoices:read, orders:refund
|
| Shows up in a token as | realm_access.roles |
resource_access.<client-id>.roles |
Rule of thumb: if the name would be confusing next to your other applications, it is a client role.
Both kinds are assigned to users and groups the same way, so choosing a client role does not make the role harder to hand out later.
Creating a role
- Open Roles from the realm sidebar.
- Select New role. The dialog asks for the scope first and explains both options inline.
-
Choose Realm role or Client role.
- Realm role: nothing more to pick.
- Client role: choose the application it belongs to. The dropdown lists the applications you registered in this realm. If the realm has no applications yet, create one first.
- Name it, add an optional description, then select Create role.
The Roles list shows every role in the realm with a Scope column: Realm for a
realm role, or the application’s client ID for a client role. Renaming,
editing the description and deleting all work the same way in either scope.
Creating, renaming and deleting roles needs the users:manage permission.
Keycloak’s own built-in roles (the ones on account, realm-management and
broker) are not listed here. They are platform plumbing, not yours to manage,
and they would bury your own roles.
Assigning Roles to Users
Control what users can do in your applications:
- Open the user, then the Roles tab
- Realm roles are listed first. Every role in the realm appears, and a ticked box means the user has it.
- Client roles come next. Pick a client from the dropdown to see that client’s roles for this user.
- Tick a box to assign a role, untick it to remove one. The change is saved right away.
Assigning roles needs the users:manage permission. Without it the boxes are
read-only.
Understanding Role Hierarchy
Roles come in the two scopes described above (realm-wide and per-application),
and a role can also be composite: assigning it grants the roles it contains.
Composite roles are marked in the Roles list. A realm role can contain client
roles, so a single staff role can carry the right permissions in several
applications at once.
Group Management
Organizing Users into Groups
Groups simplify permission management for multiple users:
- Create groups with hierarchical structure
- Add users to groups individually or in bulk
- Assign roles to groups (inherited by all members)
- Set group attributes for additional metadata
Group Strategies
Department-based Groups:
/company
  /engineering
    /frontend
    /backend
    /devops
  /sales
  /support
Permission-based Groups:
/access-levels
  /read-only
  /editors
  /administrators
Project-based Groups:
/projects
  /project-alpha
    /developers
    /testers
  /project-beta
User Sessions and Activity
Monitoring Active Sessions
Track user login activity and manage sessions:
View active sessions per user
-
See login details:
- IP addresses
- Client/browser information
- Session duration
- Last activity time
Revoke sessions individually or all at once
User Attributes and Metadata
Attributes are the extra fields you keep on a user beyond username, email, and name: a department, an employee number, a tenant ID, a plan level. Open any user and pick the Attributes tab to see what that user carries.
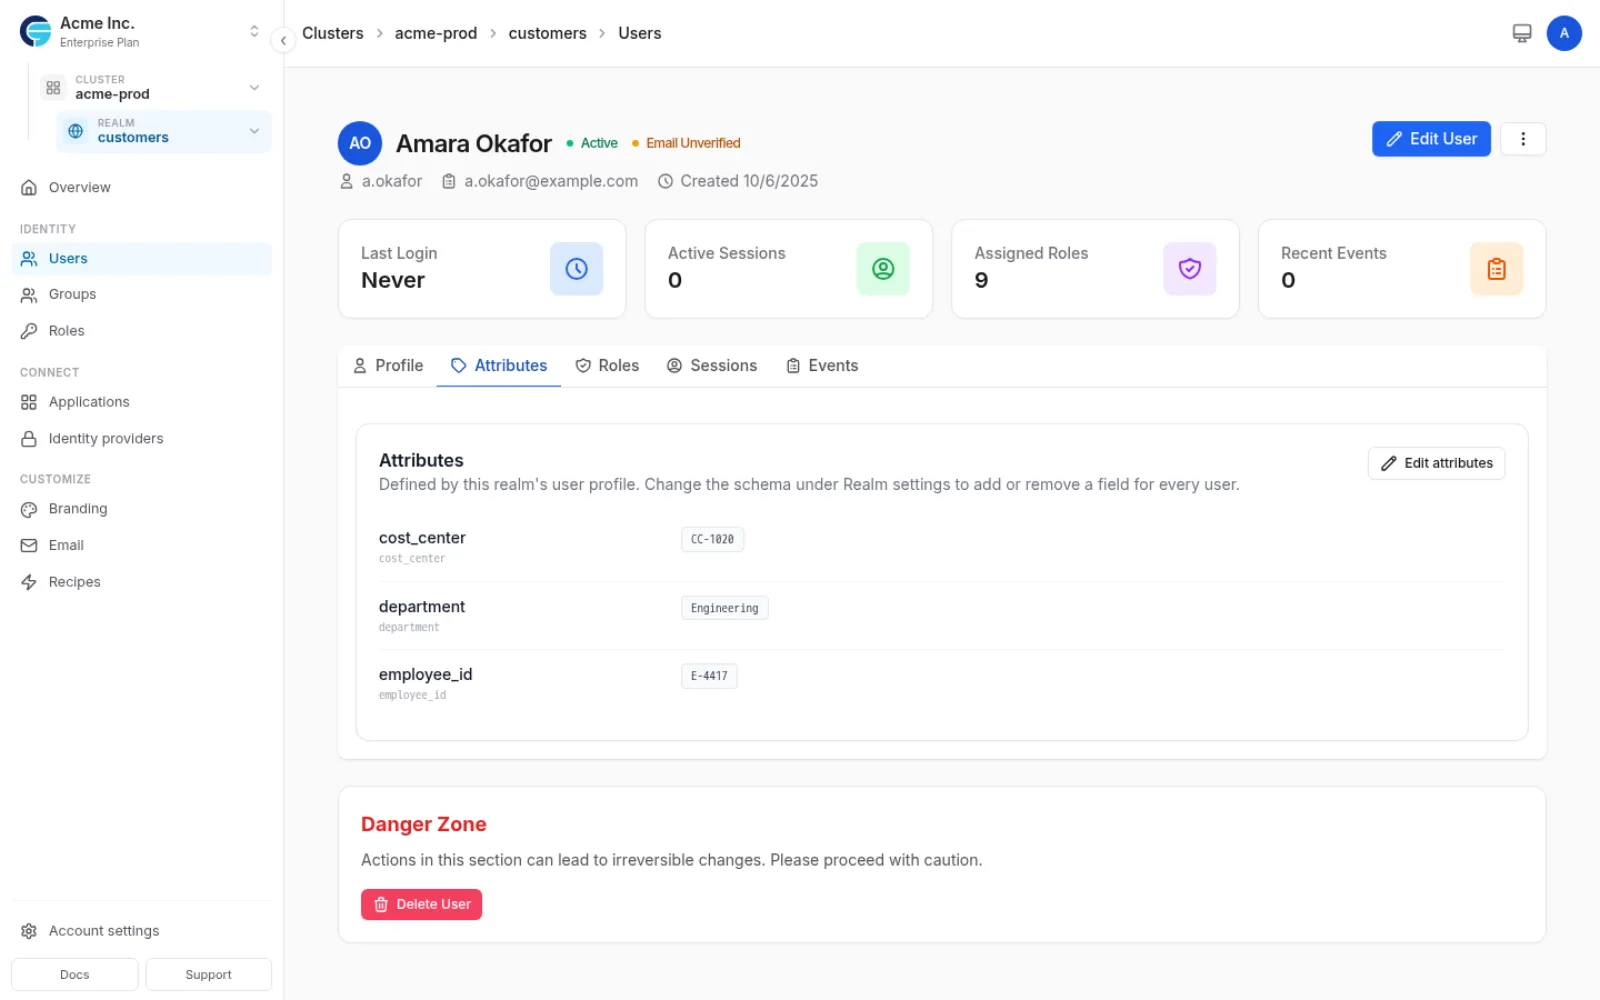
Editing attributes
Edit attributes opens every attribute at once. Add a row, rename a key, change a value, or remove one, then save the whole set in a single step.
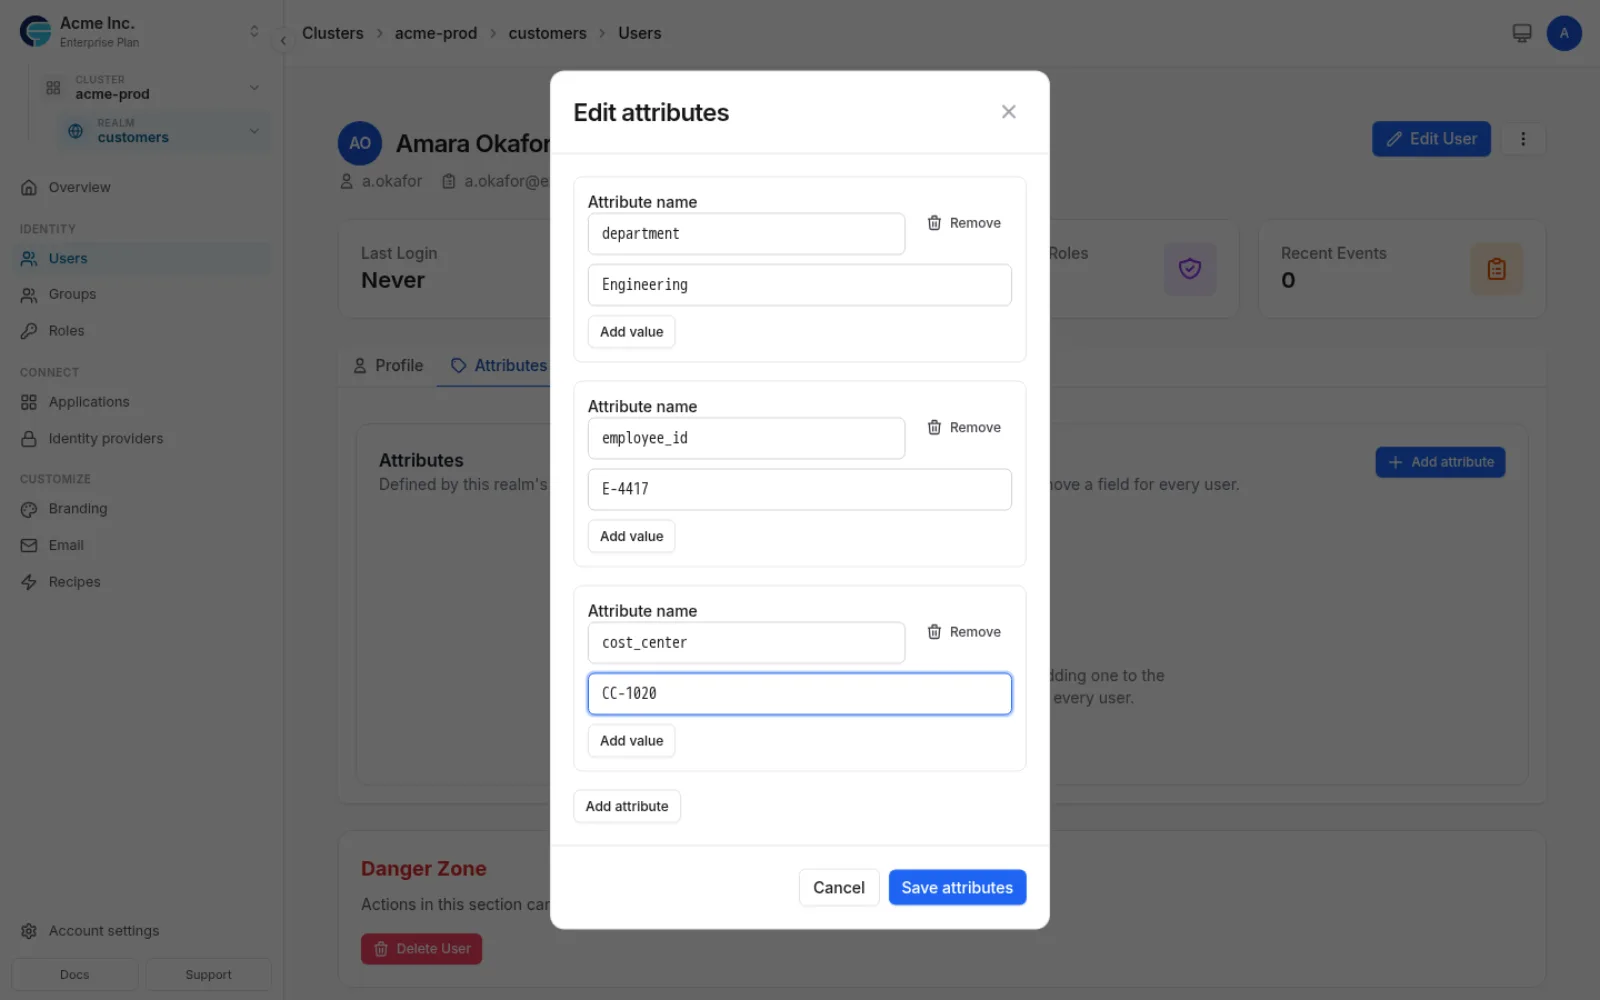
An attribute can hold more than one value. Use Add value to append to a key rather than replacing what is there. Attributes your identity provider owns are shown but not editable, because writing them here would be overwritten on the user’s next login.
If the tab says the realm hides attributes
A realm can refuse to hand out attributes that its user profile does not declare. This is Keycloak’s default (unmanagedAttributePolicy: disabled), and it is stricter than it sounds: attributes written by an import or by your own code still exist on the user, but the admin API will not return them, so nothing can display them, here or in the Keycloak admin console.
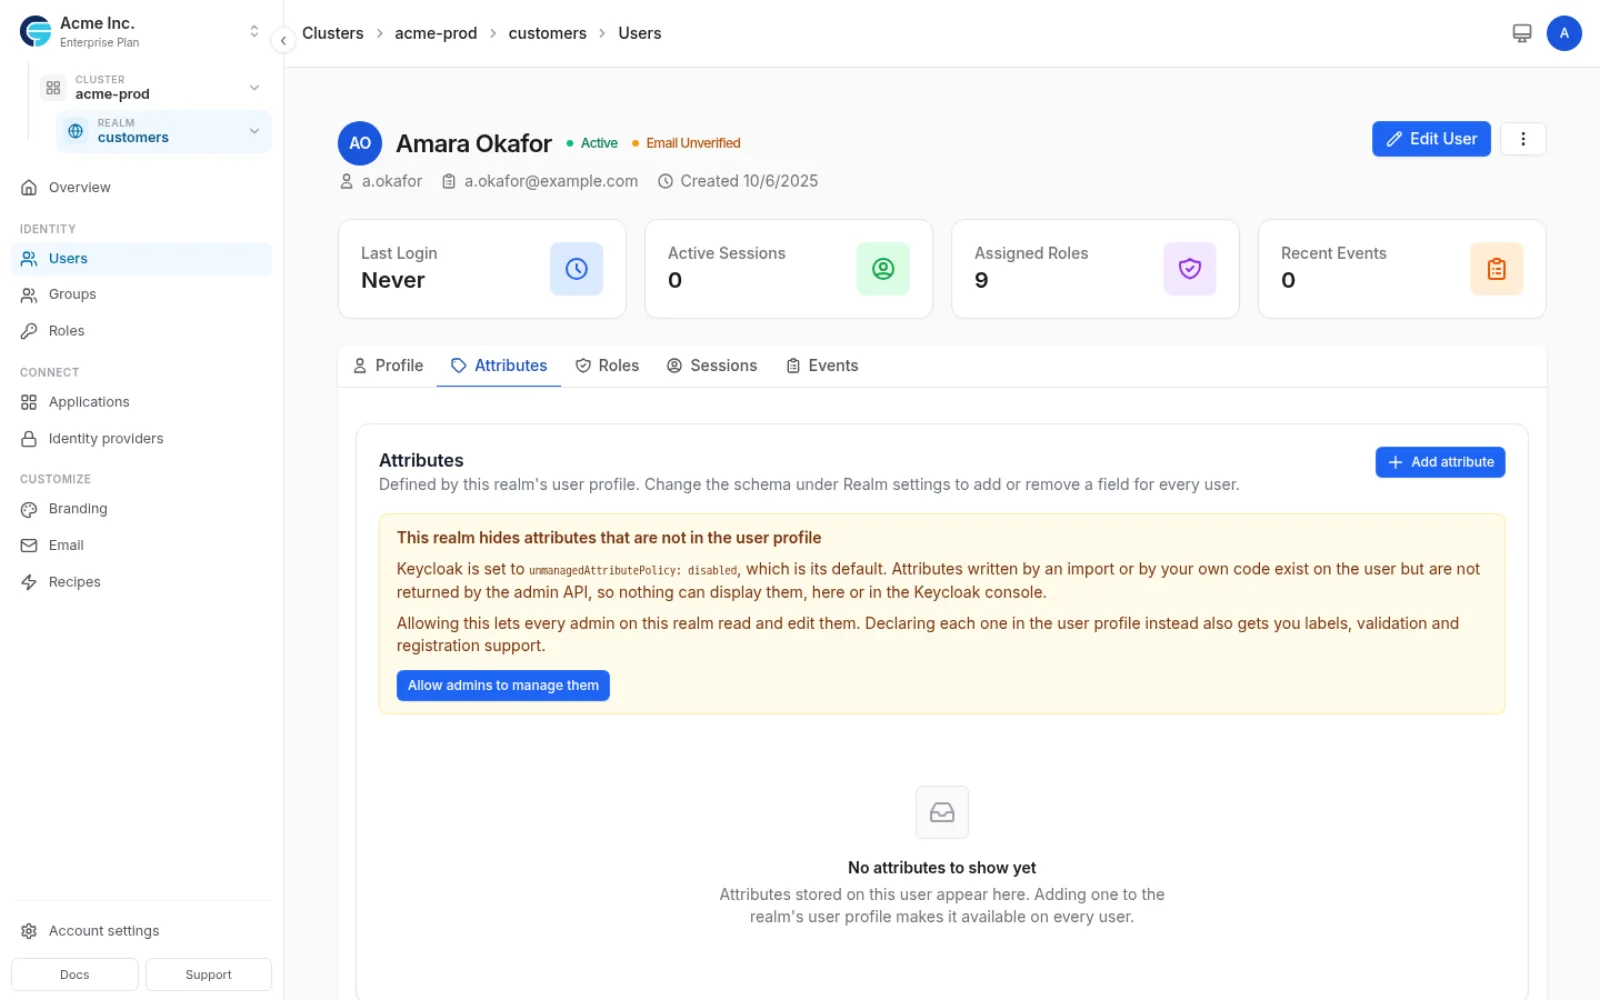
Allow admins to manage them switches the realm to admin-managed attributes and the tab starts working immediately. It applies to the realm, not to one user, and it lets every admin on that realm read and edit those attributes.
Declaring each attribute in the realm’s user profile instead is the stricter option, and it buys you a display label, validation rules, and a field on the registration form. Reach for the button when you need to see what is already on your users; declare them in the user profile when you want the field to be part of your schema.
Showing attributes as columns
Attributes can sit alongside username and email in the users table. Choose Customize Columns and tick the ones you want.
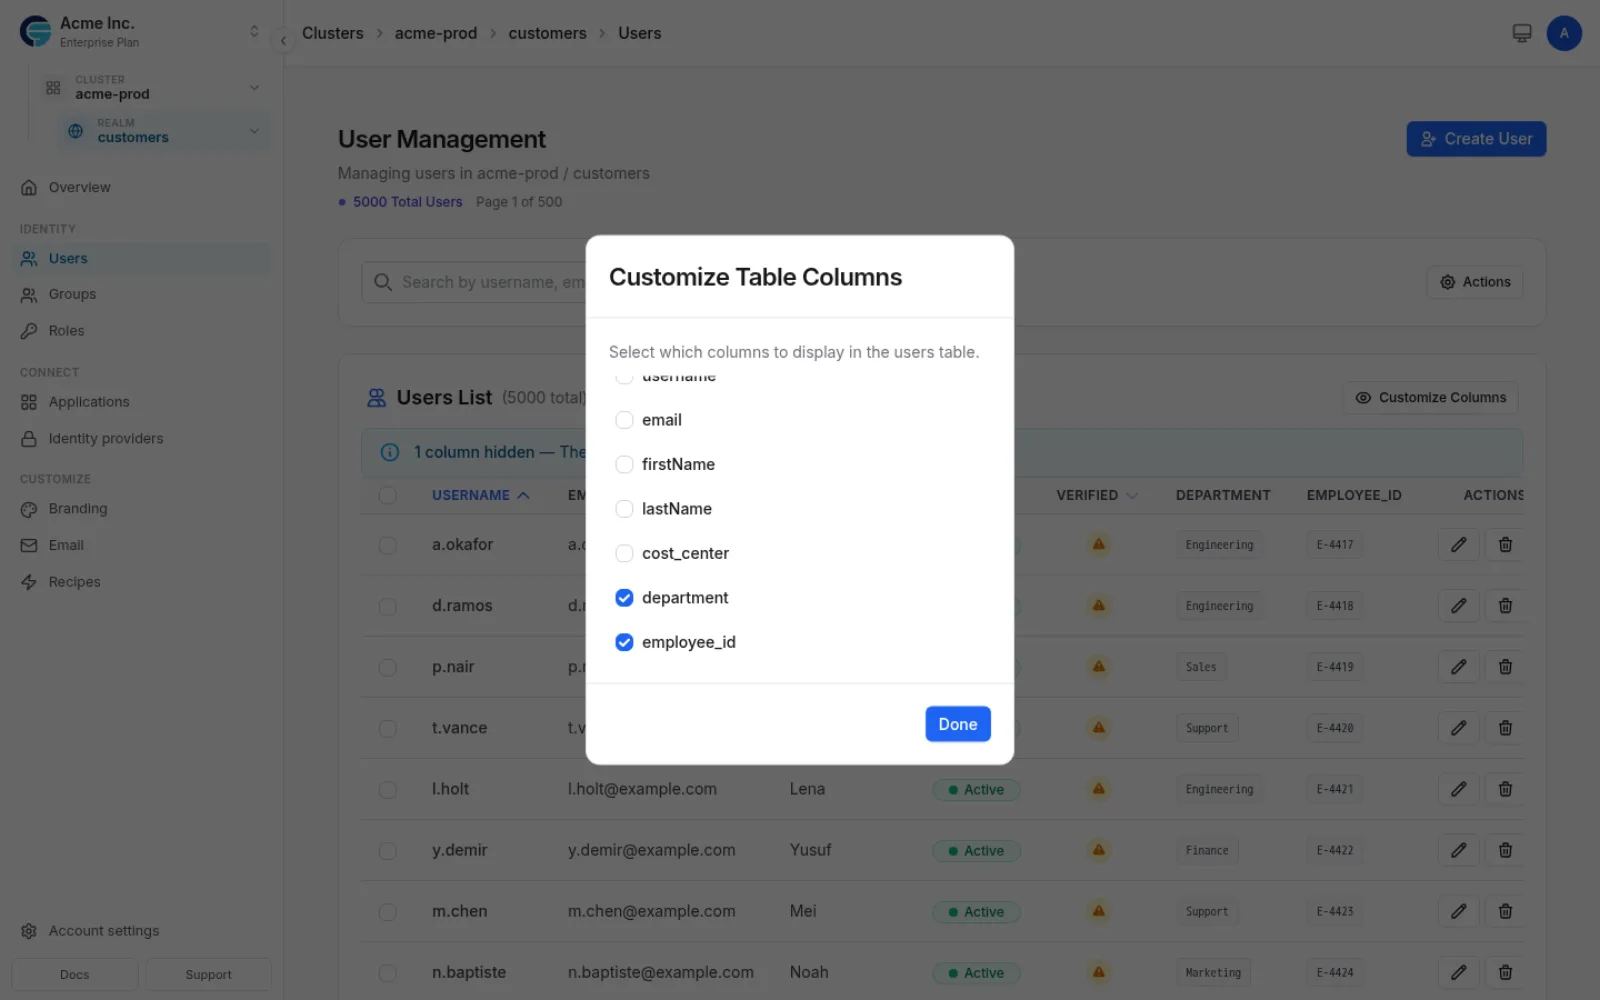
The list offers every attribute the realm declares, plus any it finds on the users currently loaded, so an attribute that only exists on a handful of users still shows up as an option. Your choice is remembered per realm.
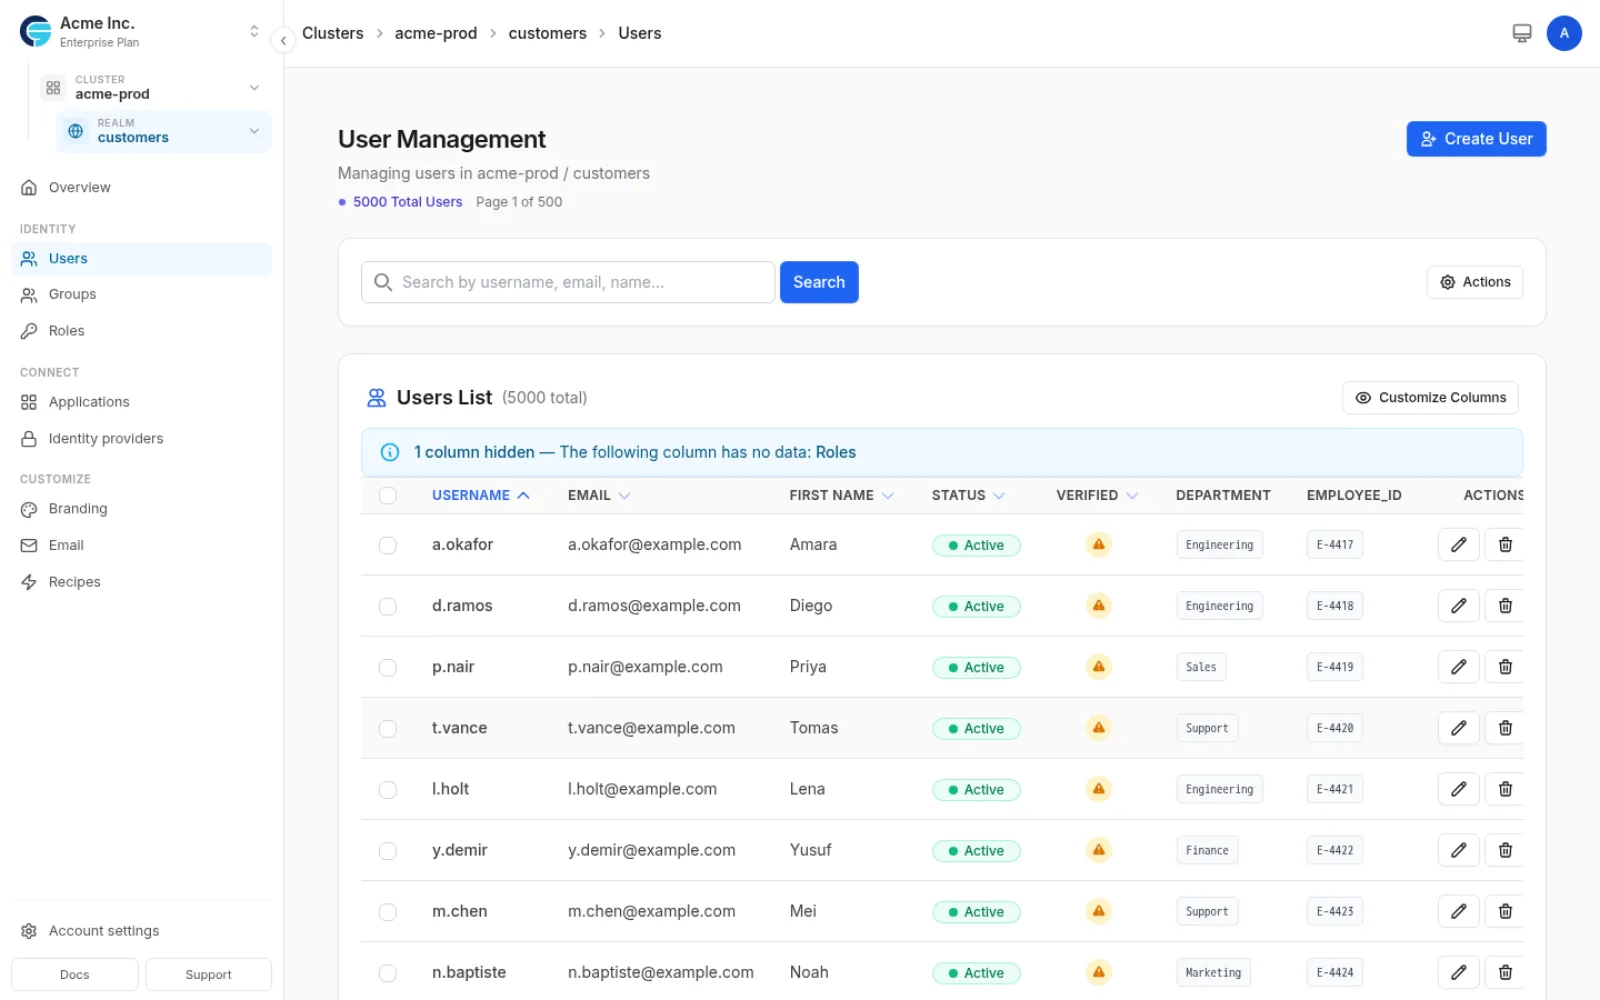
Two things to know. Sorting and searching still work on the built-in columns only, so you cannot order the table by an attribute. And if a column you enabled turns out to be empty for everyone on the page, the table says so rather than leaving you with a blank stripe.
Common attributes
-
department- the team a user belongs to -
employee_id- an internal identifier -
subscription_tier- the plan a user is on -
tenant_id- which of your customers a user belongs to
To send any of these to an application, add a User attribute mapper on that application so the value lands in its tokens. See Applications.
Password Policies
Configuring Password Requirements
Set security standards for user passwords:
Policy Options:
- Length - Minimum character count (8-128)
- Complexity - Uppercase, lowercase, digits, special characters
- History - Prevent reuse of recent passwords
- Expiration - Force periodic password changes
- Blacklist - Prevent common/compromised passwords
User Federation
Connecting External User Sources
Integrate existing user directories:
Supported Sources:
- LDAP/Active Directory - Enterprise directories
- Kerberos - Single sign-on
- Custom Providers - Via SPI
Federation Benefits:
- Sync existing users automatically
- Maintain single source of truth
- Preserve existing passwords
- Map directory groups to Keycloak
Self-Registration
Enabling User Sign-up
Allow users to create their own accounts:
Enable self-registration in realm settings
-
Configure registration form:
- Required fields
- Custom attributes
- Terms acceptance
-
Set up verification:
- Email verification required
- Admin approval workflow
- Domain restrictions
Best Practices
User Management Strategy
-
Use groups for scale
- Assign roles to groups, not individual users
- Create logical group hierarchies
- Use group attributes for metadata
-
Implement strong password policies
- Minimum 12 characters for standard users
- Minimum 16 for administrators
- Require MFA for privileged accounts
-
Regular maintenance
- Review inactive users quarterly
- Audit role assignments monthly
- Clean up test accounts
-
Security considerations
- Enable email verification
- Use temporary passwords for new accounts
- Monitor failed login attempts
- Implement account lockout policies
Performance Optimization
For large user bases:
- Use pagination and filters effectively
- Implement user federation for external sources
- Cache user attributes when possible
- Use bulk operations for mass updates
Common Use Cases
Scenario 1: Onboarding New Employees
- Create user with temporary password
- Assign to appropriate department group
- Group automatically grants necessary roles
- User receives welcome email with instructions
- First login forces password change and MFA setup
Scenario 2: Customer User Management
- Enable self-registration with email verification
- Auto-assign “customer” role on registration
- Use attributes for subscription tiers
- Implement progressive profiling
- Track usage via session monitoring
Scenario 3: B2B Multi-tenant Setup
- Create groups per organization
- Use group attributes for organization metadata
- Assign organization-admin roles
- Implement domain-based registration
- Isolate users via group-based permissions
Troubleshooting
Common Issues and Solutions
User can’t log in:
- Check user is enabled
- Verify email if required
- Check password hasn’t expired
- Review required actions
- Verify realm is correct
Roles not working:
- Check effective roles (including inherited)
- Verify client/realm role assignment
- Clear user session/cache
- Check role scope mappings
Import failures:
- Validate file format (UTF-8 encoding)
- Check for duplicate usernames
- Verify required fields are present
- Review import size limits
Email not sending:
- Configure SMTP settings in realm
- Check email template configuration
- Verify user email address
- Review spam filters
Security Considerations
Protecting User Data
-
Data Privacy:
- Limit attribute visibility
- Use minimal data collection
- Implement data retention policies
- Enable GDPR compliance features
-
Access Control:
- Restrict user management permissions
- Audit admin actions
- Use principle of least privilege
- Implement approval workflows
-
Account Security:
- Enforce strong passwords
- Require MFA for sensitive roles
- Monitor suspicious activity
- Implement account lockout
API Integration
Programmatic User Management
Programmatic access to your Keycloak uses the per-cluster automation client with the OAuth2 client credentials grant. See Automating your Keycloak for where to find the credentials and how to obtain a token.
Manage users via Keycloak Admin API:
// Create a user
POST /admin/realms/{realm}/users
{
  "username": "john.doe",
  "email": "john@example.com",
  "enabled": true,
  "firstName": "John",
  "lastName": "Doe"
}

// Assign roles
PUT /admin/realms/{realm}/users/{id}/role-mappings/realm
[
  {
    "id": "role-id",
    "name": "user"
  }
]

// Add to group
PUT /admin/realms/{realm}/users/{id}/groups/{groupId}
Related Features
- Identity Providers - Connect external identity sources
- Applications - Configure app access
- Team Management - Manage workspace members
- Event Logs - Track user activity
Next Steps
- Set up Identity Providers for SSO
- Configure Application access
- Implement Custom branding for login pages
- Enable Multi-factor authentication