Migrating from Self-Hosted Keycloak
This guide walks you through migrating from a self-hosted Keycloak installation to Skycloak, including your database, custom domains, themes, and extensions.
Why Migrate to Skycloak?
- Zero Maintenance: No more managing infrastructure, updates, or backups
- Automatic Scaling: Handle traffic spikes without manual intervention
- High Availability: Built-in redundancy and failover
- Expert Support: Direct access to Keycloak experts
- Cost Predictable: Fixed monthly pricing, no surprise infrastructure bills
- Security Updates: Automatic security patches and updates
Prerequisites
Before starting your migration, ensure you have:
- Skycloak Account: Launch plan or higher (required for migration feature)
- Database Access: Administrative access to your Keycloak PostgreSQL database
-
Database Tools:
pg_dumpinstalled on your database server - File Size: Database dump must be under 10GB when compressed
- Supported Version: Keycloak version 20.x or higher
Migration Overview
The migration process consists of five main steps:
Step 1: Create Your Database Dump
For PostgreSQL Databases
Connect to your Keycloak database server and run the following commands:
# Create the database dump
pg_dump -h [hostname] -p [port] -U [username] -d [database_name] \
  --no-owner --no-acl --clean --if-exists \
  -f keycloak_backup_$(date +%Y%m%d_%H%M).sql

# Compress the dump (required for upload)
zip keycloak_backup.zip keycloak_backup_*.sql

# Verify the compressed size (must be under 10GB)
ls -lh keycloak_backup.zip
Replace the placeholders:
-
[hostname]: Your database host (e.g.,localhost,db.example.com) -
[port]: PostgreSQL port (default:5432) -
[username]: Database username -
[database_name]: Your Keycloak database name (oftenkeycloak)
Important Dump Options
The dump flags ensure compatibility:
-
--no-owner: Removes ownership information -
--no-acl: Excludes access control lists -
--clean: Adds DROP statements for clean restoration -
--if-exists: Prevents errors if objects don’t exist
Step 2: Start the Migration Wizard
- Log in to your Skycloak dashboard
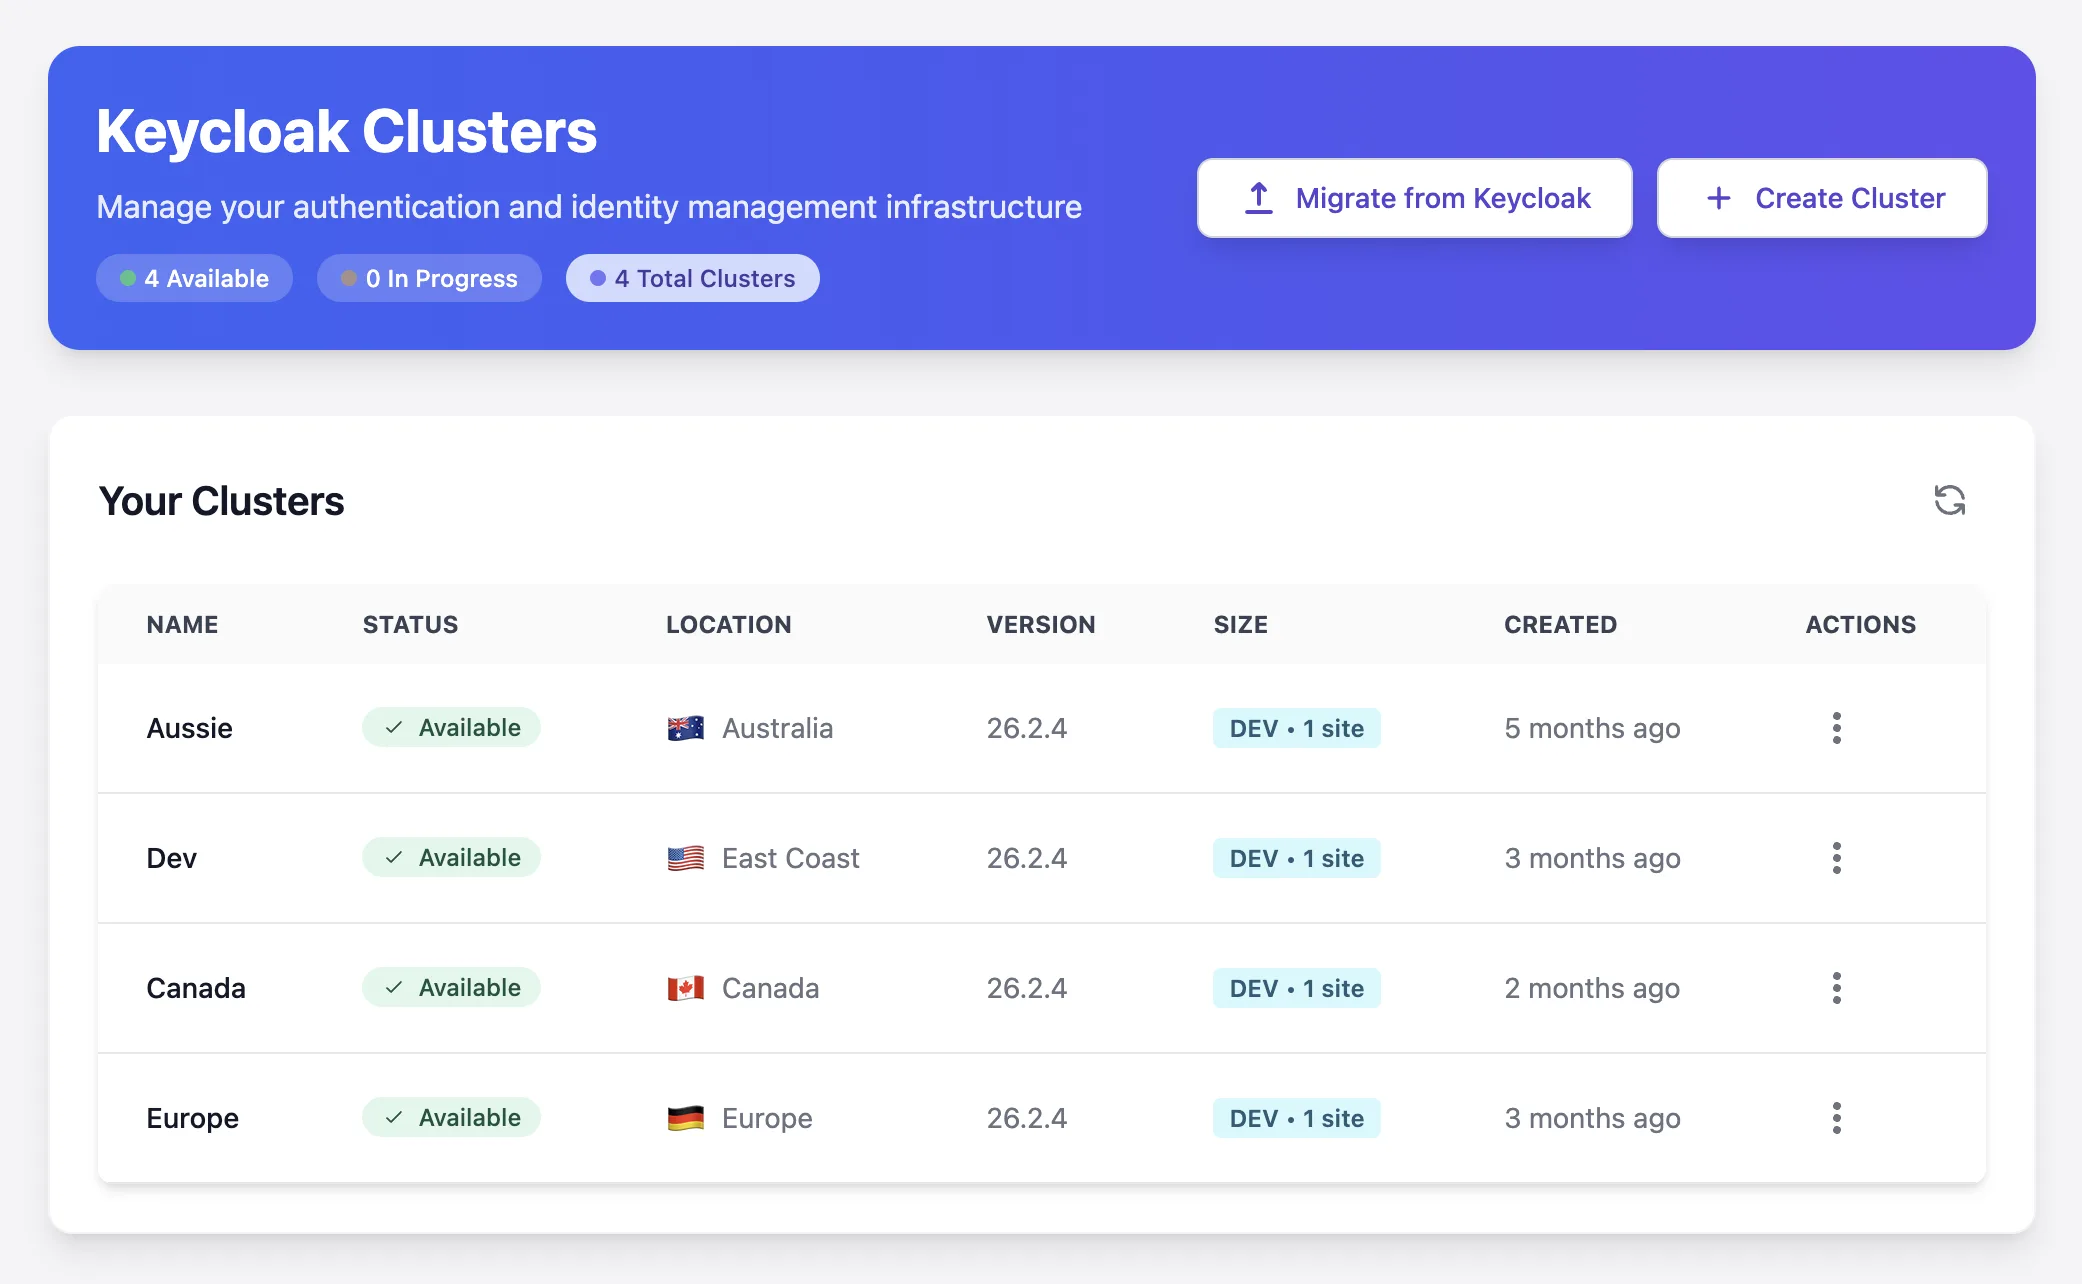
- Navigate to the Clusters page (shown at the top of this guide)
- Click the “Migrate from Keycloak” button to start the migration wizard
- The migration wizard will guide you through the process
Upload Your Database
The first step of the wizard provides a clean interface for uploading your database:
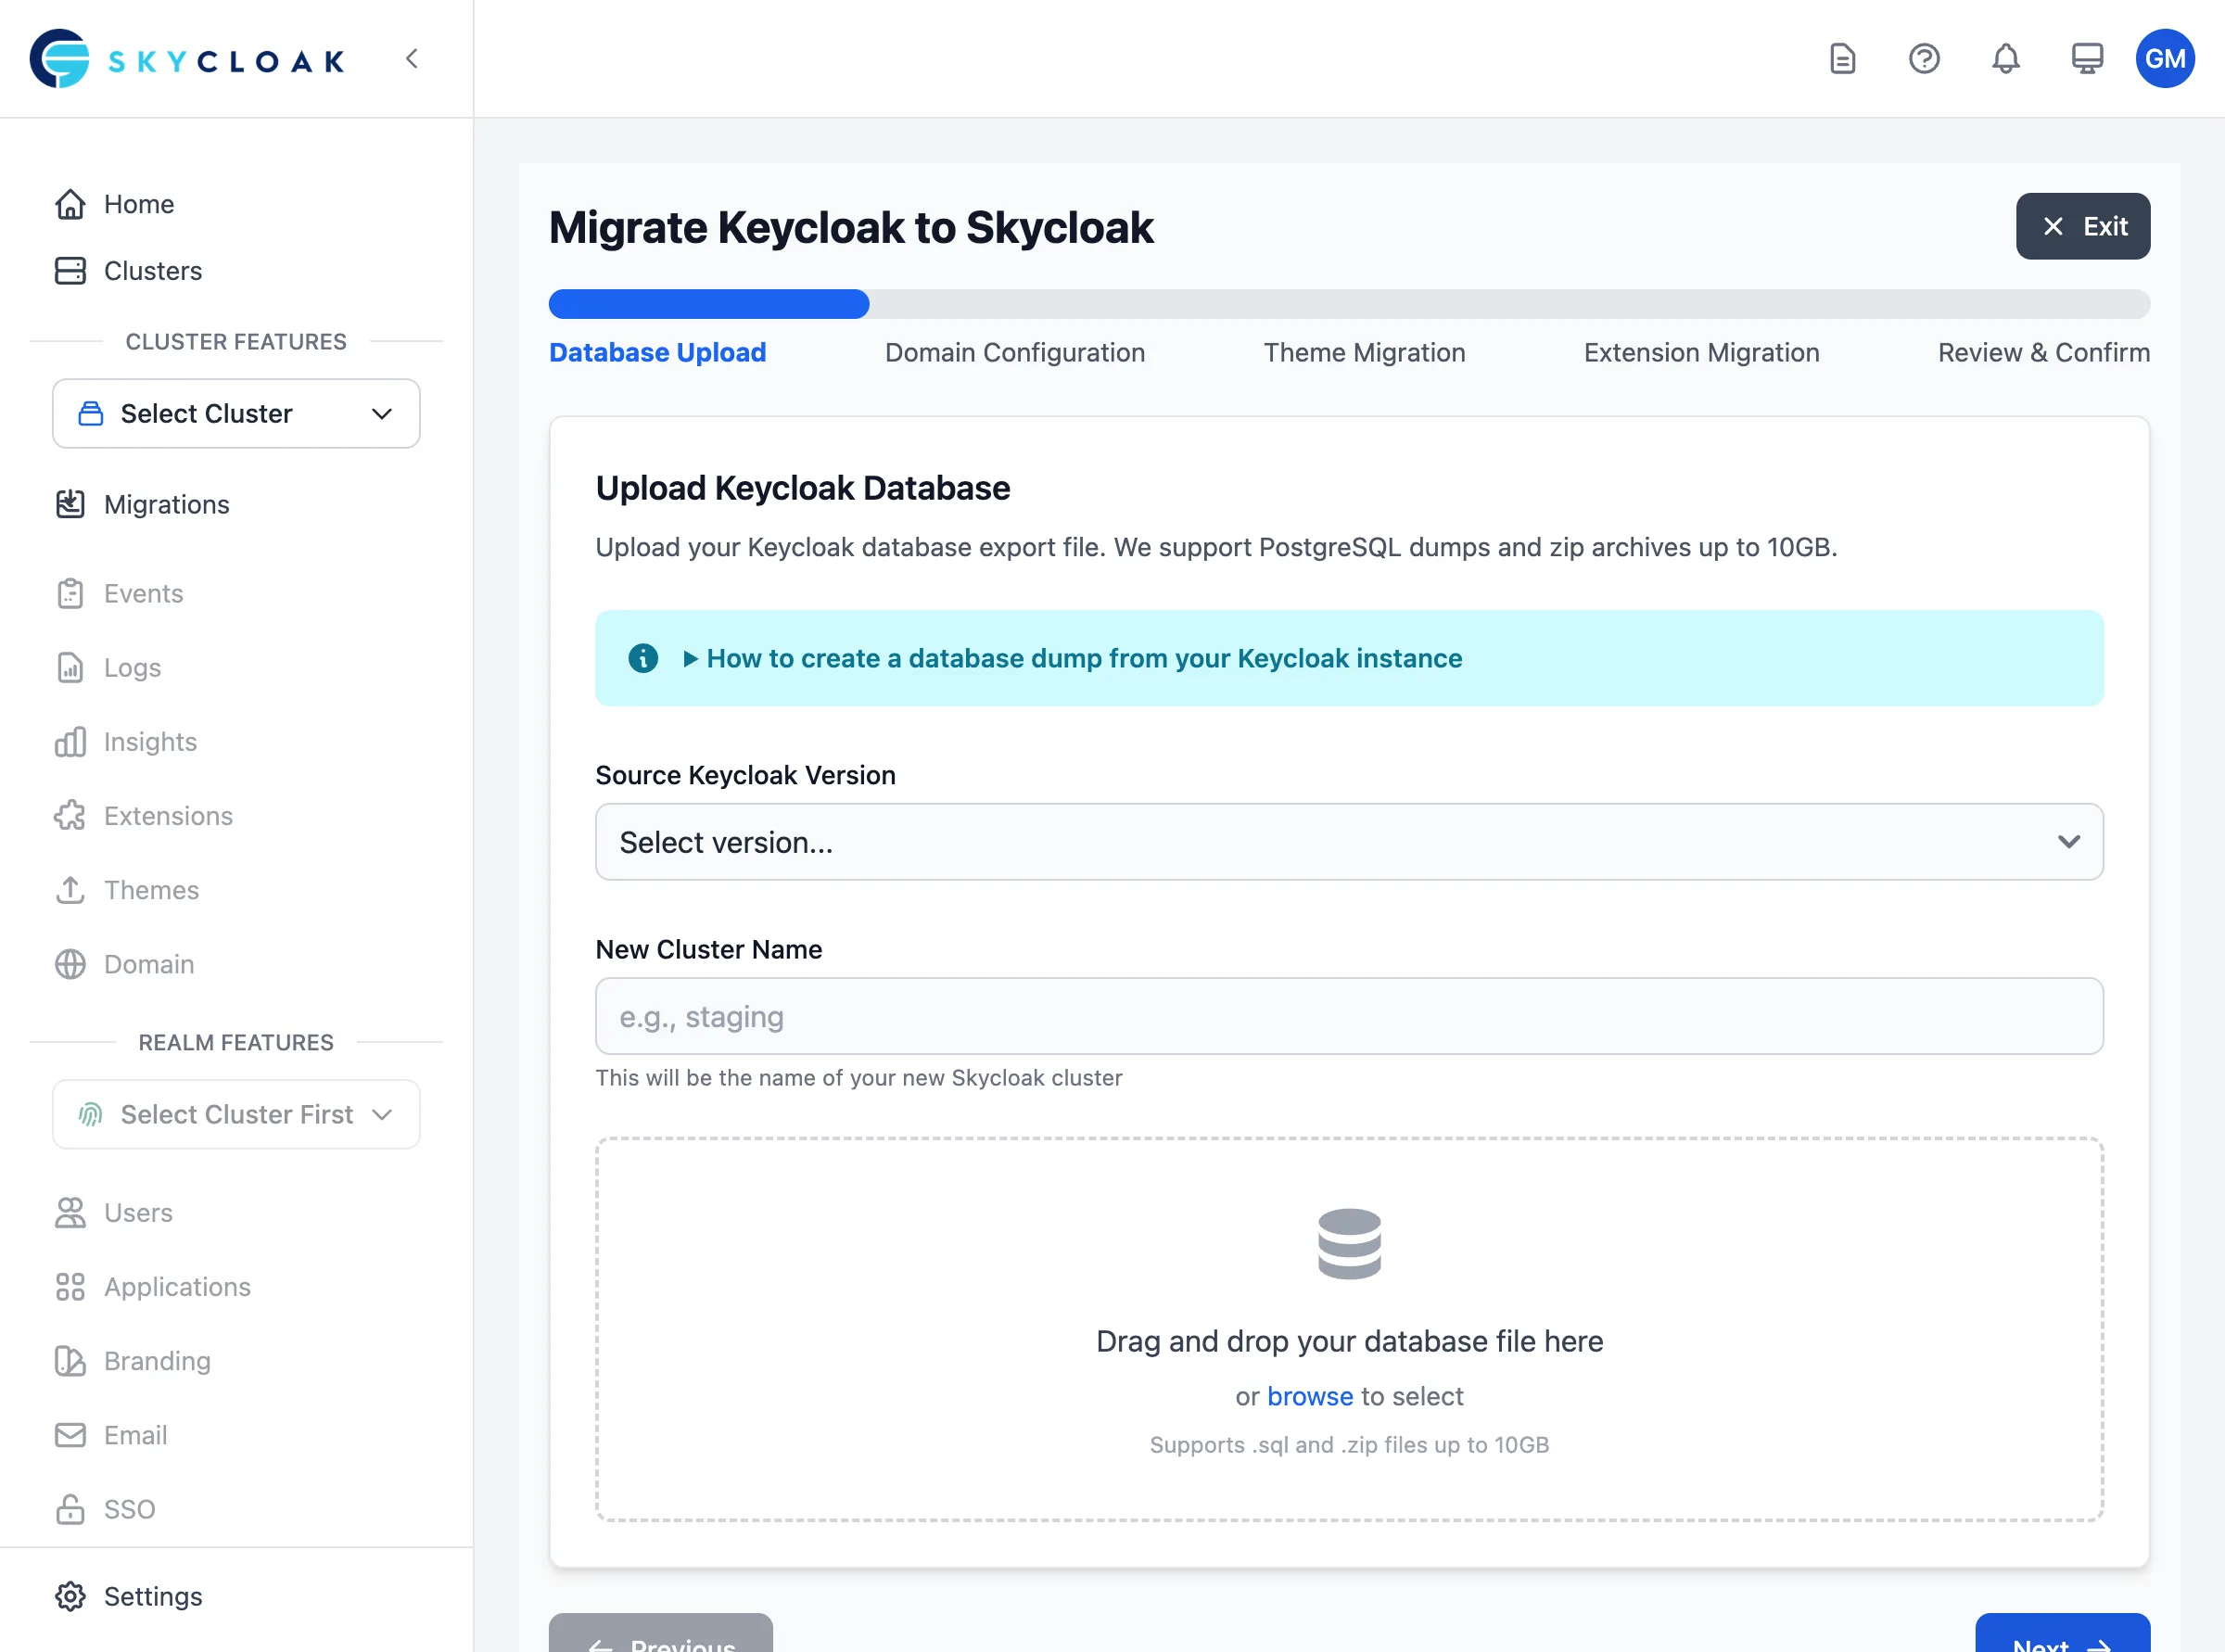
In this step:
- Select Keycloak Version: Choose your current Keycloak version from the dropdown
- Name Your Cluster: Enter a descriptive name for your new Skycloak cluster
-
Upload Database: Use the drag and drop area to upload your
.zipfile (supports .sql and .zip files up to 10GB)
Step 3: Configure Your New Cluster
The second step of the wizard lets you configure your new Skycloak cluster:
Cluster Configuration
- Cluster Name: Enter a descriptive name for your new cluster
- Cluster Size: Choose Small, Medium, or Large based on your workload
- Deployment Location: Select your preferred region (US, EU, Canada, Asia Pacific)
Admin Credentials (Recommended)
Providing your Keycloak admin credentials enables full management mode, which allows Skycloak to manage your instance completely. Without credentials, the cluster runs in semi-management mode.
Advanced Options
- Keycloak Features: Enable or disable specific Keycloak server features
-
Legacy /auth Path: Enable if your applications use the pre-17.0
/authURL path
Step 4: Monitor Migration Progress
Once you start the migration, you’ll be redirected to the Migrations page where you can track progress in real-time.
Migration Stages
-
Database Upload (a few minutes, depending on file size and connection speed)
- File transfer to secure storage
- Integrity and checksum verification
-
Cluster Provisioning (5-10 minutes)
- Infrastructure setup in your selected region
- Network and database configuration
-
Database Restoration (5-30 minutes, depending on database size)
- Database restore into the new cluster
- Keycloak startup with migrated data
Estimated Total Time
| Database Size | Estimated Time |
|---|---|
| < 1 GB | 10-15 minutes |
| 1-5 GB | 20-30 minutes |
| 5-10 GB | 30-45 minutes |
Progress Indicators
- Progress Bar: Shows overall completion percentage
- Status Badge: Displays current stage (Uploading, Processing, Restoring, Completed)
- Real-time Updates: Progress updates automatically via live streaming
Step 5: Post-Migration Verification
Access Your New Cluster
- Once migration completes, click “Go to Cluster”
- Note your new Keycloak admin console URL
- Use your original admin credentials to log in
Verification Checklist
Verify the following have migrated correctly:
- Realms: All realms are present
- Users: User accounts and profiles
- Clients: Application configurations
- Identity Providers: Social login settings
- Groups & Roles: Permission structures
- Authentication Flows: Custom authentication
- Themes: Custom login pages (if migrated)
Update Your Applications
Update your applications to use the new Skycloak URLs:
// Old configuration
const keycloak = new Keycloak({
  url: 'https://auth.yourdomain.com/',
  realm: 'your-realm',
  clientId: 'your-app'
});

// New configuration
const keycloak = new Keycloak({
  url: 'https://your-cluster.skycloak.io/',  // Or your custom domain
  realm: 'your-realm',
  clientId: 'your-app'
});
Post-Migration: Custom Domain Setup
After your migration completes, you can configure custom domains, themes, and extensions from the cluster settings:
Custom Domain
- Navigate to your cluster’s Domain Settings page
- Add your custom domain (e.g.,
auth.yourdomain.com) - Update your DNS with a CNAME record:
Type: CNAME
Name: auth.yourdomain.com
Value: [provided by Skycloak]
TTL: 300
Custom Themes
Upload your custom themes from the Branding page in your cluster settings.
Extensions
Install extensions from the Extensions page in your cluster settings.
SSL Certificate
Skycloak automatically provisions and manages SSL certificates for your custom domain.
Migration Best Practices
Before Migration
- Test in Staging: Run a test migration with a staging database first
- Backup Everything: Keep your original database backup safe
- Plan Maintenance Window: Schedule 2-4 hours for production migration
- Notify Users: Inform users about the planned maintenance
During Migration
- Stop Write Operations: Prevent database changes during migration
- Monitor Progress: Stay on the migration status page
- Keep Backup Ready: Have rollback plan if needed
After Migration
- Test Thoroughly: Verify all authentication flows work
- Monitor Performance: Check response times and user experience
- Update Documentation: Document new URLs and configurations
- Keep Old System: Keep old Keycloak running for 1-2 weeks as backup
Troubleshooting
Common Issues
Upload Fails
Problem: File upload stops or fails Solution:
- Check file size is under 10GB
- Ensure stable internet connection
- Try uploading during off-peak hours
- Contact support if issue persists
Migration Stuck
Problem: Progress stops or seems frozen Solution:
- Wait at least 10 minutes (large databases take time)
- Check the current step message for details
- Contact support with your migration ID
Users Can’t Login
Problem: Authentication fails after migration Solution:
- Verify realm settings match original
- Check client configurations
- Ensure redirect URIs are updated
- Review authentication flows
Version Compatibility
| Source Keycloak | Target Skycloak | Support Level |
|---|---|---|
| 26.x | 26.x | ✅ Full |
| 24.x - 25.x | 24.x - 26.x | ✅ Full |
| 22.x - 23.x | 22.x - 26.x | ✅ Full |
| 20.x - 21.x | 20.x - 26.x | ✅ Full |
| < 20.x | Any | ⚠️ Contact Support |
Frequently Asked Questions
How long does migration take?
Migration typically takes 15-45 minutes depending on:
- Database size (most significant factor)
- Network upload speed
Can I migrate during business hours?
We recommend migrating during low-traffic periods because:
- You need to stop writes to your database
- Users may experience brief interruptions
- You’ll need time for verification
What if my database is larger than 10GB?
For databases over 10GB:
- Contact [email protected] for assisted migration
- We can arrange direct database transfer
- Alternative migration methods available
Can I keep my existing Keycloak version?
Yes! Skycloak supports multiple Keycloak versions. Your migrated cluster will run the same version as your source, and you can upgrade later if desired.
Is there downtime during migration?
Yes, you should plan for downtime on your source Keycloak while the migration runs. Typical migration times:
- Small databases (< 1 GB): 10-15 minutes
- Medium databases (1-5 GB): 20-30 minutes
- Large databases (5-10 GB): 30-45 minutes
Can I rollback if something goes wrong?
Yes, your original Keycloak remains untouched. You can:
- Continue using your self-hosted instance
- Retry the migration after addressing issues
- Contact support for assistance
Getting Help
Support Channels
- Email: [email protected]
- Documentation: docs.skycloak.io
- Status Page: status.skycloak.io
When to Contact Support
Contact support for:
- Non-PostgreSQL database migration
- Databases over 10GB
- Custom migration requirements
- Migration errors or failures
- Performance concerns
Information to Provide
When contacting support, include:
- Migration ID (shown in wizard)
- Source Keycloak version
- Database size
- Error messages (if any)
- Time of migration attempt
Next Steps
After successful migration:
- Review Analytics: Check the Insights dashboard for usage patterns
- Enable Backups: Configure automated backups
- Review Security: Check security settings and MFA
- Optimize Performance: Review and optimize realm settings
- Plan Upgrades: Consider upgrading Keycloak version